
User's Manual
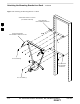

Attaching the Mounting Bracket to a Wall – continued
JAN 2002
3-5
SC300 1X BTS Hardware Installation, ATP, and FRU Procedures
DRAFT
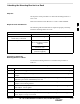
Table 3-1: Required Tools and Materials for Concrete Wall Mounting
Hand Tools Materials Power Tools
T30 Torx tamper bit, 1/4–in hex metal shim material Hilti wall drilling rig
Torque driver wrench, 1/4–in hex
female drive, 0–10 N–M
Hilti anchors (for each
bracket)
Hilti DCM 18–14 metric bit
15/16-in. (23.8 mm) socket, a ratchet
wrench, and an 18-in. (45.7 cm)
breaker bar
MicroCell Mounting Kit shop vacuum
safety glasses electrical tape
chalk for marking outline on wall
tape measure
4-ft (1.22 m) bubble level
rubber mallet
ear plugs
dust mask
Procedure to Drill Holes in the
Wall
Safety glasses, dust masks, and ear plugs must be worn by
all installation personnel, including those in the immediate
vicinity of the personnel operating the drilling equipment.
WARNING
Table 3-2: Procedure to Drill Holes in the Wall for Mounting Bracket Installation
Step Action
1 Verify with the site manager that the wall has been previously checked and is capable of
supporting the weight of the system.
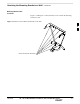
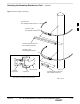
2 Hold the bracket in position and mark the mounting hole locations.
3 Prepare a standard 3/8” electric drill or the Hilti wall drilling rig.
4 Install the appropriate bit in the drill using the following information:
For concrete walls use the Hilti DCM 18–14 metric bit and Hilti anchors.
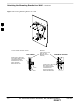
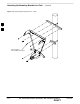
5 Begin to drill by using short bursts until the bit has a “bite” into the wall.
6 Run the drill at full speed to the appropriate depth. Check the depth of the hole by using the shop
vacuum to collect the debris.
* IMPORTANT
For concrete installation, the hole MUST be at least 5 in. (12.7 cm) deep. Anchors can not be
removed once they are tapped into the hole.
. . . continued on next page
3