
User's Manual


RFDS Setup and Calibration – continued
May 2000
3-73
SC 4812T CDMA BTS Optimization/ATP
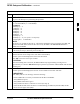
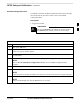
Table 3-38: RFDS Parameter Settings
Step Action
* IMPORTANT
Log out of the BTS prior to performing this procedure.
1 Using a text editor, verify the following fields are set correctly in the bts–#.cdf file
(1 = GLI based RFDS; 2 = Cobra RFDS).
EXAMPLE:
RfdsEquip = 2
TsuEquip = 1
MC1Equip = 0
MC2Equip = 0
MC3Equip = 0
MC4Equip = 0
Asu1Equip = 1
Asu2Equip = 0 (1 if system is non-duplexed)
TestOrigDN = ’123456789’’
NOTE
The above is an example of the bts-#.cdf file that should have been generated by the OMC and
copied to the LMF. These fields will have been set by the OMC if the RFDSPARM database is
modified for the RFDS.
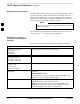
2 Save and/or quit the editor. If any changes were made to these fields data will need to be downloaded
to the GLI2 (see Step 3, otherwise proceed to Step 4).
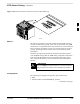
3 To download to the GLI2, click on the Device menu and select the Download Data menu item
(selected devices do not change color when data is downloaded).
A status report window displays the status of the download.
Click OK to close the status report window.
! CAUTION
After downloading data to the GLI2, the RFDS LED slowly begins flashing red and green for
approximately 2–3 minutes. DO NOT attempt to perform any functions with the RFDS until the LED
remains green.
4 Status the RFDS TSU.
A status report window displays the software version number for the TSIC and SUA.
* IMPORTANT
If the LMF yields an error message, check the following:
Ensure AMR cable is correctly connected from the BTS to the RFDS.
Verify RFDS has power.
Verify RFDS status LED is green.
Verify fields in the bts-#.cdf file are correct (see Step 1).
Status the MGLI and ensure the device is communicating (via Ethernet) with the LMF, and the
device is in the proper state (INS).
3