
Installation and Operating Manual
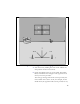
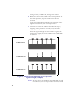

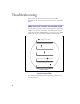

Table Of Contents
- Installing and using your CPE device
- Welcome!
- Connecting your CPE to a computer or LAN
- Installation Overview
- Setting up the computer to dynamically receive an IP address
- Windows 95, Windows 98, Windows NT: Setting up the network connection
- Windows 2000: Setting up the network connection
- Connecting the CPE to a Computer or Network
- Connecting the CPE to a computer
- Connecting the CPE to a network
- Supplying Power to the CPE
- Finding the Strongest Service Provider Signal
- Using the Software-Assisted Method to Find the Strongest Signal
- Using the LEDs to find the Strongest Service Provider Signal
- Troubleshooting
- LEDs that don’t blink, but rather chase
- The LEDs on the CPE blink more slowly than normal
- You receive a dialog box indicating that you cannot connect to your service provider
- I can successfully contact my service provider at home, but not at work or at a friend’s house
- If You have Problems Getting Connected
- Congratulations!

15
4 Start the scan by holding the front of the CPE at the
9:00 position for about 5 seconds.
5 Check the LEDs on the top of the CPE. The LEDs
blink, and indicate the strength of the signal received
from your service provider.
The stronger the signal from the service provider, the
more LEDs on the device are lit; for example, if all 5
LEDs are lit, the signal from the service provider is very
Figure 8: Orienting CPE front during signal scan