
Installation and Operating Manual
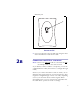
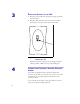
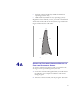
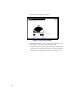
Table Of Contents
- Installing and using your CPE device
- Welcome!
- Connecting your CPE to a computer or LAN
- Installation Overview
- Setting up the computer to dynamically receive an IP address
- Windows 95, Windows 98, Windows NT: Setting up the network connection
- Windows 2000: Setting up the network connection
- Connecting the CPE to a Computer or Network
- Connecting the CPE to a computer
- Connecting the CPE to a network
- Supplying Power to the CPE
- Finding the Strongest Service Provider Signal
- Using the Software-Assisted Method to Find the Strongest Signal
- Using the LEDs to find the Strongest Service Provider Signal
- Troubleshooting
- LEDs that don’t blink, but rather chase
- The LEDs on the CPE blink more slowly than normal
- You receive a dialog box indicating that you cannot connect to your service provider
- I can successfully contact my service provider at home, but not at work or at a friend’s house
- If You have Problems Getting Connected
- Congratulations!

11
10:30, 12:00, 1:30, and 3:00.
4 To start a scan for signals from your service provider,
click Start. Hold the front of the CPE at the 9:00
position for about 5 seconds.
The CPE searches for a signal from your service
provider, as indicated by the blinking of LEDs on the
CPE.
Note: In most cases, the LEDs on the CPE blink on and
off. However, if a service provider cannot be found
in your area, the CPE’s LEDs chase each other —
Figure 6: Orienting CPE front during signal scan