
Installation and Operating Manual
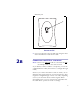
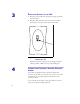
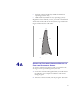
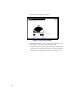
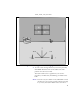

Table Of Contents
- Installing and using your CPE device
- Welcome!
- Connecting your CPE to a computer or LAN
- Installation Overview
- Setting up the computer to dynamically receive an IP address
- Windows 95, Windows 98, Windows NT: Setting up the network connection
- Windows 2000: Setting up the network connection
- Connecting the CPE to a Computer or Network
- Connecting the CPE to a computer
- Connecting the CPE to a network
- Supplying Power to the CPE
- Finding the Strongest Service Provider Signal
- Using the Software-Assisted Method to Find the Strongest Signal
- Using the LEDs to find the Strongest Service Provider Signal
- Troubleshooting
- LEDs that don’t blink, but rather chase
- The LEDs on the CPE blink more slowly than normal
- You receive a dialog box indicating that you cannot connect to your service provider
- I can successfully contact my service provider at home, but not at work or at a friend’s house
- If You have Problems Getting Connected
- Congratulations!

7
Ethernet jack.
2 On your computer, locate the NIC jack. Plug the other
end of the Ethernet cable into the NIC.
2B
CONNECTING THE CPE TO A NETWORK
Note: Plan to use only one CPE on a network. Do not
use multiple CPEs on the same network.
If you directly connect a CPE to a computer, you use the
supplied Ethernet cable (also known as a straight through
cable).
However, to connect the CPE to a hub or switch, use an
Ethernet cable appropriate for your network device. This
might be a straight through or cross-over cable, depending
on how your network device switches signals. When
determining how to set up your network, remember that
the CPE device operates as a hub or a bridge.
Figure 2: Ethernet Jack Location on
Bottom of CPE