Installing and using your CPE device Directions for connecting your CPE to a computer or LAN and obtaining highspeed Internet and voice services.
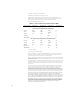
Expedience is a trademark of NextNet Wireless. ©2000-2001 NextNet Wireless, Inc. All rights reserved. NOTICE: This equipment has been tested and found to comply with the Radio Frequency Radiation Exposure Limits detailed below. A minimum of 20 centimeters (8 inches) separation between the CPE and the operator and all other persons should be maintained. Radio Frequency Radiation Exposure Limits TABLE 1.
ARISING FOM A COUSRE OF DEALING, USAGE, OR TRADE PRACTICE. IN NO EVENT SHALL NEXTNET WIRELESS OR ITS SUPPLIERS BE LIABLE FOR ANY INDIRECT, SPECIAL, CONSEQUENTIAL, OR INCIDENTAL DAMAGES, INCLUDING, WITHOUT LIMITATION, LOST PROFITS OR LOSS OF DAMAGE TO DATA ARISING OUT OF THE USE OR INABILITY TO USE THIS MANUAL, EVEN IF NEXTNET WIRELESS HAS BEEN ADVISED OF THE POSSIBILITY OF SUCH DAMAGES.
iv
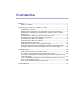
Contents Welcome! ....................................................................................... 1 Before You Begin ....................................................................... 1 Connecting your CPE to a computer or LAN ......................................... 4 Installation Overview .................................................................. 4 Setting up the computer to dynamically receive an IP address .........
vi
Welcome! This document describes how to install and use your customer premise equipment (CPE), which provides you with high speed internet services.You can connect your CPE to your computer, or you can connect it to a small office/home office (SOHO) local area network (LAN) through a hub, switch, gateway, or router. BEFORE YOU BEGIN • Make sure your computer is equipped with an Ethernet network interface card (NIC). • The Ethernet cable that is supplied with your CPE plugs into any standard Ethernet NIC.
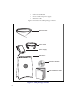
• Software CD-ROM • Power cable and power supply • Ethernet cable Figure 1 illustrates the CPE package contents.
Table 1 lists the standard contents in your CPE package.
Connecting your CPE to a computer or LAN INSTALLATION OVERVIEW The installation consists of the following major tasks, each of which is explained in greater detail in the sections that follow: 1 After ensuring your Ethernet NIC is installed properly, make sure your computer is set up to automatically obtain an IP address. 2 Perform one of the following: • If you are connecting the CPE directly to your computer, use the supplied Ethernet cable to do so.
• • 1A If you are running Windows 2000, go to “Windows 2000: Setting up the network connection‚” on page 5. If you don’t see your operating system listed here, check the system’s help file. Most explain how to set up a system to dynamically receive an IP address. WINDOWS 95, WINDOWS 98, WINDOWS NT: SETTING UP THE NETWORK CONNECTION 1 From the Start menu, select Settings. Then select Control Panel. 2 In the window that appears, double click the Network icon. 3 Select the TCP/IP entry for the NIC.
window, click OK. On the remaining open window, click OK again. 2 CONNECTING THE CPE TO A COMPUTER OR NETWORK You can connect the CPE directly to a computer, or you can connect it to a small office/home office (SOHO) network. • • 2A If you are directly connecting the CPE to your computer, go to step 2A. If you are connecting the CPE to a network, go to step 2B.
Ethernet jack. Figure 2: Ethernet Jack Location on Bottom of CPE 2 On your computer, locate the NIC jack. Plug the other end of the Ethernet cable into the NIC. 2B CONNECTING THE CPE TO A NETWORK Note: Plan to use only one CPE on a network. Do not use multiple CPEs on the same network. If you directly connect a CPE to a computer, you use the supplied Ethernet cable (also known as a straight through cable).
3 SUPPLYING POWER TO THE CPE 1 Plug the power cable into the power supply, then into the wall outlet. 2 Plug the cable from the power box into the CPE’s power jack, located on the bottom of the CPE. Figure 3: Power Jack Location on Bottom of CPE When the CPE has a proper power supply, the light emitting diodes (LEDs) on top of the CPE light. 4 FINDING THE STRONGEST SERVICE PROVIDER SIGNAL Your CPE is equipped with an internal, directional antenna.
• Software-assisted method (available for Windows operating systems only) • LED method (available for any operating system) Regardless of the method you use, you need to understand which sides of the CPE are its front, back, top, and bottom. Figure 4 illustrates the CPE sides.
Scan window (Figure 5) appears. Figure 5: CPE Scan window 3 With CPE in hand, stand in front of the window in the room where you plan to operating the CPE.
10:30, 12:00, 1:30, and 3:00. Figure 6: Orienting CPE front during signal scan 4 To start a scan for signals from your service provider, click Start. Hold the front of the CPE at the 9:00 position for about 5 seconds. The CPE searches for a signal from your service provider, as indicated by the blinking of LEDs on the CPE. Note: In most cases, the LEDs on the CPE blink on and off.
that is, an LED blinks on as the previous LED blinks off. For more information, refer to the section “LEDs that don’t blink, but rather chase‚” on page 18. 5 When the CPE finds a signal, a dialog box displays the strength of the signal. 6 To continue your search for the strongest signal, turn your CPE slowly in a semi-circle, stopping at the 10:30, 12:00, 1:30 and 3:00 positions. 7 Note the signal strength at each position. The stronger the signal, the more LEDs on the right-side of the device are lit.
regardless of the operating system your computer runs.
To use the LEDs to find the strongest service provider signal: 1 If you have plugged the Ethernet cable into the bottom of the CPE, disconnect the Ethernet cable now. 2 Make sure the CPE’s power cord is connected to the CPE and to a power source. If your CPE has power, the LEDs on the CPE begin to blink on and off. 3 With CPE in hand, stand in front of the window in the room where you plan to operating the CPE.
Figure 8: Orienting CPE front during signal scan 4 Start the scan by holding the front of the CPE at the 9:00 position for about 5 seconds. 5 Check the LEDs on the top of the CPE. The LEDs blink, and indicate the strength of the signal received from your service provider.
strong. If only 1 LED is lit, the signal is weaker. 6 Rotate the front of the CPE to the 10:30 position. At the 10:30 position, stop the rotation for about 5 seconds. Again, the LEDs blink, indicating the strength of the signal received from your service provider. 7 Continue to rotate the CPE as described in step 6, stopping at the positions of 12:00, 1:30, and 3:00. Note the signal strength at each rotation. Again, the stronger the signal, the more LEDs on the CPE blink on and off.
in your area, the CPE’s LEDs chase each other — that is, an LED blinks on as the previous LED blinks off. For more information, refer to the section “LEDs that don’t blink, but rather chase‚” on page 18. 8 After you’ve completed the rotation, re-orient the front of the CPE to the direction it was pointed when the strongest signal was found. 9 Plug in the Ethernet cable jack on the bottom of the CPE. The CPE then registers with your service provider.
Troubleshooting This section describes common issues with CPE installation, and how to resolve the issues if you encounter them. LEDS THAT DON’T BLINK, BUT RATHER CHASE If your CPE is unable to find a service provider signal, the LEDs on your CPE don’t blink, but rather they “chase” each other, with an LED blinking on as the previous LED blinks off. Figure 10 illustrates LEDs in chase mode.
THE LEDS ON THE THAN NORMAL CPE BLINK MORE SLOWLY When your CPE searches for a service provider signal, the LEDs on the CPE blink on and off rapidly. If you notice the CPE’s LEDs blinking more slowly than usual, this usually indicates that your CPE is trying to register with your service provider. During registration, your service provider may be checking records to indicate that you are a valid user of the service provider’s system.
malfunctioning, your CPE is malfunctioning, or your service provider is still processing your payment or identification records. If you receive such a message: 1 Make a note of the message’s contents and any error number that appears. 2 Contact your service provider with this information. They should be able to resolve the problem for you.
Congratulations! After successfully completing these steps, you can use your CPE to obtain high speed, high quality internet and voice services for your home or small office. STAMP OR PRINT CONTACT INFORMATION HERE.
22