
Owner manual
Installation Instructions for 18959
RPM Window Switch with Push Buttons & Digital Readout
NOTE: Before beginning the installation of this kit please disconnect the
positive battery cable from your vehicle and read all the
instructions completely!
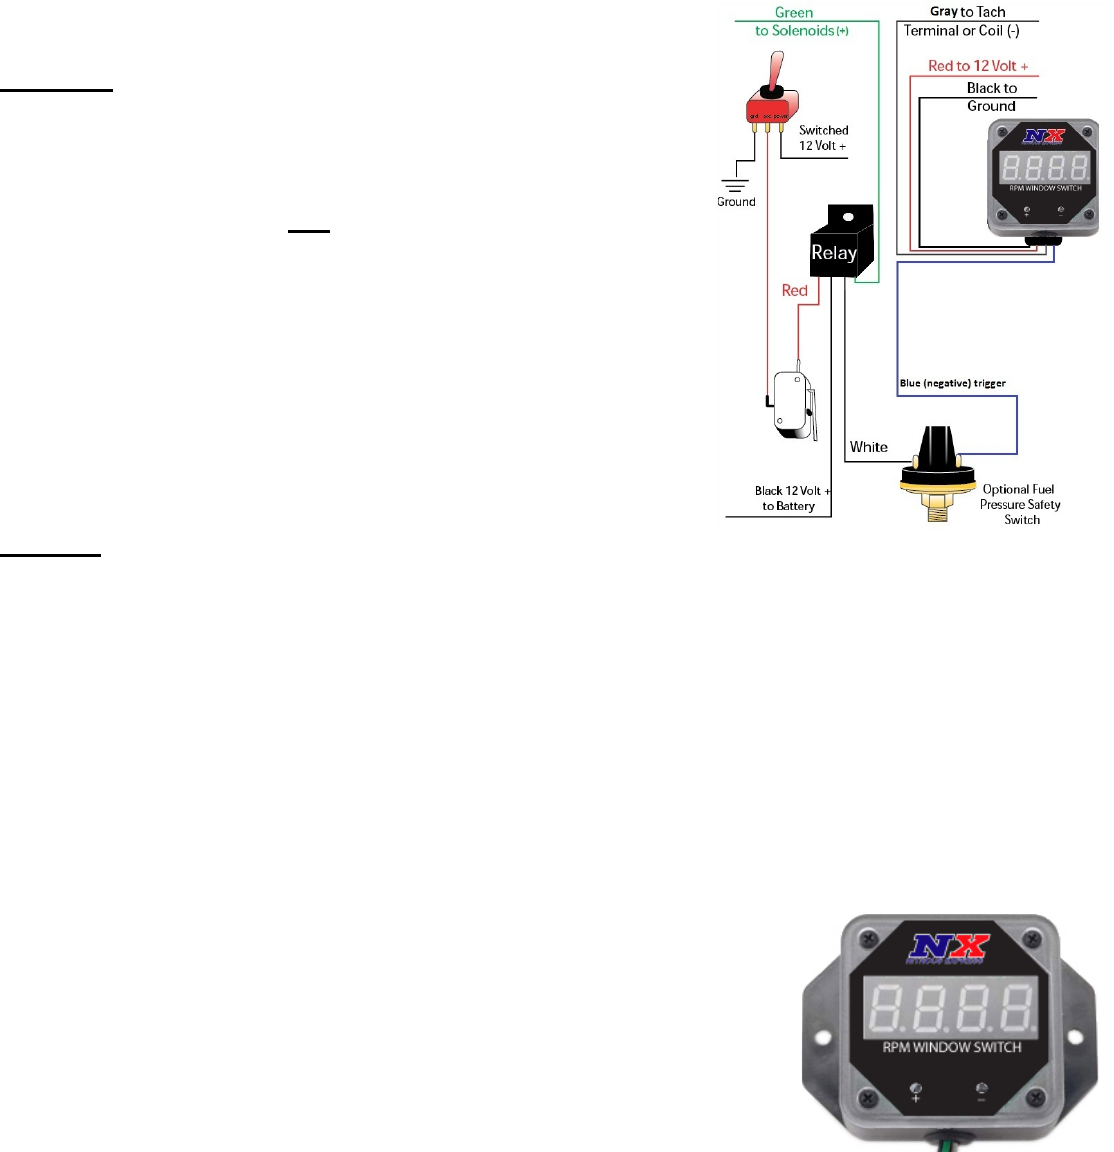
Installation:
•
Red wire attaches to a switched +12 Volt supply source.
•
Black wire attaches to chassis ground.
•
Grey wire is input for the Tachometer signal. This wire will hook up to the
negative side of your ignition coil, or if you are using a high energy CD
ignition, connect to the TACH output of your ignition system to the Grey
wire of the RPM switch and NOT the coil.
•
Blue wire connects to the negative/ground side of the device that you
want to activate at the desired RPM. This connection is either Normally
Open (Blue wire provides ground AFTER the switch reaches desired
RPM) or Normally Closed (Blue wire is grounded UNTIL switch reaches
desired RPM) according to the setting in program mode (OFF means
Normally Open and will supply ground when the selected RPM is reached,
ON means Normally Closed and the switch will open when the selected
RPM is reached). Factory default is Normally Open.
NOTE: If the device to which the blue wire is attached to draws more
than 3 amps, a relay must be used to drive that device or damage
will occur to the unit.
Operation:
• The unit comes preset at the factory for 8 cylinders, Activation at 3000 RPM, Deactivation at 5000 RPM and
switch set to Normally Open (NO). The display will stay in a continuous program mode loop until it receives
incoming tach signals.
• To change factory settings, turn the ignition on, but do not engage the starter. You can change the setting only
prior to the unit receiving Tach signals from your ignition system.
• Once your engine is started, the unit cannot be programmed until the engine is shut off and the ignition only is
turned on.
• When the unit is turned on with NO signal coming from the engine, the unit will display the setting for the rpm
in 100 rpm increments. If you wish to change the rpm setting you must press the left button while the rpm is
being displayed. This will let the microprocessor know that you wish to change the setting. Continue to press
the left button and the digital display will increase in 100 rpm increments up to 9900 rpm. If you wish to
decrease the rpm setting press the right button.
• After you have finished, the readout will continue to display your setting for a couple of seconds then it will
proceed to the next setting which is the Deactivation setting.
• After setting the desired “turnoff” RPM , the unit will then jump to the Normally Open or Normally Closed
program section. The display will read NO or NC at this time. To toggle between
NO and NC, simply press the left button until the desired setting is reached.
• Finally, to change the number of cylinders, wait until the unit is done displaying
the NO/NC status at which time it will then display 8CYL, 6CYL, or 4CYL. Again,
simply press the left button until the desired setting is reached and then you are
finished. At anytime during this procedure the unit receives pulses from the
engine, the unit will instantly jump into Tach/RPM switch mode. Therefore, once
you initially set the unit up for NO/NC and number of cylinders and you only wish
to change the RPM setting, you may instantly start the engine after you change
the RPM setting. The unit will continuously loop in program mode until the
engine is started.