
Manual


5
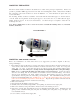
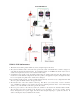
7. Follow illustration “B” when wiring the system,
the
relay must be used in all
applications.
8. Solder all connections for a permanent
trouble
free
installation.
Note: The nitrous and fuel solenoids are rated
only
for intermittent duty. Do not engage either
solenoid
for
more than 20 continuous seconds. Solenoids
that
have “burned or scorched”
electro-magnets
will
not
be
replaced under
warranty.
COMPLETING
AND TESTING THE
SYSTEM
1. Reinstall the carburetor; hook up all vacuum
lines,
and linkages using the diagram prepared
before
disassembly.
2. Reconnect the fuel line and tighten
securely.
3. After all components have been assembled on
the
vehicle and each piece has been verified for
cor
rect
installation and the wiring has been
rechecked
and verified to be correct, it is time to test
the system.
4. After installing the nitrous bottle in the
brackets
previously mounted in section 1, connect
the
bottle to the
supply line and tighten firmly, do
not
over tighten (use no Teflon tape on any
component
of this system). Do
not open the bottle valve
at
this
time.
5. Reconnect the negative battery
cable.
6. Using the master arming switch “Arm”
the
nitrous
system.
7. Test the solenoid operation by “Engaging”
the
WOT switch. Both solenoids should “Click”.
If
they do not,
re-verify all electrical
connections
and wiring
diagrams.
8. Open the nitrous bottle and check all
connections
for leaks. Retighten any fitting or connection
that
leaks
and
recheck.
9. Start the engine and check for fuel leaks,
correct
any fuel leak problems before
proceeding.
10. Adjust the fuel pressure regulator at this time.
A
Master Flo-Check (PN #15519) or Master
Flo-
Check Pro
(PN # 15529) should be used for
accu
rate fuel pressure
settings
11. All NX systems are intended for off road use
only
and should only be used in that
context.
12. Choose a suitable testing area, such as your local
race
track is best. Drive the vehicle to verify all
opera
tions
are normal and the throttle linkage is
operat
ing
properly.
13. Pre-stage the vehicle, arm the system, purge
the
air from the supply line using 3 one-second
bursts
from
the purge valve (PN 15600-15601).
Stage
and launch the vehicle, shutting off at the
60ft
mark. Check all
system components to
verify
proper operation, correct any noted
problems
before
proceeding.
14. Repeat the staging procedure, the system
should
be crisp and responsive, make a full throttle
pass
and shut
the engine off for a spark plug
check.
Verify each cylinder is getting equal amounts
of
N2O and fuel. The
plugs should have little or
no
color, if they are sooty or black the fuel
pressure
must be reduced for
optimum
performance.
SAFETY TIPS
Do not attempt to start engine if nitrous has been accidentally injected while the engine was not running. Disconnect
coil wire and turn motor with throttle wide open for several revolutions before attempting to restart. If it is not
possible to disable the ignition then the spark plugs must be removed and the engine cleared of all nitrous before
attempting to start engine.
1. Never permit oil, grease, or any other readily combustible substances to come into contact with nitrous cylinders,
valves, solenoids, hoses and fittings. Oil and certain gases (such as oxygen and nitrous oxide) may combine to
produce a flammable condition.
2. Never interchange solenoids or other appliances used for one compressed gas with those used for another.
3. Identify the gas content by the label on the bottle before using. If the bottle is not identified to show the gas
contained, return the bottle to the supplier.
4. Do not deface or remove any markings, which are used for content identification.
5. Cylinder valves should be closed except when nitrous is actually being used.
6. Notify supplier of any condition, which might have permitted any foreign matter to enter the valve or bottle.
7. Never drop or violently strike the bottle
8. Keep valves closed on all empty bottles to prevent accidental contamination.