
Manual


2
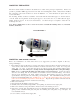
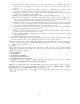
MOUNTING THE
BOTTLE
The nitrous bottle should be mounted in the
trunk
area or outside of the passenger compartment. If
this
is not
possible or practical a NHRA approved blow
down tube and vent fitting (PN’s 11708, 11709)
must
be installed.
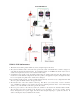
The positioning of the bottle should
be
as shown in illustration “A”. This will allow the
siphon
tube to be
covered at all
times.
The mounting brackets should be assembled
on
the bottle with the short bracket approx. 2” from
the
bottom,
on 10 lb. bottles the long bracket should
be
place approx. 7” above the lower one, on 15lb
bottles
the upper
bracket should be approx. 12” above the
lower bracket. Use this mock up as a template to
locate the four
mounting bolt holes.
Note:
Before
drilling holes be sure to check for clearance
beneath
the mounting surface i.e.: fuel tank,
fuel lines,
brake lines.
ILLUSTRATION A
MOUNTING THE NITROUS
PLATE
Before any modifications are made under
the
hood, we suggest that you make a diagram of
all
hoses,
wiring, and
linkages.
1. Pre-assemble the nitrous plate before you
begin. The nitrous solenoid should be mounted towards the rear
of the vehicle, while the fuel solenoid should be mounted towards the front.
Select the horsepower
setting that you want
to
start with, insert the proper nitrous jet in the plate jet
fi
tting marked
“N2O”
(CAUTION: You must
always
use a back-up wrench when tightening the
lines to the plate
fittings,
failure to do so could break the fittings and will void the
system
warranty!!!!!) Connect the nitrous
solenoid to
this
fitting with the 3/16 stainless steel hardline
con
nector with blue fittings. The nitrous
solenoid
can
be identified by the “N2O” marked on the
base.
The Lightning solenoids are unique and
special
attention must be paid to the “inlet-outlet
port
arrangement. The 1/8th
NPT side inlet
port
is the
location for the N2O filter fitting, the 1/8 NPT purge port is for the
optional
purge valve. If no purge
valve is used a 1/8
NPT
plug is provided to block this port. Repeat
this procedure for the fuel solenoid
NOTE: Always check each jet for obstructions before using.
2. Remove the air
cleaner.
3. Disconnect the throttle linkage, noting its
position.
4. Carefully remove the fuel line, being careful
to
avoid spilling any raw fuel on hot engine
parts.
5. Remove the carburetor; noting all vacuum
connec
tions before disconnecting any
hoses.
6. Remove the old carb studs and install the
longer
ones furnished with the NX system. Install
the
new carb
gasket provided. Install the N2O
plate,
and place the remaining new carb gasket on
top
of the plate. Do
not re-install the carb yet.
7. It is now time to route the nitrous supply
line.