INSTRUCTION MANUAL BUILT-IN WINE COOLER °C ° C °F MODEL: NPDUAL04 Read this manual and follow all safety rules and operating instructions before first use of this wine cooler.
TABLE OF CONTENTS IMPORTANT SAFETY INSTRUCTIONS 3 PRODUCT DIAGRAM 5 INSTALLATION INSTRUCTIONS 6 Before Using Your wine cooler 6 To Install Stainless Steel Handle 6 To Install Your wine cooler 7 OPERATION INSTRUCTIONS 9 Controls 9 Storage 10 Door Lock 10 Beech Shelves 10 CARE & MAINTENANCE 11 Cleaning Your wine cooler 11 Power Failure 11 Vacation Time 11 Moving Your wine cooler 12 Energy Saving Tips 12 TROUBLESHOOTING GUIDE 13-14
IMPORTANT SAFETY INSTRUCTIONS Your safety and the safety of others are very important. This wine cooler complies with the applicable safety requirements and is safe for daily use. However, basic safety precautions should always be followed when using an electrical appliance, to reduce the risk of fire, electric shock, and personal injury. Plug into its own individual electrical outlet with a voltage rating that matches the rating label on the cooler (115/120V AC only, 60Hz, 10A).
Do not use this wine cooler for other than its intended purpose. For indoor, household use only. Move this wine cooler by 2 people. Failure to do so can result in injury. Place this wine cooler in a well-ventilated area with temperatures above 15°C (60°F) and below 32°C (90°F). To ensure proper ventilation for your wine cooler, the front of the cooler must be completely unobstructed. This wine cooler must be installed in an area away from wind, rain, water spray or drips.
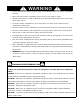
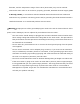
PRODUCT DIAGRAM 2 7 °C ° C 2 °F 3 7 4 5 1 Control Panel 2 Top Hinge 3 Wood Shelves 4 Safety Child Lock 5 Exhaust Window 6 7 Glass Door with Handle 5 Leveling Legs
INSTALLATION INSTRUCTIONS Before Using Your wine cooler Remove the exterior and interior packaging. Check to be sure you have all of the following parts: o 6 Wood Shelves o 2 Keys o Stainless Steel Handle o Instruction Manual o 2 Extra Screws for Installing Handle IMPORTANT: Before connecting this wine cooler to a power source, let it stand upright for approximately 24 hours. This will reduce the possibility of a malfunction in the cooling system from handling during transportation.
Illustration #1 Illustration #2 1 Gasket 2 Screw 3 Screw Driver 4 Handle To Install Your wine cooler - This wine cooler is designed for free standing or built-in (fully recessed) installation. - Place your wine cooler on a solid and level floor that is strong enough to support it when it is fully loaded. This will ensure a vibration-free and noise-free operation. Adjust the leveling legs in and out to stabilize the cooler horizontally.
fluctuate, and the temperature range of 5ºC-18ºC (40ºF-65ºF) may not be reached. - Connect the wine cooler to an exclusive, properly grounded, standard electrical supply (115 V AC only, 60 Hz), in accordance with the National Electrical Code and local codes and ordinances. Any questions concerning power and/or grounding should be directed toward a certified electrician or an authorized products service center. Warning: Improper use of the grounded plug can result in the risk of electrical shock.
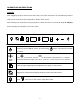
OPERATION INSTRUCTIONS Controls After plugging the wine cooler into a wall outlet, the cooler would turn on automatically and the LCD screen would show the temperature inside of the cooler. After setting your desired serving temperature, allow the cooler to cool down for 3 to 4 hours before placing wine bottles in the wine cooler. °C °F Press once to turn ON the cooler. Press and hold about 3 seconds to turn OFF the cooler.
Storage Many cans and bottles may differ in size and dimensions. As such the actual number of bottles you may be able to store may vary.. Door Lock This cooler can be secured with a lock and key. The keys are located inside the plastic bag that contains the Instruction Manual. Insert the key into the lock and turn it clockwise to lock the door, making sure the metal pin is engaged completely. To unlock the door, do the reverse. Remove the key and put it in a secure location.
CARE & MAINTENANCE Cleaning Your wine cooler IMPORTANT: Always unplug the cooler before cleaning or performing maintenance. Never use harsh cleansers or scouring pads to clean any part of the cooler. Turn off the power, unplug the wine cooler, and remove all items including shelves. Wash the inside surfaces with warm water and baking soda solution. The solution should be about 2 tablespoons of baking soda to a quart of water. Wash the shelves with a mild detergent solution.
Power failure Most power failures are corrected within a few hours and should not affect the temperature of your wine cooler. If the power is off for an extended period of time, proper steps should be taken to protect your contents. Vacation Time Leave the wine cooler operating during vacations of less than three weeks. For periods longer than this, turn the wine cooler off and leave the door slightly ajar to prevent odor from building inside the wine cooler.
TROUBLESHOOTING GUIDE PROBLEM The wine cooler does not run. The wine cooler is not cold enough. The compressor turns on and off frequently. POSSIBLE CAUSE SOLUTION The wine cooler may not be plugged in, or plug may be loose. Ensure the wine cooler has been plugged in properly. The wine cooler is turned off. Press to turn on the cooler. House fuse blown or tripped circuit breaker. Check/replace fuse. Reset circuit breaker. External environment may require a higher setting.
PROBLEM The light does not work. POSSIBLE CAUSE SOLUTION Not plugged in. Plug the cooler in. The circuit breaker tripped or a blown fuse. Check the breaker and/or fuses. The light button is “OFF”. Vibrations. The cooler seems to make too much noise. The door will not close properly. Moisture build up on interior or exterior of the wine cooler. Error Code: E1-E2-E3-E4-E7-E8 Press to turn the light ON. The cooler is not leveled. Check to assure that the cooler is level.
Warranty Terms Warranty Period 1. Customers are entitled to a replacement or free repair service in case of any quality defect(s) found in the product within 15 days upon receipt of the product. 2. Customers are entitled to free repair service from NIPUS for any product proven to be defective in material or workmanship, resulting in product failure during normal consumer usage and conditions within the valid warranty period. The warranty period is 12 months, counting from the date of sale.