
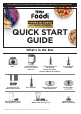
Quick Start Guide


1.
Fill container with desired contents.
Screw on the blade assembly until
you have a tight seal.
1.
Use the dial to select
an Auto-iQ® program
or manual speed, then
press START/STOP to
begin blending.
3.
When blending is
complete, remove the
container from base.
Then, remove the blade
assembly from container.
Taking It To Go?
Place the storage lid or spout lid on top
of the XL bowl or cup, and turn clockwise to seal.
Blending
PRESS THE POWER BUTTON TO TURN THE UNIT ON.
OR
WARNING: Handle the blade assembly with care, as the blades are sharp.
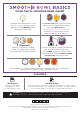
Assembling the Nutrient Extraction* Cup
& XL Smoothie Bowl Maker
NOTE: DO NOT microwave or freeze the single-serve cup or XL bowl.
*Extract a drink containing vitamins and nutrients from fruits and vegetables.
IF USING
SINGLE-SERVE CUP.
SKIP STEP 2.
2.
If using the XL bowl
twist the built-in tamper
counterclockwise
continuously while
processing.
OR
2.
Flip container upside down and
install on base. Rotate clockwise
until it clicks into place.
OR
Blending
PRESS THE POWER BUTTON TO TURN THE UNIT ON.
1.
Holding the blade assembly
by the top of the shaft,
insert it into the pitcher.
3.
Place pitcher on base.
Slightly align handle to the
right so the LOCK symbol
is visible on the motor
base. Rotate clockwise until
pitcher clicks into place.
For thicker mixtures
Press RELEASE button and lift handle to remove the flat lid,
then carefully lift out blade assembly before removing contents.
Remove contents from blade assembly by using a spatula.
2.
Fill pitcher with desired
ingredients. Install the flat lid, then
lower lid handle to lock in place.
1.
Use the dial to select
an Auto-iQ® program
or manual speed, then
press START/STOP
to begin blending.
2.
When blending is
complete, turn pitcher
counterclockwise and
lift to remove.
3.
To pour out thinner
mixtures, ensure flat lid
is locked in place, then
open pour spout.
WARNING: Blade assembly is sharp and not locked in place. Make sure lid is locked onto pitcher
before pouring contents. If pouring without lid, carefully remove blade assembly first. Failure to do
so will result in a risk of laceration. Refer to the Ninja Owner’s Guide for additional information.
NOTE: If using manual speeds with the
dough blade assembly, use only speed 1.
Assembling the Power Blender & Processor Pitcher
with Flat Lid and Blade Assemblies
NOTE: The stacked blade and dough blade
assembly are only compatible with the flat lid.