
User's Manual


1010
TOLL FREE: 1-877-646-5288
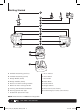
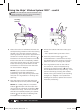
Locking
Handle
Fig. 5
5 Select the button that best suites your
needs.
* See “Speed Settings & Uses” chart.
6 Press the power button ( ) or the
selected button a second time to stop
the attachment from turning or press a
different button to change the speed.
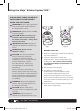
7 If the ingredients stick to the side of
the container, stop the appliance by
pressing the power button ( ) and wait
for the attachment to stop turning. Then
remove the lid by pressing the release
button, lifting the handle up and pulling
straight up. (Fig. 6) Use a spatula to
dislodge the pieces, replace the lid and
continue processing.
3 Place the color co-ordinated lid onto the
corresponding container with the locking
handle in the upright position and the
pouring spout on the corner opposite the
container’s handle. Align the arrows ( )
located on the lid and container’s handle.
Ensure that the lid is completely seated
and press the lid down into the container.
Press the locking handle down so that
the latches on the lid fit under the tabs
on the container. (Fig. 5)
NOTE: If you need to add additional
ingredients while the appliance is
processing, open the pouring spout cap
and pour the ingredients in through the
opening.
4 Plug the power cord into the electrical
outlet and press on the power button ( ).
NOTE: As a safety feature, the power
button ( ) will flash and the motor will
not work if the container and lid are not
installed correctly. When the container
and lid are installed properly, the power
button ( ) will be solid, indicating that
the appliance is ready for use.
Using the Ninja
®
Kitchen System 1100™ - cont'd
Fig. 6
NOTE: The handle will remain locked in the
upward position until the lid is completely
seated on top of the container.
NJ602_series_30_IB_ENG_120427_2.indd 10 12-04-30 8:44 AM