
User's Manual


13
www.ninjakitchen.com
13
Fig. 12
6 Plug the power cord into the electrical
outlet and press on the power button ( ).
NOTE: Please refer to “Speed Settings &
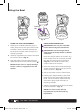
Uses” chart for suggested uses.
7 Once finished making dough, remove the
bowl from the motor base.
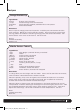
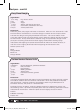
8 To remove the motor base from inside
the dough station, pull the locking tab
away from the back of the motor base
while you lift the motor base out of the
dough station. (Fig. 12)
9 To release the dough station from the
counter or tabletop, lift the tabs located
on suction feet of the dough station.
WARNING: Never leave the appliance
unattended while in use.
USING THE DOUGH PADDLE
IMPORTANT: Use only the “DOUGH”
button when using this attachment.
IMPORTANT: Use the dough station
when using the dough paddle on
SPEED 1/DOUGH.
1 Place the dough station on a clean, dry,
level surface such as a counter or table
top with the locking tab in the back.
(Fig. 10) Press down to secure the
suction feet to the surface.
2 Place the motor base inside the dough
station and push down until you hear it
click into place. (Fig. 10)
3 Secure the bowl onto the motor base.
4 Holding the dough paddle by the shaft,
place it onto the gear shaft inside the
bowl. Ensure that the attachment fits
around the gear shaft and that it is
standing straight.
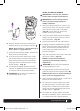
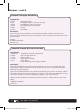
5 Add the ingredients and secure the bowl
lid onto the bowl. (Fig. 13)
NOTE: For best results add wet
ingredients first and then add dry
ingredients.
WARNING: Never leave the appliance
unattended while in use.
6 Plug the power cord into the electrical
outlet and press on the power button ( ).
NOTE: Please refer to “Speed Settings &
Uses” chart for suggested uses.
7 Once finished making dough, remove the
bowl from the motor base.
8 To remove the motor base from inside
the dough station, pull the locking tab
away from the back of the motor base
while you lift the motor base out of the
dough station. (Fig. 12)
9 To release the dough station from the
counter or tabletop, lift the tabs located
on suction feet of the dough station.
Fig. 13
NJ602_series_30_IB_ENG_120427_2.indd 13 12-04-30 8:44 AM