USER MANUAL 1
SUMMARY PREFACE ................................................................................................................................................................. 5 PRECAUTIONS ..................................................................................................................................................... 5 DESCRIPTION.......................................................................................................................................................
Photo resolution.............................................................................................................................................. 19 Display time ...................................................................................................................................................... 19 SYSTEM PARAMETERS SETTING .................................................................................................................. 20 Warning tone ..........................
Fast shots ...................................................................................................................................................... 32 File preview mode (Playback) ................................................................................................................... 32 Full screen preview mode and functions ............................................................................................... 34 Video trimming (only available on iPhone and iPad) ..........
PREFACE Thanks for choosing EVO, the high-definition digital camera. Easy to use, compact and with an integrated design. With its high-definition and dynamic image capturing technology it can record your daily activities at anytime and anywhere, so you can remember your experiences and share them with your family and friends. This manual will clearly explain you how to use and install the video camera, providing detailed information as well as technical specifications.
TECHNICAL SPECIFICATIONS EVO camera has the following specifications: • • • • • • • • • • • • • • • • • • • • • • • • • • • • 170° ultra wide-angle lens f/2.7. HD lens, supporting 1080P, 960P, 720P video recording 16 mega pixel photo shooting function, supporting a maximum resolution of 4608x3456. Device Wi-Fi control via Smartphone applications (Apps). 10X digital zoom. Fast shot, for shooting up to 10 photos per second. Different shooting modes: single shot, continuous shot and self shot.
• • With IP68 waterproof case, up to 100 meters depth resistant, with two different covers. Automatic standby for power saving and audio/video data saving.
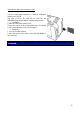
STRUCTURE EVO STRUCTURE 1. Exposure meter 2. Blue Wi-Fi status led (a) 3. Green status led 4. Red status led (b) 5. G-sensor 6. "Record" Key 7. Power Switch 1.Green status led (d) 2.LCD Display 3.Downward Key 4.Upward Key 5.OK Key 6.Status led (available for future use) 7.Status led (available for future use) 8.TFT display 9.Speaker 10.Left Key 8. Status led (available for future use) 9. Battery lock release 10. Microphone 11. Threaded interface 12. Green status led (c) 13. Lens unit 11.
OPERATING INSTRUCTIONS CHARGE Turn on the video camera and check battery status; if low, charge it. Either a computer USB port of power adapter (not included) can be used to charge it. When ECO is charged in off status, the red status led will flash slowly. When finished charging, the red led will remain on. The charge process inhibits video camera operations.
INSERTING AND REMOVING THE MEMORY CARD The EVO video camera supports TF memory cards with capacity up to 64 GB. Any type of Micro SD card can be used but we recommend high speed cards to optimise performance. • Installation. 1 Make sure the video camera is off 2 Insert the card in its slot, being careful that it is inserted in the correct direction until a click is heard. • Removal. 1 Turn off the video camera 2 Press the centre of the back of the card and release it; then remove it.
PRELIMINARY OPERATIONS Before using EVO, set the date and time as well as the display language. All EVO settings are accompanied by explicative graphic symbols. The three small icons on the left of the screen represent: - A video camera: to select to edit video settings. - A camera: to select to edit photo settings. A gear: to select to edit common settings. The icon is outlined in blue when the option is selected. DATE/TIME SETTING It allows to adjust the date and the time 1.Key 2. Press and 3.
LEGENDA Following are the symbols that most commonly appear on the screen. LCD SYMBOLS Displayed in the upper left corner, it indicates the video recording mode Displayed at the top left when EVO is in photo Photo camera mode camera mode Displayed in the centre position, it indicates the duration of the current recording video. The time is 00:00:22 Video recording duration synchronously displayed with the one on the TFT screen. Displayed at the centre, in alternative to the video recording length.
FRONT SELECTORS AND SETTINGS MENU Some selectors are located on the front of the video camera EXPOSURE MODE SELECTOR According to need and lighting conditions, the video camera exposure meter can be set to SPOT mode. This mode is used to adjust the amount of light according to a well-defined central point. Two different exposure meter management modes are included: Central Area: set this parameter in order to improve the central dark area, if the central area is dark but the surrounding area is bright.
PARAMETERS SETTING To set video camera parameters, use key , then confirm selections by pressing key and navigate the menu with keys and . VIDEO PARAMETERS SETTING Symbol to select on the left side of the screen EXE MODE Icon It allows to select the using mode of EVO video camera. 1. key 2. EXE’ selected by default 3. Press to confirm 4. Press and key to modify the choice, press Please choose one of the following options: key to confirm.
Possible choices in seconds are:0.5, 1, 2, 5, 10, 30 off VIDEO RESOLUTION It allows to select the desired resolution for the video recording. 1. key 2. Press 3. Press and to reach the item key to confirm 4. Choose the desired item and press key to confirm The choices for the video resolution are the following: 1080P (16:9) 1920X1080 60 fps 48 fps 30 fps 24 fps 960P (4:3) 1280X960 60 fps 48 fps 720P (16:9) 1280X720 120 fps 60 fps VIEW ANGLE It allows to set 4 types of views with different angles.
BITRATE It allows to change the numbers of recorded frames per each recording second. 1. key 2. Press and 3. Press to reach the item key to confirm 4. Choose the desired item and press key to confirm The bit rate choices available are: • normal (N), high (F). The higher the parameter is, the clearer is the image, but the file size increases. VIDEO CONTENT LOOP Lets you start or stop the loop recording function.
DISPLAY TIME This function records automatically the date and time during the video recording and displays them in a video in the bottom right corner of the screen. 1. 2. Press 3. Press key and to reach the item key to confirm 4.
CAMERA SETTING PARAMETERS Symbol to select on the left side of the screen CAPTURE MODE Lets you set photo shooting mode. 1. key 2. Press 3. Press and to reach the item key to confirm 4. Choose the desired item and press The choices are: key to confirm • Single shot • Multiple shot The choices available are: 3, 6, 10 shots per second. • Self timer The choices available are: 3, 5, 10-second delay. Press the Photo key to start the reverse counting timer.
PHOTO RESOLUTION It allows to select the resolution photo resolution. 1. key 2. Press and 3. Press to reach the item key to confirm 4. Choose the desired item and press key to confirm Possible resolutions are: 16.0M (4608×3456 4:3), 12.0M (4000×3000 4:3), 8.0M (3200×2400 4:3). DISPLAY TIME This function automatically records the date and displays the photo at the bottom right. 1. 2. Press 3. Press key and to reach the icon key to confirm 4.
SYSTEM PARAMETERS SETTING Symbol to select on the left side of the screen WARNING TONE Set this function to enable the tick tone 1. key 2. Press and 3. Press to reach the item key to confirm 4. Choose the desired item and press The choices available are: Off, 50%, 100%. key to confirm STATUS INDICATOR It allows you to turn off the frontal status led 1. key 2. Press and 3. Press to reach the item key to confirm 4.
AUTO TO STANDBY It allows the automatic turn-off of the video camera display. 1. key 2. Press and 3. Press to reach the item key to confirm 4. Choose the desired item and press The choices in minutes are: • 10,5,2,Off. key to confirm Where there is no operation, the system starts counting the time. When the preset time is reached, the video camera enters the standby mode. In case that any operation is carried out in the meanwhile, the system restarts counting the time.
DATE/TIME It allows to adjust the date and the time 1. key 2. Press and to reach the item 3. Press to confirm the selection 4. The choices available are: • Y-M-D-H-M (year, month, day, hour, minutes) • D-M-Y-H-M (day, month, year, hour, minutes) • M-D-Y-H-M (month, day, year, hour, minutes) 5. Modify the valuse and press 6.Press and key to move from an item to another key to confirm FORMAT It allows to format an external memory card 1. key 2. Press and to reach the item 3.
STARTING STEPS Before using your EVO: • Make sure that the battery is full. If the level is low, connect the video camera to a computer using the supplied USB cable to charge the battery. The mini red led slowly flashes when charging.
RECORDING A VIDEO IN TIME LAPSE MODE In the preview state press the Record key, on the front of the camera, to start video recording without audio. The video recording duration is displayed in the upper right part of the TFT screen. The small green led on the top, the one on the lower right and the one on the front of the video camera will flash slowly. The recording duration is displayed both on the LCD display and on the TFT screen.
1. key 2. Three icons appear on the right side of the screen. 3. Press the key in sequence to enable view mode: Video only, photo only, video and photo. PLAYING A VIDEO FILE Display all thumbnails, select the desired file and press When playing a video file, you can use the following keys: Key to play it. and Description Turns the sound volume up and down during playback. Enlarges or shrinks the picture preview, but not during playback. Press this key to fast forward or fast rewind.
PLAYING AN AUDIO FILE A group of video files are displayed with the audio file in preview status; the displayed instead of the initial video icon. icon will be Press to play the audio file You can use the following keys: Key Description Turns the sound volume up and down Returns to the playback interface when you press this key again. Starts or suspends playing an audio file During the playback mode of an audio file all other keys are disabled.
To protect a file, perform the following operations: 1. key to switch to photo view mode 2. Press keys and to move to the file to be protected 3. Press , select the icon and press 4. Select the desired item from: • Protect single • Protect all • Remove protection from single • Remove protection from all to confirm No confirmation is required; the protected files are displayed with icon Vice versa, unprotected files are displayed with icon . .
OUTPUT INTERFACES EVO Photo camera has 1 audio video output interfaces: • Hdmi and one data files output: • Usb HDMI VIDEO OUT You can connect the photo camera to a video input, through the Hdmi output, by using a specific cable (not supplied). In the meanwhile the video camera can work normally. The display or the TV, connected to the video camera, works exactly like the TFT display of the video camera. In this way you can see photos or videos in playback mode, or adjust the setting parameters.
USB OUTPUT The USB connection allows to : • • Give power supply to the EVO video camera with a USB cable Connect the EVO video camera to a computer in order to read the data in its memory and micro SD card. The icon of USB connection is displayed on the LCD screen and the green indicator blinks slowly. Incorrect UDB cable removal could cause EVO video camera malfunctions. After rebooting, the EVO video camera returns to normal conditions.
WI-FI CONNECTION Thanks to the built-in Wi-Fi module, EVO can be connected to Apple or Android Smartphones and Tablets and remotely controlled. Just download the free NILOX F-60 EVO App to connect the device in Wi-Fi.
1 Total number of files 2 Wi-Fi status 3 Battery level 4 Remaining recording time or number of pictures 5 Recording length 6 Video mode 7 Single shot photo mode 8 File preview 9 Full screen 10 Currently in use 11 Parameters setting 12 Zoom in 13 Zoom out 14 Fast shots The mobile device must be used within max. 100 metres from the video camera and without obstacles. Real-time preview is not available for 1080p 48fps/50fps/60fps e 720P 100fps/120fps video recording.
From the first menu displayed by the application, switch from video mode to photo mode using the icons at the centre of the screen , still using the icon, switch to full screen view. 1. Current use status 2. Resolution 3. Back to previous interface 4. Number of pictures taken You can set photo resolution in the setting parameters. . Fast shots From the first menu displayed by the application, select the fast shot mode , using screen mode. 1. Current use status 2. Number of shots 3.
From the main menu, press to open the file preview menu. 1. File on video camera mode 2. Selection switch 3. Files downloaded on device mode 4. Download mode settings 5. Back to main menu 6. File sharing 7. File download Use the switch (2) to select between viewing saved files on the photo camera or downloading files from the video camera to a mobile device and viewing them later. The icon lets you select the files and then delete or share them (mail, social network, social media).
Full screen preview mode and functions When viewing a photo or video in full screen mode you can: • Return to the previous menu by using the top • left arrow Share an image on a social network or sent it • via mail Download from the video camera to the device memory • Delete the image Video trimming (only available on iPhone and iPad) Videos downloaded on iPhone or iPad can be retouched using the "Trim" function.
APPLICATION AND FUNCTIONS ANDROID Once your EVO and Smartphone are connected, start the application that will appear in the following screen: The first icon opens EVO functions, the second lets you view recorded videos and photos. Video recording To start recording, press the central green key.
Photo Touch the icon to switch from video mode to photo mode and select between single photo and burst mode. In this case too, the icons are highly self-explanatory and similar to those already seen for videos. Settings Click on the gear at the bottom right to open the cam settings menu. Most parameters can be set and some operations run from this menu for correct cam operations.
File preview mode (Playback) The image is immediately displayed when From the main menu, press to open the file preview is selected. preview menu. Alternatively, the same menu can be opened from the home screen by selecting My Album. If the selector is positioned on cam (left) the user can either view a photo or video or download it to smartphone or tablet.
Move the selector to the right to smartphone opens the photo and video gallery device to open the downloaded photo and video gallery. Touch the icon depicting the photo album For best recorded photo and video viewing, we recommend using the player specific to the tablet or smartphone used. CHANGE WI-FI CONNECTION NAME AND PASSWORD Change name and connection • Connect the photo camera (with MicroSD card inserted) to the computer and turn on the photo camera.
EVO ACCESSORIES The EVO camera comes with multiple accessories. UNDERWATER CASE AND HUMIDITY PROOF LENS The EVO video camera underwater case, IP8 standard compliant, is guaranteed to a depth of 100 metres. To avoid and reduce the formation of condensation on the case lens, we recommend inserting the humidity proof plate in the case. (fig.
CLOSING CAP The underwater case comes with a waterproof cap on the left (frontal view). The video camera microphone is located there. This cap can be replaced with a perforated cap for better sound passage to the microphone. Watertight cap for underwater diving Waterproof cap.
TECHNICAL SPECIFICATIONS Wide angle Shutter opening Digital zoom Pixel Video recording format Audio recording format Photo format Wi-Fi coverage 170° f/2.7 10X 16 million MP4 WAV JPG (JPEG) about 100 metres (Max.
PRECAUTIONS PRECAUTIONS FOR THE CAMERA CASE The waterproof case is a precision component. Please use the following precautions: • Do not randomly dismount and mount the O-ring of the case, keys and lens cover, otherwise the waterproof performance deteriorates. • Do not put the case in a place where corrosive gases are easily generated due to the existence of strong acid or alkali and keep it away from chemical or corrosive substances.
The articles included in the pack are the following: 1 EVO 1 TFT display 1 built-in battery 1 waterproof case 1 interchangeable backs 1 USB cable 1 bracket 3 humidity proof lenses 1 flat accessory 1 curve accessory 1 supporting bracket 1 waterproof cap 1 lanyards 43
WARRANTY AND LEGAL NOTES EVO is equipped with a rechargeable lithium polymer battery. To reduce the risk of fire, please avoid tampering, falls, contact with water or fire. To avoid personal injury, electric shock, fire or damage to various parts of the product, please follow the following instructions: Do not immerse the product without its waterproof case into water Personal Safety. Do not disassemble, repair, alter or modify any part of the O-ring of the product.
Moreover we suggest to adopt additional measures favourable to the environment: recycling the inner and outer packaging and properly dispose of used batteries (if any). With your help we can reduce the amount of natural resources used for the realization of electrical and electronic equipment, minimizing the use of landfills for the disposal of products and improving the quality of life by preventing to release into the environment potentially dangerous substances.
telecommunications and their mutual recognition. The declaration of conformity is available at our offices. This device can thus be used in all EEC countries and in all countries where Directive 1999/5/EC applies, without restrictions, except for: Norway (NO): device not to be used within 20 km of Ny Alesund. Italy (IT): This peripheral complies with the National Radio Interface and meets requirements on Frequency Assignment.