DIGITAL CAMERA User's Manual • Read this document thoroughly before using the camera. • To ensure proper use of the camera, be sure to read “For your safety” (page 11). • After reading this document, keep it readily accessible for future reference. Scan for detailed operating instructions.
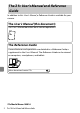
The Z fc User’s Manual and Reference Guide In addition to this User’s Manual, a Reference Guide is available for your camera. The User’s Manual (this document) The User’s Manual describes basic camera operations. The Reference Guide Camera features and operations are detailed in a Reference Guide, a supplement to the User’s Manual. The Reference Guide can be viewed on computers, smartphones, and tablets.
D Lens kit lenses For information on lenses supplied as part of a lens kit, see the lens documentation available for download from the Nikon Download Center. D The Nikon Download Center Visit the Nikon download center to download firmware updates, NX Studio and other Nikon software, and documentation for Nikon products including cameras, NIKKOR lenses, and flash units. https://downloadcenter.nikonimglib.
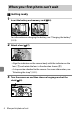
When your first photo can’t wait ❚ ❚Getting ready 1 Insert the battery and memory card (024). For information on charging the battery, see “Charging the battery” (023). 2 Attach a lens (027). ・ Align the indicator on the camera body with the indicator on the lens (q) and rotate the lens in the direction shown (w). ・ A strap can be attached to the camera. For more information, see “Attaching the strap” (022). 3 Turn the camera on and then choose a language and set the clock (030).
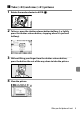
❚ ❚Take (033) and view (041) pictures 1 Rotate the mode selector to AUTO (b). 2 3 4 To focus, press the shutter-release button halfway (i.e, lightly press the shutter-release button, stopping when it is pressed halfway). Without lifting your finger from the shutter-release button, press the button the rest of the way down to take the picture. View the picture.
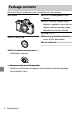
Package contents Be sure all items listed here were included with your camera. ❏ EN-EL25 rechargeable Li-ion ❏ Camera battery ❏ MH-32 battery charger (plug adapter supplied in countries or regions where required; shape depends on country of sale) ❏ BF-N1 body cap ❏ Strap (022) ❏ Warranty (printed on the back cover of this document) ❏ User’s Manual ❏ DK-32 rubber eyecup (comes attached to camera) ・ Memory cards are sold separately.
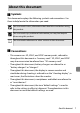
About this document ❚ ❚Symbols This document employs the following symbols and conventions. Use them to help locate the information you need. D This icon marks notes, information that should be read before using this product. A This icon marks tips, additional information you may find helpful when using this product. 0 This icon marks references to other sections in this document. ❚ ❚Conventions ・ This camera uses SD, SDHC, and SDXC memory cards, referred to throughout this document as “memory cards”.
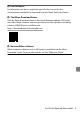
❚ ❚Nikon user support Should you need technical support, we offer a number of options. ・ For users in the U.S.A.: https://www.nikonusa.com/ ・ For users in Canada: https://www.nikon.ca/ ・ For users in Mexico: https://www.nikon.com.mx/ ・ For users in Latin America: https://www.nikonamericalatina.com/ ・ For users in Europe: https://www.europe-nikon.com/support ・ For users in Asia, Oceania, the Middle East, and Africa: https://www.nikon-asia.
Table of contents The Z fc User’s Manual and Reference Guide ...................................................2 When your first photo can’t wait ..........................................................................4 Package contents .......................................................................................................6 About this document ............................................................................................... 7 For your safety .................................
Warranty terms 62 Warranty terms - Nikon Europe service warranty ........................................
For your safety To prevent damage to property or injury to yourself or to others, read “For your safety” in its entirety before using this product. After reading these safety instructions, keep them readily accessible for future reference. DANGER: Failure to observe the precautions marked with this icon carries a high risk of death or severe injury. WARNING: Failure to observe the precautions marked with this icon could result in death or severe injury.
Do not use this product in the presence of flammable dust or gas such as propane, gasoline or aerosols. Failure to observe this precaution could result in explosion or fire. Do not directly view the sun or other bright light source through the lens. Failure to observe this precaution could result in visual impairment. Do not aim the flash or AF-assist illuminator at the operator of a motor vehicle. Failure to observe this precaution could result in accidents. Keep this product out of reach of children.
Do not handle with bare hands in locations exposed to extremely high or low temperatures. Failure to observe this precaution could result in burns, or frostbite. CAUTION Do not leave the lens pointed at the sun or other strong light sources. Light focused by the lens could cause fire or damage to product’s internal parts. When shooting backlit subjects, keep the sun well out of the frame. Sunlight focused into the camera when the sun is close to the frame could cause fire.
Do not transport cameras or lenses with tripods or similar accessories attached. Failure to observe this precaution could result in injury or product malfunction. DANGER (Batteries) Do not mishandle batteries. Failure to observe the following precautions could result in the batteries leaking, overheating, rupturing, or catching fire: ・ Use only rechargeable batteries approved for use in this product. ・ Do not expose batteries to flame or excessive heat. ・ Do not disassemble.
WARNING (Batteries) Keep batteries out of reach of children. Should a child swallow a battery, seek immediate medical attention. Keep batteries out of reach of household pets and other animals. The batteries could leak, overheat, rupture, or catch fire if bitten, chewed, or otherwise damaged by animals. Do not immerse batteries in water or expose to rain. Failure to observe this precaution could result in fire or product malfunction.
Notices ・ No part of the documentation included with this product may be reproduced, transmitted, transcribed, stored in a retrieval system, or translated into any language in any form, by any means, without Nikon’s prior written permission. ・ Nikon reserves the right to change the appearance and specifications of the hardware and software described in this documentation at any time and without prior notice. ・ Nikon will not be held liable for any damages resulting from the use of this product.
etc.), commuter passes, or coupon tickets, except when a minimum of necessary copies are to be provided for business use by a company. Also, do not copy or reproduce passports issued by the government, licenses issued by public agencies and private groups, ID cards, and tickets, such as passes and meal coupons. ・ Comply with copyright notices Under copyright law, photographs or recordings of copyrighted works made with the camera cannot be used without the permission of the copyright holder.
・ ・ ・ ・ ・ device. Failure to observe these precautions could result in loss of data or in damage to the camera or card. - Do not remove or insert memory cards - Do not turn the camera off - Do not remove the battery Do not touch the card terminals with your fingers or metal objects. Do not use excessive force when handling memory cards. Failure to observe this precaution could damage the card. Do not bend or drop memory cards or subject them to strong physical shocks.
Parts of the camera Camera body 1 2 3 4 5 6 7 8 Eyelet for camera strap ISO sensitivity dial ISO sensitivity dial lock release Stereo microphone Shutter-speed dial Shutter-speed dial lock release Power switch Shutter-release button 9 10 11 12 13 14 Video-record button E (focal plane mark) Exposure compensation dial Control panel Photo/video selector Accessory shoe (for optional flash unit) 15 Mode selector 16 Speaker Camera body 19
1 2 3 4 5 6 7 20 Sub-command dial Image sensor CPU contacts Lens mounting mark AF-assist illuminator Red-eye reduction lamp Self-timer lamp Cover for HDMI, USB, and microphone connectors HDMI connector Camera body 8 Charge lamp 9 USB connector 10 Connector for external 11 12 13 14 microphone Lens release button Lens mount Fn button Body cap
1 2 3 4 5 6 7 8 9 10 11 Diopter adjustment control A (g) button Main command dial i button J button Multi selector DISP button G button W (Q) button Memory card access lamp X button 12 Battery-chamber/memory card slot cover 13 Battery-chamber/memory card 14 15 16 17 18 19 20 21 22 23 slot cover latch Battery latch Memory card slot Tripod socket Monitor M button O button K button Eye sensor Viewfinder Rubber eyecup Camera body 21
First steps Attaching the strap To attach a strap (whether the supplied strap or one that has been purchased separately): 22 Attaching the strap
Charging the battery Charge the supplied EN-EL25 battery in the supplied MH-32 battery charger before use. D The battery and charger Read and follow the warnings and cautions in “For your safety” (011) and “Caring for the camera and battery: Cautions” (044). ・ Plug the charger into a household outlet to charge it. In some countries or regions, the charger may be supplied with the adapter connected. The charger lamp flashes while charging, and lights up when charging is complete.
Inserting the battery and a memory card ・ Turn the camera off before inserting or removing the battery and memory card. ・ Using the battery to keep the orange battery latch pressed to one side, slide the battery into the battery chamber until the latch locks it in place. ・ Holding the memory card in the orientation shown, slide it straight into the slot until it clicks into place.
D Removing the battery To remove the battery, turn the camera off and open the battery-chamber/ memory card slot cover. Press the battery latch in the direction shown by the arrow to release the battery and then remove the battery by hand. D Removing the memory card After confirming that the memory card access lamp is off, turn the camera off and open the battery-chamber/memory card slot cover. Press the memory card in to eject it (q), and pull it out to remove it (w).
・ The battery level display changes as the battery level diminishes, from L through K, and H. When the battery level falls to H, suspend shooting and charge the battery or ready a spare battery. ・ If the message [Shutter release disabled. Recharge battery.] is displayed, charge or exchange the battery. D The standby timer The camera uses a standby timer to help reduce the drain on the battery.
Attaching a lens ・ The camera can be used with Z mount lenses. The lens generally used in this document for illustrative purposes is a NIKKOR Z DX 16–50mm f/3.5–6.3 VR. ・ Be careful to prevent dust entering the camera. ・ Confirm that the camera is off before attaching the lens. - Remove the camera body cap (q, w) and rear lens cap (e, r). - Align the mounting marks on the camera (t) and lens (y). Do not touch the image sensor or lens contacts.
- Rotate the lens as shown until it clicks into place (u). ・ Remove the front lens cap before taking pictures. D F mount lenses ・ Be sure to attach the FTZ mount adapter (available separately) before using F mount lenses. ・ Attempting to attach F mount lenses directly to the camera could damage the lens or image sensor. Detaching lenses ・ After turning the camera off, press and hold the lens release button (q) while turning the lens in the direction shown (w).
Opening the monitor Slowly rotate the monitor without using excessive force.
Turning on the camera When the camera is turned on for the first time, the language selection screen is displayed. Choose a language and then set the camera clock (no other operations can be performed until the clock is set). 1 Turn the camera on. ・ The [Language] selection screen will be displayed. 2 Select a language. ・ Press 1 or 3 to highlight the desired language and press J (the languages available vary with the country or region in which the camera was originally purchased).
3 Choose a time zone. ・ Press 1 or 3 to choose a time zone and press J. ・ The display shows the selected cities in the chosen zone and the difference between the time in the chosen zone and UTC. ・ The [Date format] screen will be displayed. 4 Choose a date format. ・ Highlight the desired date (year, month, and day) display order and press J. ・ The [Daylight saving time] screen will be displayed.
5 Turn daylight saving time on or off. ・ Highlight [On] (daylight saving time on) or [Off] (daylight saving time off) and press J. ・ Selecting [On] advances the clock one hour; to undo the effect, select [Off]. ・ The [Date and time] screen will be displayed. 6 Set the clock. ・ Press 4 or 2 to highlight date and time items and press 1 or 3 to change them. ・ Press J to confirm the date and time setting. ・ The message [Done.] will be displayed and the camera switches to shooting mode.
Basic photography and playback Taking photographs (b auto) Select b (auto) mode for simple “point-and-shoot” photography. D Lenses with retractable barrels Lenses with retractable barrels must be extended before use. Rotate the zoom ring as shown until the lens clicks into the extended position. 1 Select photo mode by rotating the photo/video selector to C. 2 Rotate the mode selector to AUTO (b).
3 Ready the camera. Holding the handgrip in your right hand and cradling the camera body or lens with your left, bring your elbows in against the sides of your chest. Landscape (wide) orientation 4 Portrait (tall) orientation Frame the photograph. Position the main subject in the AF-area brackets (5). ・ The AF-area brackets will disappear and a yellow border indicating the focus point appears around the faces of human subjects detected by the camera.
5 Press the shutter-release button halfway to focus. ・ The focus point will be displayed in green when the camera focuses. If the camera is unable to focus, the AF-area brackets will flash. ・ The AF-assist illuminator may light to assist the focus operation if the subject is poorly lit. ・ If the camera detects human faces or eyes, the focus point will light green when the subject is in focus. The focus point will flash in red when the camera does not focus.
D The AF-assist illuminator Do not obstruct the AF-assist illuminator while it is lit. 6 Smoothly press the shutter-release button the rest of the way down to take the photograph. D The memory card access lamp The memory card access lamp will light while the photograph is being recorded. Do not remove the memory card or battery.
A The touch shutter You can also take a photograph by touching the monitor. Touch your subject to focus and lift your finger to release the shutter.
Recording videos (b auto) b (auto) mode can also be used for simple, “point-and-shoot” video recording. 1 Select video mode by rotating the photo/video selector to 1. Note that optional flash units cannot be used when the camera is in video mode. 2 38 Rotate the mode selector to AUTO (b).
3 Press the video-record button to start recording. ・ A recording indicator will be displayed in the monitor. The monitor also shows the time remaining, or in other words the approximate amount of new footage that can be recorded to the memory card. 1 Recording indicator 2 Time remaining ・ Sound is recorded via the built-in microphone. Do not cover the microphone during recording.
D The memory card access lamp The memory card access lamp will light while the video is being recorded. Do not remove the memory card or battery. D The 0 icon A 0 icon indicates that videos cannot be recorded.
Viewing photos Press the K button to view photos and videos recorded with the camera in the monitor or viewfinder. ・ Press 4 or 2, or flick left or right on the monitor to view other images. ・ Videos are indicated by a 1 icon at the upper left of the monitor. Press the J button, or tap the a icon in the monitor to play back videos. ・ To end playback and return to shooting mode, press the shutterrelease button halfway.
Troubleshooting Before contacting customer support You may be able to resolve any issues with the camera by following the steps below. Check this list before consulting your retailer or Nikonauthorized service representative. Check the list of common problems. STEP STEP 42 problems and solutions are listed in the 1 Common troubleshooting section of the Reference Guide. 2 Turn the camera off and remove the battery, then wait about a minute, re-insert the battery and turn the camera on.
Technical notes Caring for the camera Storage When the camera will not be used for an extended period, remove the battery. Before removing the battery, confirm that the camera is off.
Caring for the camera and battery: Cautions Camera care ● Do not drop Do not drop the camera or lens or subject them to blows. The product may malfunction if subjected to strong shocks or vibration. ● Keep dry Keep the camera dry. Rusting of the internal mechanism caused by water inside the camera can not only be expensive to repair but can in fact cause irreparable damage.
● Lasers and other bright light sources Do not direct lasers or other extremely bright light sources toward the lens, as this could damage the camera’s image sensor. ● Cleaning When cleaning the camera body, use a blower to gently remove dust and lint, then wipe gently with a soft, dry cloth. After using the camera at the beach or seaside, wipe off any sand or salt using a cloth lightly dampened in fresh water and then dry the camera thoroughly.
enclosed vehicle on a hot day. Failure to observe these precautions could result in product malfunction. ● Long-term storage To prevent damage caused by, for example, leaking battery fluid, remove the battery if the product will not be used for an extended period. Store the camera in a plastic bag containing a desiccant. Do not, however, store the leather camera case in a plastic bag, as this may cause the material to deteriorate. Store the battery in a cool, dry place.
- dizziness, headache, stiffness in your neck or shoulders, - queasiness or loss of hand-eye coordination, or - motion sickness. ・ The display may rapidly flicker on and off during burst photography. Watching the flickering display could cause you to feel unwell. Discontinue use until your condition improves. ● Bright lights and back-lit subjects Noise in the form of lines may in rare cases appear in pictures that include bright lights or back-lit subjects.
- Use only batteries approved for use in this equipment. - Do not short or disassemble batteries or expose them to flame or excessive heat. - When the battery is not inserted in the camera or charger, keep it in a plastic bag or other non-conductive container so that the terminals are insulated. ・ If the battery is hot, for example immediately after use, wait for it to cool before charging.
drop in capacity as the temperature drops, even if the battery is fully charged. ・ Batteries may be hot after use. Observe due caution when removing batteries from the camera. ● Charge batteries before use Charge the battery before use. The supplied battery is not fully charged at shipment. ● Ready spare batteries Before taking photographs, ready a spare battery and keep it fully charged. Depending on your location, it may be difficult to purchase replacement batteries on short notice.
Using the charger ・ Do not move the charger or touch the battery during charging; failure to observe this precaution could in very rare instances result in the charger showing that charging is complete when the battery is only partially charged. Remove and reinsert the battery to begin charging again. ・ Do not short the charger terminals. Failure to observe this precaution could result in overheating and damage to the charger. ・ Unplug the charger when it is not in use.
Trademarks and licenses ・ The SD, SDHC, and SDXC logos are trademarks of SD-3C, LLC. ・ Windows is either a registered trademark or a trademark of Microsoft Corporation in the United States and/or other countries. ・ Apple®, App Store®, the Apple logos, iPhone®, iPad®, Mac, and macOS are trademarks of Apple Inc. registered in the U.S. and/or other countries. ・ Android, Google Play and the Google Play logo are trademarks of Google LLC.
・ The software for this product includes open-source software copyrighted by third parties. The terms of the licenses for this opensource software may be found in the Reference Guide. https://downloadcenter.nikonimglib.
Notices ● Notices for customers in the U.S.A. The battery charger IMPORTANT SAFETY INSTRUCTIONS—SAVE THESE INSTRUCTIONS DANGER—TO REDUCE THE RISK OF FIRE OR ELECTRIC SHOCK, CAREFULLY FOLLOW THESE INSTRUCTIONS For connection to a supply not in the U.S.A., use an attachment plug adapter of the proper configuration for the power outlet if needed. This power unit is intended to be correctly oriented in a vertical or floor mount position.
・ Connect the equipment into an outlet on a circuit different from that to which the receiver is connected. ・ Consult the dealer or an experienced radio/television technician for help. CAUTIONS Modifications The FCC requires the user to be notified that any changes or modifications made to this device that are not expressly approved by Nikon Corporation may void the user’s authority to operate the equipment. Interface cables Use the interface cables sold or provided by Nikon for your equipment.
・ This product is designated for separate collection at an appropriate collection point. Do not dispose of as household waste. ・ Separate collection and recycling helps conserve natural resources and prevent negative consequences for human health and the environment that might result from incorrect disposal. ・ For more information, contact the retailer or the local authorities in charge of waste management. This symbol on the battery indicates that the battery is to be collected separately.
Bluetooth and Wi-Fi (wireless LAN) This product is controlled by the United States Export Administration Regulations (EAR). The permission of the United States government is not required for export to countries other than the following, which as of this writing are subject to embargo or special controls: Cuba, Iran, North Korea, Sudan, and Syria (list subject to change). The use of wireless devices may be prohibited in some countries or regions.
discontinue transmission in case of either absence of information to transmit or operational failure. Frequency Tolerance: ±20 ppm There are models that support only 2.4GHz or models that support 2.4GHz / 5GHz. The Guam sales model is only compatible with 2.4GHz. FCC Radio Frequency Interference Statement Note: This equipment has been tested and found to comply with the limits for a Class B digital device, pursuant to part 15 of the FCC Rules.
no proof, however, that these low power wireless devices are absolutely safe. Low power Wireless devices emit low levels of radio frequency energy (RF) in the microwave range while being used. Whereas high levels of RF can produce health effects (by heating tissue), exposure of low-level RF that does not produce heating effects causes no known adverse health effects. Many studies of low-level RF exposures have not found any biological effects.
This device complies with radio-frequency regulations. The content of certification labels not affixed to the device is given below. ● Notice for customers in Nigeria ● Notice for customers in Thailand ● Notice for customers in Europe and in countries complying with the Radio Equipment Directive Hereby, Nikon Corporation declares that the radio equipment type Z fc is in compliance with Directive 2014/53/EU.
・ Maximum output power (EIRP): - 2.4 GHz band: 8.1 dBm - 5 GHz band: 7.9 dBm (countries in the Americas) Bluetooth ・ Operating frequency: - Bluetooth: 2402–2480 MHz - Bluetooth Low Energy: 2402–2480 MHz ・ Maximum output power (EIRP): - Bluetooth: 2.6 dBm - Bluetooth Low Energy: 1.1 dBm ● Notice for customers in the UK Hereby, Nikon Corporation declares that the radio equipment type Z fc is in compliance with Radio Equipment Regulations 2017.
A Conformity marking Some of the information related to standards with which the camera complies can be viewed using the [Conformity marking] option in the setup menu.
Warranty terms Warranty terms - Nikon Europe service warranty Dear Nikon customer, We thank you for your purchasing this Nikon product. Should your Nikon product require warranty service, please contact the dealer from whom it was purchased or a member of our authorized service network within the sales territory of Nikon Europe B.V. (e.g. Europe/Russia/others). See details under: https://www.europe-nikon.
・ transport costs and all risks of transport relating directly or indirectly to the warranty of the products. ・ any damage resulting from modifications or adjustments which may be made to the product, without the prior written consent of Nikon, in order to comply with local or national technical standards in force in any other country than the ones for which the product was originally designed and/or manufactured. 3.
CT2H04(11) 6MOA9411-04