
Setting Guide (Auto Capture Edition)


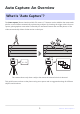
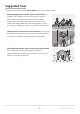
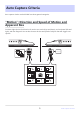
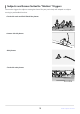
Table Of Contents
- Table of Contents
- Auto Capture: An Overview
- Using Auto Capture
- Using Auto Capture: Workflow
- Getting Ready
- Adjusting Camera Settings
- The Photo Shooting Menu “Auto Capture” Item
- “Capture Criteria”
- “Capture Criteria” > “Motion”
- “Capture Criteria” > “Distance”
- “Capture Criteria” > “Subject Detection”
- “Target Area”
- “Timing Options”
- The “View Settings” Dialog
- Initiating Auto Capture
- User Presets
- Recommended Trigger Criteria
- Troubleshooting

Photographing known subjects from a fixed location: For
example, if the camera is positioned in front of the finish
line for sprints or similar events and set to shoot when
subjects approach, finish-line photos for all heats can be
taken automatically. Meanwhile, the photographer is free to
concentrate on taking shots with a second, hand-held camera.
Taking pictures from hard-to-access locations: Auto capture
lets you position the camera in tight spaces or other locations
not normally capable of accommodating photographers.
Photographing subjects whose arrival cannot be predicted:
Auto capture lets you leave the camera in charge of
photographing wild animals or other subjects that cannot be
relied on to appear on demand.
Suggested Uses
Examples of situations in which [Auto capture] can come in handy include:
8
What Is “Auto Capture”?