
Setting Guide (Auto Capture Edition)

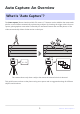
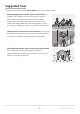
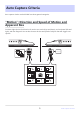
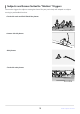
Table Of Contents
- Table of Contents
- Auto Capture: An Overview
- Using Auto Capture
- Using Auto Capture: Workflow
- Getting Ready
- Adjusting Camera Settings
- The Photo Shooting Menu “Auto Capture” Item
- “Capture Criteria”
- “Capture Criteria” > “Motion”
- “Capture Criteria” > “Distance”
- “Capture Criteria” > “Subject Detection”
- “Target Area”
- “Timing Options”
- The “View Settings” Dialog
- Initiating Auto Capture
- User Presets
- Recommended Trigger Criteria
- Troubleshooting

Shooting continues while the trigger criteria are met, and
the frame advance rate can be chosen from [Continuous high-
speed], [Continuous low-speed], [C30], or [C120]. Choose a
frame advance rate according to your subject.
You can specify multiple trigger criteria, including direction
of motion (q), distance (w), and subject type (e). The trigger
criteria can be tailored to avoid wasted shots. The effects of the
chosen criteria can be previewed in live view.
You can choose the focus points used for subject detection
by enabling or disabling specific focus points for use when
[Auto-area AF] is selected for AF-area mode. Auto capture will
only be triggered if a subject is detected in at least one of
the selected focus points. Target-area selection can be used to
disable focus points in areas of the frame that are blocked by
obstacles or can otherwise be ignored for purposes of subject
detection, ensuring that the desired subject can be detected
more reliably.
You can use autofocus for automatic focus on subjects that
meet the trigger conditions before shooting. This lets you take
advantage of the bokehoffered by wide-aperture lenses.
Features
[Auto capture] supports the following features:
6
What Is “Auto Capture”?