
Setting Guide (Auto Capture Edition)
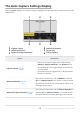

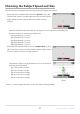
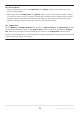
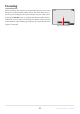
Table Of Contents
- Table of Contents
- Auto Capture: An Overview
- Using Auto Capture
- Using Auto Capture: Workflow
- Getting Ready
- Adjusting Camera Settings
- The Photo Shooting Menu “Auto Capture” Item
- “Capture Criteria”
- “Capture Criteria” > “Motion”
- “Capture Criteria” > “Distance”
- “Capture Criteria” > “Subject Detection”
- “Target Area”
- “Timing Options”
- The “View Settings” Dialog
- Initiating Auto Capture
- User Presets
- Recommended Trigger Criteria
- Troubleshooting

Choose one or more directions; a subject moving in any of the
selected directions will trigger auto capture. Press W (Q) to display
options. Highlight directions and press J to select (M) or deselect
(U). Subjects moving in directions that are disabled (U) will be
ignored.
“Capture Criteria”> “Motion”
To view the motion settings display, highlight [Advanced: Motion] in the auto capture settings display
and press J. This is where you’ll choose the direction of motion, speed, and apparent size of subjects
that will trigger auto capture.
Choosing the Direction of Motion
Press X to save changes and return to the motion settings display.
To exit to the motion settings display without saving changes, press i.
26
“Capture Criteria”> “Motion”