
Manual cu modificările aduse de actualizarea firmware
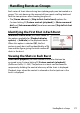
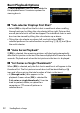
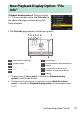
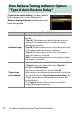
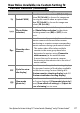
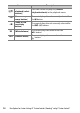
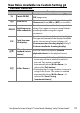
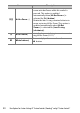
Table Of Contents
- Table of Contents
- Changes with “C” Firmware Version 3.00
- Features Available with “C” Firmware Version 3.00
- Changes Made with “C” Firmware Version 3.00
- New DX-Only Image Size Options
- New High-Speed Frame Capture Option: C60
- New Menu Item: “High-Frequency Flicker Reduction”
- New “Focus Shift Shooting” Option: “Focus Position Auto Reset”
- New Video Recording Feature: Hi-Res Zoom
- New “Timecode” Option: “Reset Using Remote”
- “Prioritize Viewfinder” Monitor Modes
- New “Focus Point Display” Option: “3D-Tracking Focus Point Color”
- New View Mode Options for Flash Photography
- New Monitor Brightness Options
- Tall-Orientation Playback
- New Color Temperature Display for Pictures Taken with “Preset Manual” White Balance
- Handling Bursts as Groups
- New Playback Display Option: “File Info”
- New Release Timing Indicator Option: “Type A Auto Restore Delay”
- New Display Option for Center- Weighted Metering
- New Options for Custom Settings f2 “Custom Controls (Shooting)” and g2 “Custom Controls”
- New Options for Custom Setting f3 “Custom Controls (Playback)”
- New “Full Format” Option for CFexpress Memory Cards
- New FTP Connection Indicator
- Support for FTPS
- New Remote Camera Count Display
- New “ATOMOS AirGlu BT Options” Item
- Menu Items and Defaults for “C” Firmware Version 3.00
- Post-Upgrade Specifications for “C” Firmware Version 3.00
- Index

27
New Options for Custom Settings f2 “Custom Controls (Shooting)” and g2 “Custom Controls”
New Roles Available via Custom Setting f2
“Custom Controls (Shooting)”
Item Description
K
[Switch FX/DX]
Press the control to switch to [DX (24×16)]
when [FX (36×24)] is chosen for image area.
Pressing the control when an option other
than [FX (36×24)] is chosen for image area
selects [FX (36×24)].
a
[Photo flicker
reduction]
Press the control to switch the option selected
for [Photo flicker reduction] in the photo
shooting menu from [ON] to [OFF] or vice
versa.
L
[Override other
cameras]
Press the control to remotely take over the
master camera role from another camera
functioning as a master camera commanding
remote cameras during synchronized release.
•
This option takes effect when multiple
cameras in the same group have been
designated as masters using [Connect to
other cameras] in the network menu.
•
It cannot be used to promote cameras
functioning in the remote role to the role of
master camera.
M
[Cycle live view
info display]
Press the control to cycle the shooting display.
The type and content of the displays available
can be chosen using Custom Settings d18
[Custom monitor shooting display] and d19
[Custom viewfinder shooting display].
m
[View mode
(photo Lv)]
Press the control to switch the option selected
for Custom Setting d9 [View mode (photo Lv)]
from [Show effects of settings] to [Adjust for
ease of viewing] or vice versa.