
Reference Guide (PDF Edition)
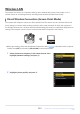
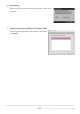
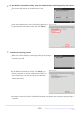
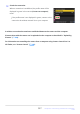
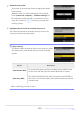
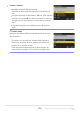
Table Of Contents
- Table of Contents
- Introduction
- Getting to Know the Camera and Its Menus
- First Steps
- Basic Photography and Playback
- Shooting Settings
- Video Recording
- Viewing and Retouching Pictures
- Voice Memos
- Connecting to HDMI TVs and Recorders
- Connecting to Smart Devices
- Connecting to Computers or FTP Servers
- Making the Connection
- Computers: Connecting via USB
- Computers: Connecting via Ethernet or Wireless LAN
- FTP Servers: Connecting via Ethernet or Wireless LAN
- Troubleshooting Wireless LAN and Ethernet Connections
- Connecting to Other Cameras
- Flash Photography
- Remote Flash Photography
- The Photo Shooting Menu: Shooting Options
- The Photo Shooting Menu
- Shooting Menu Bank
- Extended Menu Banks
- Storage Folder
- File Naming
- Role Played by Card in Slot 2
- Image Area
- Image Quality
- Image Size Settings
- RAW Recording
- ISO Sensitivity Settings
- White Balance
- Set Picture Control
- Manage Picture Control
- Color Space
- Active D-Lighting
- Long Exposure NR
- High ISO NR
- Vignette Control
- Diffraction Compensation
- Auto Distortion Control
- Photo Flicker Reduction
- High-Frequency Flicker Reduction
- Metering
- Flash Control
- Focus Mode
- AF-Area Mode
- AF Subject Detection Options
- Vibration Reduction
- Auto Bracketing
- Multiple Exposure
- HDR Overlay
- Interval Timer Shooting
- Time-Lapse Video
- Focus Shift Shooting
- The Video Recording Menu: Video Recording Options
- Video Recording Menu
- Shooting Menu Bank
- Extended Menu Banks
- Storage Folder
- File Naming
- Destination
- Video File Type
- Frame Size/Frame Rate
- Video Quality (N-RAW)
- Image Area
- Extended Oversampling
- ISO Sensitivity Settings
- White Balance
- Set Picture Control
- Manage Picture Control
- HLG Quality
- Active D-Lighting
- High ISO NR
- Vignette Control
- Diffraction Compensation
- Auto Distortion Control
- Video Flicker Reduction
- High-Frequency Flicker Reduction
- Metering
- Focus Mode
- AF-Area Mode
- AF Subject Detection Options
- Vibration Reduction
- Electronic VR
- Microphone Sensitivity
- Attenuator
- Frequency Response
- Wind Noise Reduction
- Mic Jack Plug-in Power
- Headphone Volume
- Timecode
- External Rec. Cntrl (HDMI)
- Hi-Res Zoom
- Custom Settings: Fine-Tuning Camera Settings
- Custom Settings Menu
- Custom Settings Bank
- a1: AF-C Priority Selection
- a2: AF-S Priority Selection
- a3: Focus Tracking with Lock-On
- a4: Focus Points Used
- a5: Store Points by Orientation
- a6: AF Activation
- a7: Focus Point Persistence
- a8: Limit AF-Area Mode Selection
- a9: Focus Mode Restrictions
- a10: Focus Point Wrap-Around
- a11: Focus Point Display
- a12: Built-in AF-Assist Illuminator
- a13: Focus Peaking
- a14: Focus Point Selection Speed
- a15: Manual Focus Ring in AF Mode
- b1: ISO sensitivity Step Value
- b2: EV Steps for Exposure Cntrl
- b3: Easy Exposure Compensation
- b4: Matrix Metering Face Detection
- b5: Center-Weighted Area
- b6: Fine-Tune Optimal Exposure
- b7: Keep Exp. When f/ Changes
- c1: Shutter-Release Button AE-L
- c2: Self-Timer
- c3: Power Off Delay
- d1: Continuous Shooting Speed
- d2: Maximum Shots per Burst
- d3: Limit Release Mode Selection
- d4: Pre-Release Capture Options
- d5: Sync. Release Mode Options
- d6: Extended Shutter Speeds (M)
- d7: Limit Selectable Image Area
- d8: File Number Sequence
- d9: View Mode (Photo Lv)
- d10: Starlight View (Photo Lv)
- d11: Warm Display Colors
- d12: LCD Illumination
- d13: View All in Continuous Mode
- d14: Release Timing Indicator
- d15: Image Frame
- d16: Grid Type
- d17: Virtual Horizon Type
- d18: Custom Monitor Shooting Display
- d19: Custom Viewfinder Shooting Display
- d20 High FPS Viewfinder Display
- e1: Flash Sync Speed
- e2: Flash Shutter Speed
- e3: Exposure Comp. for Flash
- e4: Auto Flash ISO Sensitivity Control
- e5: Modeling Flash
- e6: Auto Bracketing (Mode M)
- e7: Bracketing Order
- e8: Flash Burst Priority
- f1: Customize i Menu
- f2: Custom Controls (Shooting)
- f3: Custom Controls (Playback)
- f4: Control Lock
- f5: Reverse Dial Rotation
- f6: Release Button to Use Dial
- f7: Reverse Indicators
- f8: Reverse Ring for Focus
- f9: Focus Ring Rotation Range
- f10: Control Ring Response
- f11: Switch Focus/Control Ring Roles
- f12: Full-Frame Playback Flicks
- f13: Prefer Sub-selector Center
- g1: Customize i Menu
- g2: Custom Controls
- g3: Control Lock
- g4: Limit AF-Area Mode Selection
- g5: Focus Mode Restrictions
- g6: AF Speed
- g7: AF Tracking Sensitivity
- g8: Hi-Res Zoom Speed
- g9: Fine ISO Control (Mode M)
- g10: Extended Shutter Speeds (Mode M)
- g11: View Assist
- g12: Zebra Pattern
- g13: Limit Zebra Pattern Tone Range
- g14: Grid Type
- g15: Brightness Information Display
- g16: Custom Monitor Shooting Display
- g17: Custom Viewfinder Shooting Display
- g18: Red REC Frame Indicator
- The Playback Menu: Managing Pictures
- The Setup Menu: Camera Setup
- Setup Menu
- Format Memory Card
- Language
- Time Zone and Date
- Monitor Brightness
- Monitor Color Balance
- Viewfinder Brightness
- Viewfinder Color Balance
- Finder Display Size (Photo Lv)
- Limit Monitor Mode Selection
- Auto Rotate Info Display
- AF Fine-Tuning Options
- Non-CPU Lens Data
- Save Focus Position
- Auto Temperature Cutout
- Sensor Shield Behavior at Power Off
- Clean Image Sensor
- Image Dust Off Ref Photo
- Pixel Mapping
- Image Comment
- Copyright Information
- IPTC
- Voice Memo Options
- Camera Sounds
- Silent Mode
- Touch Controls
- HDMI
- USB Connection Priority
- Location Data (Built-In)
- Wireless Remote (WR) Options
- Assign Remote (WR) Fn Button
- Conformity Marking
- Battery Info
- USB Power Delivery
- Energy Saving (Photo Mode)
- Slot Empty Release Lock
- Save/Load Menu Settings
- Reset All Settings
- Firmware Version
- The Network Menu: Network Connections
- My Menu/Recent Settings
- Troubleshooting
- Technical Notes
- Compatible Lenses and Accessories
- Camera Displays
- Compatible Flash Units
- Compatible Accessories
- Software
- Caring for the Camera
- Caring for the Camera and Battery: Cautions
- Specifications
- Approved Memory Cards
- Memory Card Capacity
- Battery Endurance
- Trademarks and Licenses
- Cautions: Location Data (GPS/GLONASS)
- Notices
- Bluetooth and Wi-Fi (Wireless LAN)
- Changes with “C” Firmware Version 4.00
- Features Available with “C” Firmware Version 4.00
- Changes Made with “C” Firmware Version 4.00
- New Bracketing Increments
- More Time for Pre-Release Capture
- New Large Size Option for JPEG + JPEG Recording
- New Menu Item: “Auto Capture”
- Low ISO Sensitivity Settings for N-Log Video
- New Options for Hi-Res Zoom Speed
- New: Slow-Motion Videos
- Changes to i-Menu “Select for Upload” Options
- "Priority Upload" Options Added to i Menu
- Support for Power Zoom
- New Custom Setting: d6 “Exposure Delay Mode”
- New Options for Custom Settings f2 “Custom Controls (Shooting)” and g2 “Custom Controls”
- New Options for Custom Setting f3: “Custom Controls (Playback)”
- Updates to “Non-CPU Lens Data”
- Increased Character Limit for IPTC “Category” Entries
- New Shutter Sound and Volume Options
- Support for “Viewfinder Display Size” Selection in Video Mode
- Updated Distance Display for Manual Focus
- Changes and Additions to “Connect to FTP Server”
- Changes to Synchronized Release
- New “Overwrite Copyright Info” Option for Master Cameras
- Menu Items and Defaults for “C” Firmware Version 4.00
- Post-Upgrade Specifications for “C” Firmware Version 4.00
- Changes with “C” Firmware Version 4.10
- Index

Name the new profile.
To proceed t
o the next step without changing the default
name, press X.
Whatever name you choose will appear in the network
menu [Connect to computer]> [Network settings] list.
To rename the profile, press J. For information on text
entry, see “Text Entry” (
0 71). Press X to proceed after
entering a name.
Highlight [Search for Wi-Fi network] and press J.
The camera will search for networks currently active in the
vicinity and list them by name (SSID).
To connect without entering an SSID or encryption key, press
X in Step 4. Next, pr
ess J and choose from the following
options:
D [Easy Connect]
Option Description
[Push-butt
on WPS
]
For rout
ers that support push-button WPS. Press the WPS button
on the r
out
er and then pr
ess the camera J button to connect.
[PIN-entry WPS]
The camera will display a PIN. Using a computer, enter the PIN on
the router. For more information, see the documentation provided
with the router.
After connecting, proceed to Step 7.
329
Computers: Connecting via Ethernet or Wireless
LAN
3
4