
Reference Guide (PDF Edition)
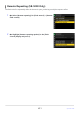
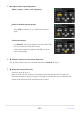
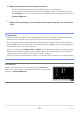
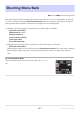
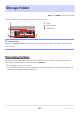
Table Of Contents
- Table of Contents
- Introduction
- Getting to Know the Camera and Its Menus
- First Steps
- Basic Photography and Playback
- Shooting Settings
- Video Recording
- Viewing and Retouching Pictures
- Voice Memos
- Connecting to HDMI TVs and Recorders
- Connecting to Smart Devices
- Connecting to Computers or FTP Servers
- Making the Connection
- Computers: Connecting via USB
- Computers: Connecting via Ethernet or Wireless LAN
- FTP Servers: Connecting via Ethernet or Wireless LAN
- Troubleshooting Wireless LAN and Ethernet Connections
- Connecting to Other Cameras
- Flash Photography
- Remote Flash Photography
- The Photo Shooting Menu: Shooting Options
- The Photo Shooting Menu
- Shooting Menu Bank
- Extended Menu Banks
- Storage Folder
- File Naming
- Role Played by Card in Slot 2
- Image Area
- Image Quality
- Image Size Settings
- RAW Recording
- ISO Sensitivity Settings
- White Balance
- Set Picture Control
- Manage Picture Control
- Color Space
- Active D-Lighting
- Long Exposure NR
- High ISO NR
- Vignette Control
- Diffraction Compensation
- Auto Distortion Control
- Photo Flicker Reduction
- High-Frequency Flicker Reduction
- Metering
- Flash Control
- Focus Mode
- AF-Area Mode
- AF Subject Detection Options
- Vibration Reduction
- Auto Bracketing
- Multiple Exposure
- HDR Overlay
- Interval Timer Shooting
- Time-Lapse Video
- Focus Shift Shooting
- The Video Recording Menu: Video Recording Options
- Video Recording Menu
- Shooting Menu Bank
- Extended Menu Banks
- Storage Folder
- File Naming
- Destination
- Video File Type
- Frame Size/Frame Rate
- Video Quality (N-RAW)
- Image Area
- Extended Oversampling
- ISO Sensitivity Settings
- White Balance
- Set Picture Control
- Manage Picture Control
- HLG Quality
- Active D-Lighting
- High ISO NR
- Vignette Control
- Diffraction Compensation
- Auto Distortion Control
- Video Flicker Reduction
- High-Frequency Flicker Reduction
- Metering
- Focus Mode
- AF-Area Mode
- AF Subject Detection Options
- Vibration Reduction
- Electronic VR
- Microphone Sensitivity
- Attenuator
- Frequency Response
- Wind Noise Reduction
- Mic Jack Plug-in Power
- Headphone Volume
- Timecode
- External Rec. Cntrl (HDMI)
- Hi-Res Zoom
- Custom Settings: Fine-Tuning Camera Settings
- Custom Settings Menu
- Custom Settings Bank
- a1: AF-C Priority Selection
- a2: AF-S Priority Selection
- a3: Focus Tracking with Lock-On
- a4: Focus Points Used
- a5: Store Points by Orientation
- a6: AF Activation
- a7: Focus Point Persistence
- a8: Limit AF-Area Mode Selection
- a9: Focus Mode Restrictions
- a10: Focus Point Wrap-Around
- a11: Focus Point Display
- a12: Built-in AF-Assist Illuminator
- a13: Focus Peaking
- a14: Focus Point Selection Speed
- a15: Manual Focus Ring in AF Mode
- b1: ISO sensitivity Step Value
- b2: EV Steps for Exposure Cntrl
- b3: Easy Exposure Compensation
- b4: Matrix Metering Face Detection
- b5: Center-Weighted Area
- b6: Fine-Tune Optimal Exposure
- b7: Keep Exp. When f/ Changes
- c1: Shutter-Release Button AE-L
- c2: Self-Timer
- c3: Power Off Delay
- d1: Continuous Shooting Speed
- d2: Maximum Shots per Burst
- d3: Limit Release Mode Selection
- d4: Pre-Release Capture Options
- d5: Sync. Release Mode Options
- d6: Extended Shutter Speeds (M)
- d7: Limit Selectable Image Area
- d8: File Number Sequence
- d9: View Mode (Photo Lv)
- d10: Starlight View (Photo Lv)
- d11: Warm Display Colors
- d12: LCD Illumination
- d13: View All in Continuous Mode
- d14: Release Timing Indicator
- d15: Image Frame
- d16: Grid Type
- d17: Virtual Horizon Type
- d18: Custom Monitor Shooting Display
- d19: Custom Viewfinder Shooting Display
- d20 High FPS Viewfinder Display
- e1: Flash Sync Speed
- e2: Flash Shutter Speed
- e3: Exposure Comp. for Flash
- e4: Auto Flash ISO Sensitivity Control
- e5: Modeling Flash
- e6: Auto Bracketing (Mode M)
- e7: Bracketing Order
- e8: Flash Burst Priority
- f1: Customize i Menu
- f2: Custom Controls (Shooting)
- f3: Custom Controls (Playback)
- f4: Control Lock
- f5: Reverse Dial Rotation
- f6: Release Button to Use Dial
- f7: Reverse Indicators
- f8: Reverse Ring for Focus
- f9: Focus Ring Rotation Range
- f10: Control Ring Response
- f11: Switch Focus/Control Ring Roles
- f12: Full-Frame Playback Flicks
- f13: Prefer Sub-selector Center
- g1: Customize i Menu
- g2: Custom Controls
- g3: Control Lock
- g4: Limit AF-Area Mode Selection
- g5: Focus Mode Restrictions
- g6: AF Speed
- g7: AF Tracking Sensitivity
- g8: Hi-Res Zoom Speed
- g9: Fine ISO Control (Mode M)
- g10: Extended Shutter Speeds (Mode M)
- g11: View Assist
- g12: Zebra Pattern
- g13: Limit Zebra Pattern Tone Range
- g14: Grid Type
- g15: Brightness Information Display
- g16: Custom Monitor Shooting Display
- g17: Custom Viewfinder Shooting Display
- g18: Red REC Frame Indicator
- The Playback Menu: Managing Pictures
- The Setup Menu: Camera Setup
- Setup Menu
- Format Memory Card
- Language
- Time Zone and Date
- Monitor Brightness
- Monitor Color Balance
- Viewfinder Brightness
- Viewfinder Color Balance
- Finder Display Size (Photo Lv)
- Limit Monitor Mode Selection
- Auto Rotate Info Display
- AF Fine-Tuning Options
- Non-CPU Lens Data
- Save Focus Position
- Auto Temperature Cutout
- Sensor Shield Behavior at Power Off
- Clean Image Sensor
- Image Dust Off Ref Photo
- Pixel Mapping
- Image Comment
- Copyright Information
- IPTC
- Voice Memo Options
- Camera Sounds
- Silent Mode
- Touch Controls
- HDMI
- USB Connection Priority
- Location Data (Built-In)
- Wireless Remote (WR) Options
- Assign Remote (WR) Fn Button
- Conformity Marking
- Battery Info
- USB Power Delivery
- Energy Saving (Photo Mode)
- Slot Empty Release Lock
- Save/Load Menu Settings
- Reset All Settings
- Firmware Version
- The Network Menu: Network Connections
- My Menu/Recent Settings
- Troubleshooting
- Technical Notes
- Compatible Lenses and Accessories
- Camera Displays
- Compatible Flash Units
- Compatible Accessories
- Software
- Caring for the Camera
- Caring for the Camera and Battery: Cautions
- Specifications
- Approved Memory Cards
- Memory Card Capacity
- Battery Endurance
- Trademarks and Licenses
- Cautions: Location Data (GPS/GLONASS)
- Notices
- Bluetooth and Wi-Fi (Wireless LAN)
- Index

Remote repeating options can be viewed using the [Flash info]
it
em in the
i
menu, which can be added to the menu using Custom
Setting f1 [Customize i menu].
C/f: Compose the shot and arrange the flash units.
See the documentation provided with the flash units for mor
e information.
Test-fire the units and confirm that they are functioning normally. To test-fire the units, use
the [Test flash] item in the i menu,which can be added to the menu using Custom Setting f1
[Customize i menu].
C/f: Take the photograph after confirming that the flash-ready lights for all flash units
are lit.
D Optical AWL
Position the sensor windows on the remote flash units to pick up the light from the master flash.
Particular care is required if the master flash is mounted on a hand-held camera.
Be sure that direct light or strong reflections from the remote flash units do not enter the camera
lens (in [TTL] mode) or the photocells on the remote flash units ([qA] mode). Otherwise light from
the flash units may interfere with exposure.
Even if [--] is selected for [Master flash] > [Mode], the master flash may emit low-intensity timing
flashes. These flashes may appear in photographs taken at short range. This can be prevented by
choosing low ISO sensitivities or small apertures (high f-numbers).
After positioning the remote flash units, take a test shot and view the results in the camera display.
Tip: Flash Info
433
Optical AWL
6
7