Professional Setting Guide —Video Edition— Revision 2.
Table of Contents Getting Ready The Video Recording Workflow...... 4 Frequently-Used Controls............... 7 The Video Recording Display.......... 9 ● The Shooting Display...........................................9 ● The Information Display: Video Mode......... 10 Settings Accessing Video Settings.............. 14 ● The i-Button Menu............................................ 14 ● Video-Related Controls..................................... 15 ● The Video Recording Menu.............................
Table of Contents Auto Capture.................................. 56 HDMI Output.................................. 77 ● Auto Capture........................................................ 56 Controls and Displays.................... 57 ● Timecode............................................................... 57 ● Hi-Res Zoom......................................................... 59 ● Power Zoom.......................................................... 60 ● Reverse Ring for Focus.........................
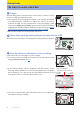
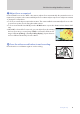
Getting Ready The Video Recording Workflow 1 Prepare. Before making videos, learn the names and locations of camera controls and insert a battery and memory card. ● The supplied EH‑7P charging AC adapter or an optional AC adapter is recommended for extended recording. The camera can also be powered via USB. For more information, see the description of the setup menu [USB power delivery] option in the Z 9 Reference Guide, available from the Nikon Download Center’s Z 9 product page (https:// downloadcenter.
The Video Recording Workflow, Continued 4 Adjust focus as required. In the default focus mode—AF-F—the camera adjusts focus automatically. No particular action is required on your part, as the camera will adjust focus continuously in response to subject movement or changes in composition. ● To focus on a new subject, tap it in the monitor. The camera will also automatically refocus on subjects in focus points chosen using the multi selector.
The Video Recording Workflow, Continued Using Other Controls for Video Recording • You can start and end video recording using a control that has been assigned [Record videos] via Custom Setting g2 [Custom controls]. [Record videos] can be assigned to controls other than [Command dials] and [Lens control ring] (0 65).
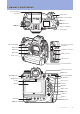
Frequently-Used Controls Stereo microphone (for videos) Power switch Shutter-release button E button S (Q) button I button Video-record button Control panel Sub-command dial Fn1 button Fn2 button Fn3 button Connector for external microphone Headphone connector HDMI connector Image sensor USB connector Focus-mode button Photo/video selector DISP button g (Fn4) button O (Q) button Main command dial AF-ON button Speaker Sub-selector Monitor i button J button Multi selector G button K button X butt
Frequently-Used Controls , Continued Dust on the Image Sensor Dust on the image sensor can greatly complicate the post-production process, particularly when it comes to video. For this reason, we recommend that, before exchanging lenses or the like, you configure the sensor shield to close when the camera is turned off. This can be accomplished by selecting [Sensor shield closes] for [Sensor shield behavior at power off] in the setup menu. • Camera startup times may increase.
The Video Recording Display Exposure for videos and photos shot in video mode can be previewed in the monitor and viewfinder. The explanation that follows concentrates mostly on the monitor. The Shooting Display The following are displayed in the monitor in video mode: q w e r t y u !4 !3 !2 !1 q Recording indicator w External recording control e !0 r o i t y u i o !0 !1 !2 !3 !4 Indicates that recording is in progress.
The Video Recording Display, Continued The Information Display: Video Mode Press the DISP button to choose the information displayed in video mode. The type and content of the displays available vary with the options chosen for Custom Settings g18 [Custom monitor shooting display] and g19 [Custom viewfinder shooting display] (0 72). Display 1 Display 2 Display 4 Display 3 ! Temperature Warnings • If the camera temperature becomes elevated, a temperature warning and count-down timer will be displayed.
The Video Recording Display, Continued ■ Customizing the Displays The indicators shown in the displays can be chosen using Custom Settings g18 [Custom monitor shooting display] and g19 [Custom viewfinder shooting display]. For more information, see “Custom Shooting Displays” (0 72). The options available are listed below. A [Basic shooting info] View the shooting mode, shutter speed, aperture, and other basic shooting info.
The Video Recording Display, Continued ■ The Virtual Horizon Display The virtual horizon can be used to help level the camera. It can be used, for example, to level the camera when it is mounted on a tripod. At default settings, it can be viewed by pressing the DISP button to cycle to Display 3. ● The indicators are displayed in green when the camera is level.
The Video Recording Display, Continued ■ Quick Display Selection Controls can be assigned display-related functions using Custom Setting g2 [Custom controls]. ● b [Live view info display off]: Pressing the control hides indicators in the shooting display. Press again to view indicators. [Framing grid]: Pressing the control displays a framing grid. Press the control again to turn the display off. The display type can be selected using Custom Setting g15 [Grid type].
Settings Accessing Video Settings Video settings can be adjusted in video mode using any of the following three methods: the i button menu, video-related controls, or the video recording menu. The i-Button Menu ● To display the video i menu, rotate the photo/video selector to 1 and either press the i button or tap the i icon. Option [Set Picture Control] Control] [White balance] balance] [Frame size/frame rate] rate] [Microphone sensitivity] sensitivity] [AF-area mode/subj.
Accessing Video Settings, Continued Video-Related Controls The following controls can be used for video recording: Control I button E button S button Fn2 button Focus-mode button g ((Fn4 Fn4)) button b button U button Setting Shooting mode Exposure compensation ISO sensitivity Image area Focus and AF-area mode Picture Control Microphone sensitivity White balance 0 0 38 0 39 0 25 0 24 0 43, 44 0 30 0 53 0 27 ■ Custom Controls The following controls can be assigned video-related functions using Custom Se
Accessing Video Settings, Continued The Video Recording Menu The video recording menu can be displayed by pressing the G button and selecting the 1 tab.
Storage Choose a memory card and format for video recording. Destination To choose the slot used for video recording when two memory cards are inserted: 1 With the camera in video mode, press the i button and then highlight [Destination] and press J. ●Options will be displayed. ●You can also select an option using the command dials before pressing the J button. 2 Press 4 or 2 to highlight the desired option and press J to select. ●The menu shows the time available on each card.
Storage, Continued Video File Type i-button menu Camera controls Other menus Choose the video encoding and file type. — — 4 The selection can be made using [Video file type] in the video recording menu. You have a choice of NEV, MOV, and MP4 formats. Option Description This option assumes the footage will later undergo RAW processing [N‑RAW 12‑bit (NEV)] and editing using a professional high-performance computer system of the type typically employed for editing video.
Storage, Continued ■ RAW Video The following restrictions apply when [N‑RAW 12‑bit (NEV)] or [ProRes RAW HQ 12‑bit (MOV)] is selected for [Video file type] in the video recording menu. ● ISO sensitivities of Hi 0.3 through Hi 2.0 are not available. ● [Active D-Lighting], [High ISO NR], [Diffraction compensation], and [Electronic VR] are not available in the video recording menu.
Picture Quality The settings covered in this section control video picture quality. Frame Size/Frame Rate Choose the video frame size (in pixels) and frame rate. ■ Choosing a Frame Size and Frame Rate 1 With the camera in video mode, press the i button and then highlight [Frame size/frame rate] and press J. ●Options will be displayed. ●The options available for frame size vary with the settings chosen for [Video file type] in the video recording menu. See the table below for more information.
Picture Quality, Continued ■ Frame Size and Rate Options for RAW Video Consult the table below for information on the [Frame size/frame rate] options available when [N‑RAW 12‑bit (NEV)] or [ProRes RAW HQ 12‑bit (MOV)] is selected.
Picture Quality, Continued ■ Frame Size and Rate Options for Other Video Formats Consult the table below for information on the [Frame size/frame rate] options available when [ProRes 422 HQ 10‑bit (MOV)], [H.265 10‑bit (MOV)], [H.265 8‑bit (MOV)], or [H.264 8‑bit (MP4)] is selected.
Picture Quality, Continued Video Quality (N‑RAW) Choose a video quality option when filming footage with [N‑RAW 12‑bit (NEV)] selected for [Video file type] in the video recording menu. i-button menu Camera controls Other menus — — 4 Settings can be adjusted using [Video quality (N‑RAW)] in the video recording menu. Choose from [High quality] and [Normal]. “High Quality” Versus “Normal” • [High quality] features a bit rate approximately 1.6 to 2 times higher than [Normal], resulting in larger files.
Picture Quality, Continued Choose Image Area Choose the image area. Select [FX] to shoot videos in what is referred to as “FX-based video format”, [DX] to shoot in “DX-based video format”. i-button menu Camera controls Other menus 4 4 4 ■ Video Image Area Options The illustration shows the crops used for filming videos. Regardless of the option selected, the aspect ratio is 16:9. ● Select [FX] to shoot videos in what is referred to as “FX-based video format”, [DX] to shoot in “DX-based video format”.
Picture Quality, Continued Extended Oversampling Selecting [ON] optimizes image readout for improved image quality when [3840×2160; 60p] or [3840×2160; 50p] is chosen for [Frame size/ frame rate] in the video recording menu. i-button menu Camera controls Other menus — — i-button menu Camera controls Other menus 4 4 4 4 Settings can be adjusted using [Extended oversampling] in the video recording menu. ● Note that the drain on the battery increases when [ON] is selected.
Picture Quality, Continued ■ Maximum Sensitivity ● To prevent auto ISO sensitivity control setting ISO sensitivity too high, you can use the [ISO sensitivity settings] > [Maximum sensitivity] option in the video recording menu to select an upper limit from values between ISO 200 and Hi 2.0. ● The maximum ISO sensitivity for videos recorded with [ON] selected for [Electronic VR] in the video recording menu is ISO 25600.
Picture Quality, Continued White Balance Adjust white balance according to lighting conditions. ■ Adjusting White Balance the U button and rotate the main command dial. The effect of the chosen setting can be previewed in the shooting display. ● When v (auto) or I (fluorescent) is selected, you can choose an v (auto) or I sub-option by holding the U button and rotating the sub-command dial.
Picture Quality, Continued ■ “Auto” and “Natural Light Auto”: Locking Auto White Balance You can temporarily lock auto white balance when shooting in [Auto] and [Natural light auto] modes. This can, for example, be used to prevent colors changing when you zoom in on subjects wearing reds, greens, or other bright colors. White balance in close shot is adjusted to reflect colors of objects visible in frame, potentially lending shot a color cast.
Picture Quality, Continued ■ Measuring a New Value for Preset Manual White Balance Use preset manual white balance to measure a custom white balance value for the current light source and save it for later recall. 1 Hold the U button and rotate the main command dial to select L. 2 Hold the U button and rotate the sub-command dial until the destination preset is displayed. ●Choose from presets d-1 through d-6. 3 Release the U button briefly and then press it again to select direct measurement mode.
Picture Quality, Continued Picture Controls Choose a Picture Control according to the subject or type of scene. Choose [Same as photo settings] to use the option currently selected for photos. [Flat] preserves details over a wide tone range, from highlights to shadows, making it a good choice for footage that will be tweaked in post-production. Combining this option with highlight-weighted metering minimizes loss of detail in highlights.
Picture Quality, Continued ■ Modifying Picture Controls from the i Menu [Set Picture Control] in the i menu and pressing J displays a Picture Control list. To modify a Picture Control while previewing the effects in the shooting display, highlight it in the Picture Control list and press 3. ● Press 1 or 3 to highlight settings. Press 4 or 2 to choose a value in increments of 1, or rotate the sub-command dial to choose a value in increments of 0.25.
Picture Quality, Continued The [n Auto] Picture Control Settings can be adjusted in the range [A−2] to [A+2]. [A] (Auto) • Selecting the A (auto) option available for some settings lets the camera adjust the setting automatically. • Results vary with exposure and the position of the subject in the frame. The o Indicator The o indicator under the value display in the Picture Control setting menu indicates the previous value for the setting.
Picture Quality, Continued HLG Quality Adjust HLG video image processing options for use when [HLG] is chosen for tone mode. i-button menu Camera controls Other menus 4 — 4 HLG quality can be adjusted using [HLG quality] in the video recording menu. ■ HLG Quality Settings [Quick sharp] Manual adjustments [Sharpening] [Mid-range sharpening] [Clarity] [Contrast] [Saturation] [Hue] Use [Quick sharp] to quickly adjust levels for balanced [Sharpening], [Mid-range sharpening], and [Clarity].
Picture Quality, Continued Vignette Control Vignette control reduces “vignetting”—a drop in brightness at the edges of the frame—by an amount that varies from lens to lens. Its effects are most noticeable at maximum aperture. i-button menu Camera controls Other menus — — i-button menu Camera controls Other menus — — i-button menu Camera controls Other menus — — 4 [Vignette control] is available in both the photo shooting and video recording menus. Changes to one apply to the other.
Picture Quality, Continued Skin Softening Pictures taken when the face of a human portrait subject is detected will automatically be processed to soften the subject’s complexion. i-button menu Camera controls Other menus 4 4 4 i-button menu Camera controls Other menus 4 4 4 [Skin softening] is available in both the photo shooting and video recording menus. ● To perform skin softening, select [High], [Normal], or [Low].
Picture Quality, Continued Vibration Reduction Choose whether to enable vibration reduction. i-button menu Camera controls Other menus 4 — 4 ■ Choosing a Vibration Reduction Option 1 With the camera in video mode, press the i button and then highlight [Vibration reduction] and press J. ●Options will be displayed. ●The options available vary with the lens. See the table below for more information. ●Select [Same as photo settings] to use the option currently selected for photos.
Picture Quality, Continued Electronic VR Choose whether to enable electronic vibration reduction in video mode. 1 With the camera in video mode, press the i button and then highlight [Electronic VR] and press J. ●Options will be displayed. ●You can also select an option using the command dials before pressing the J button. 2 Press 4 or 2 to highlight the desired option and press J to select. ●To exit to the shooting display, press the i button again.
Exposure This section is devoted to settings that affect exposure. Shooting Mode To choose a shooting mode, hold the I button and rotate the main command dial. i-button menu Camera controls Other menus — 4 — ● The selected option is shown in the shooting display and control panel. I button ● If the image in the display seems over- or under-exposed in mode P or S, switch to mode A and adjust aperture until the desired result is achieved.
Exposure, Continued Exposure Compensation Exposure compensation is used to alter exposure from the value suggested by the camera. It can be used to make pictures brighter or darker. 4 4 i-button menu Camera controls Other menus — Hold the E button and rotate a command dial. E button ● E icons appear in the shooting display and control panel. The current value is shown in the control panel. It can also be viewed in the shooting display by pressing the E button.
Exposure, Continued Active D-Lighting Preserve details in highlights and shadows, creating pictures with natural contrast. Use for high-contrast scenes, for example when photographing brightly-lit outdoor scenery through a door or window or taking pictures of shaded subjects on a sunny day. i-button menu Camera controls Other menus 4 4 4 Settings can be adjusted using [Active D-Lighting] in the video recording menu. ● The option currently selected is shown in the display during shooting.
Exposure, Continued High-Frequency Flicker Reduction You can adjust shutter speeds in smaller increments in mode M. Shutter speeds that keep flicker to a minimum can be found by viewing the preview in the shooting display. i-button menu Camera controls Other menus — 4 4 Settings can be adjusted using [High-frequency flicker reduction] in the video recording menu. ● Selecting [On (shutter speed fine-tuning)] allows shutter speeds between 1/8000 and 1/30 s to be adjusted in smaller increments in mode M.
Exposure, Continued Metering Metering determines how the camera sets exposure. i-button menu Camera controls Other menus 4 4 4 Settings can be adjusted using [Metering] in the video recording menu. ● The option currently selected is shown in the shooting display. ■ Metering Options The camera meters a wide area of the frame and sets exposure according to tone distribution, color, composition, and distance for results close to those seen by the naked eye.
Focus This section covers the focus settings used when recording videos. Focus Mode Choose how the camera focuses. ■ Choosing a Focus Mode Hold the focus-mode button and rotate the main command dial. i-button menu Camera controls Other menus 4 4 4 Focus-mode button ● The option currently selected is shown in the shooting display and control panel. ■ Focus Mode Options AF-S [Single AF] AF-C [Continuous AF] AF-F [Full-time AF] MF [Manual focus] Use with stationary subjects.
Focus, Continued AF-Area Mode Choose how the camera selects the focus point for autofocus. ■ Choosing an AF-Area Mode i-button menu Camera controls Other menus 4 4 4 Hold the focus-mode button and rotate the sub-command dial. Focus-mode button ● The option currently selected is shown in the shooting display and control panel. ■ AF-Area Mode Options d [Single-point AF] The camera will focus on the subject in the selected focus point only.
Focus, Continued AF Subject Detection Options Choose the type of subject to which the camera gives priority when focusing using autofocus. i-button menu Camera controls Other menus 4 — 4 ■ Choosing a Subject Detection Option 1 With the camera in video mode, press the i button and then highlight [AF-area mode/subj. detection] and press J. ●Options will be displayed. ●You can also select an option using the sub-command dial before pressing the J button.
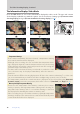
Focus, Continued ■ Subject Detection Options [People] Human faces detected by the camera are identified by a border indicating the focus point. If the camera detects the subject’s eyes, the focus point will instead appear over one or the other of their eyes (face/eye-detection AF). If the subject looks away after their face is detected, the focus point will move to track their motion.
Focus, Continued Caution: Face/Eye-Detection AF Face/eye detection may not perform as expected if: • the subject’s face is too large or small relative to the frame, • the subject’s face is too brightly or dimly lit, • the subject is wearing glasses or sunglasses, • the subject’s face or eyes are obscured by hair or other objects, or • the subject moves excessively during shooting.
Focus, Continued Cautions: Subject Detection Using “Airplanes” • Subject detection may not perform as expected with subjects that are: − too large or small relative to the frame, − too bright or too dark, − partially hidden, − similar in color to surrounding objects, or − moving excessively. • The camera may fail to detect airplanes of some shapes and colors. Alternatively, it may display a border around subjects that are not airplanes.
Focus, Continued Focus Point Display Choose focus point display options. i-button menu Camera controls Other menus — — 4 Settings can be adjusted using Custom Setting a11 [Focus point display]. ■ Manual Focus Mode Choose whether the focus point is displayed at all times in manual focus mode. ● [ON]: The focus point is displayed at all times in manual focus mode. ● [OFF]: The focus point is displayed only during focus point selection.
Focus, Continued Focus Peaking When focus peaking is enabled in manual focus mode, objects that are in focus are indicated by colored outlines in the display. 4 4 4 i-button menu Camera controls Other menus Settings can be adjusted using Custom Setting a13 [Focus peaking] > [Focus peaking display]. ■ Focus Peaking Display Select [ON] to enable focus peaking. This helps when it comes to determining what portions of the frame are currently in focus.
Focus, Continued Limit AF-Area Mode Selection Choose the AF-area modes that can be selected by pressing the focus-mode button and rotating the sub-command dial. i-button menu Camera controls Other menus — — i-button menu Camera controls Other menus — — i-button menu Camera controls Other menus — — 4 Settings can be adjusted using Custom Setting g4 [Limit AF-area mode selection]. ● Only modes marked with a check (M) can be selected by pressing the focus-mode button and rotating the sub-command dial.
Focus, Continued Lens Sounds The sound produced by the lens during focus operations increases with AF speed. The effect is particularly noticeable at a setting of [+5], so choose lower values if you find the noise distracting. “AF-ON” and “Fast AF-ON” Among the roles that can be assigned using Custom Setting g2 [Custom controls] are [AF‑ON] and [Fast AF‑ON] (0 65).
Audio Read this section for information on adjusting audio settings when recording sound with videos. Microphone Sensitivity Turn the built-in or external microphones on or off or adjust microphone sensitivity. i-button menu Camera controls Other menus 4 4 4 Microphone sensitivity can be adjusted by holding the b button and rotating a command dial. ● Choose a setting between 1 and 20. The higher the value, the higher the sensitivity; the lower the value, the lower the sensitivity.
Audio, Continued Attenuator Enable the attenuator to reduce microphone gain and prevent audio distortion when filming in loud environments. 4 i-button menu Camera controls Other menus — i-button menu Camera controls Other menus — i-button menu Camera controls Other menus — 4 Settings can be adjusted using [Attenuator] in the video recording menu. ● Select [ON] to reduce audio distortion when recording videos.
Audio, Continued Microphone Jack Plug-in Power: Mic Jack Plug-in Power Choose whether the camera powers external microphones. i-button menu Camera controls Other menus — — 4 Settings can be adjusted using [Mic jack plug-in power] in the video recording menu. ● The camera does not provide power to external microphones when [OFF] is selected.
Auto Capture Auto capture allows photographers to record videos automatically without being present. Auto Capture The camera automatically starts video recording when it detects a sub- i-button menu ject that meets the trigger conditions. Video recording will end when Camera controls Other menus the camera no longer recognizes the subject that meets the criteria. 4 — 4 Settings can be adjusted using [Auto capture] in the video recording menu.
Controls and Displays The settings discussed in this section affect video controls and displays. Timecode To record time codes giving the hour, minute, second, and frame num- i-button menu ber for each frame when shooting videos, select [On] or [On (with HDMI Camera controls output)] for [Timecode] > [Record timecodes] in the video recording Other menus menu. Time codes help you keep track of the current playback and edit position when editing video.
Controls and Displays, Continued ■ Synchronizing Time Codes across Devices Use the [ATOMOS AirGlu BT options] item in the network menu to wirelessly connect the camera to Atomos UltraSync BLUE AirGlu accessories via Bluetooth. ● The UltraSync BLUE can be used for simultaneous wireless connections to multiple compatible cameras or audio recorders. Time codes are transmitted to the connected devices from the UltraSync BLUE, synchronizing time codes even across devices from a mix of manufacturers.
Controls and Displays, Continued Hi-Res Zoom Using Hi-Res Zoom allows you to zoom in on your subject with no loss in resolution, even without a zoom lens. i-button menu Camera controls Other menus 4 4 4 Settings can be adjusted using [Hi-Res Zoom] in the video recording menu. Select [ON] for [Hi-Res Zoom] and press 4 or 2 or tilt the sub-selector left or right to zoom in or out. ● A H icon appears in the display when Hi-Res Zoom is enabled. ● The zoom position is shown by a bar as you zoom in or out.
Controls and Displays, Continued Power Zoom In addition to using the lens zoom ring, you have the option of zooming power zoom (PZ) lenses attached to the camera in and out using camera controls (“power zoom”). i-button menu Camera controls Other menus 4 4 4 Settings can be adjusted using Custom Setting g9 [Assign power zoom buttons]. [Use x/w buttons] [Power zoom speed] ● The Selecting [ON] allows the X and W (Q) buttons to be used for power zoom.
Controls and Displays, Continued Reverse Ring for Focus Choose whether to reverse the direction of rotation for lens focus or control rings during manual focus. i-button menu Camera controls Other menus — — i-button menu Camera controls Other menus — — 4 Settings can be adjusted using Custom Setting f8 [Reverse ring for focus]. Select [ON] to reverse the ring rotation direction for manual focus. ● This setting is available when a Z mount lens is attached.
Controls and Displays, Continued Control Ring Response Choose how responsive the lens control ring is when assigned the [Aperture], [Power aperture], [Exposure compensation], or [ISO sensitivity]. i-button menu Camera controls Other menus — — i-button menu Camera controls Other menus — — 4 Settings can be adjusted using Custom Setting f10 [Control ring response]; choose from [High] and [Low]. ● The function performed by the lens control ring can be selected using Custom Setting g2 [Custom controls].
Controls and Displays, Continued ■ Items That Can Be Assigned to the i Menu The following items can be assigned to the i menu for video mode. n j J G N E 9 m h 6 y h i w s 7 u 4 [Shooting menu bank] [Select custom settings bank] [Choose image area] [Frame size/frame rate] [Destination] [Exposure compensation] [ISO sensitivity settings] [White balance] [Set Picture Control] [HLG quality] [Active D-Lighting] [Skin softening] [Portrait impression balance] [Metering] [Focus mode] [AF-area mode/subj.
Controls and Displays, Continued ■ Multi-Selector Exposure Compensation: Multi Selector Exposure Comp. Choose whether the multi selector can be used to adjust exposure compensation. Enabling this option allows exposure compensation to be adjusted using the multi selector, helping prevent the clicking sounds made by the command dials being recorded with videos. 1 Assign [Multi selector exposure comp.] to the desired position using Custom Setting g1 [Customize i menu].
Controls and Displays, Continued Custom Controls Use Custom Setting g2 [Custom controls] to choose the roles played by camera controls during filming. 1 Highlight Custom Setting g2 [Custom controls] and press J. ●A list of controls will be displayed. 2 Highlight a control and press J. 3 Highlight the desired function and press J.
Controls and Displays, Continued ■ Customizable Camera Controls You can choose the roles played by the following controls: w y 1 n S u b V 8 [Fn1 button] [Fn2 button] [Fn3 button] [Fn button for vertical shooting] [Vertical ISO sensitivity button] [Focus mode button] [Protect/Fn4 button] [AF-ON button] [Sub-selector center] D [DISP button] X p p A F q z j R Q [Audio button] [Shutter-release button] [OK button] [Command dials] G y [WB button] t [QUAL button] r [Vertical multi selector center] S [Pla
Controls and Displays, Continued 1bn� Vj� S� w y u p G y S R l XpAqz� D8F 3T RSQtr 3 [Access top item in MY MENU] K [Playback] l [Filtered playback] N [Filtered playback (select criteria)] [Power aperture (open)] t [Power aperture (close)] q [Exposure compensation +] i [Exposure compensation −] h B [ISO sensitivity (increase)] C [ISO sensitivity (decrease)] I [Hi-Res Zoom +] J [Hi-Res Zoom −] Y [Power zoom +] Z [Power zoom −] [Pattern tone range] 9 [Record videos] 1 e [Same as AF-ON button] n [Shooting men
Controls and Displays, Continued Control Lock Lock exposure settings or focus-point selection during filming. i-button menu Camera controls Other menus — 4 4 Settings can be adjusted using Custom Setting g3 [Control lock]. Select [ON] to lock shutter speed at its current value in mode M. [Shutter speed lock] • O icons appear in the shooting display and control panel when shutter-speed lock is in effect. Select [ON] to lock aperture at its current value in modes A and M.
Controls and Displays, Continued View Assist Preview the effects of the [HLG] and [N-Log] tone modes during recording using simplified colors for enhanced contrast. i-button menu Camera controls Other menus — — 4 Settings can be adjusted using Custom Setting g12 [View assist]. Select [ON] to preview the effect using simplified colors. ● Colors in the actual recorded footage are unaffected. ● Contrast is also enhanced when HLG or N-Log footage is viewed on the camera.
Controls and Displays, Continued Zebra Pattern Choose whether a zebra pattern is used to indicate selected tone ranges. i-button menu Camera controls Other menus 4 4 4 Settings can be adjusted using Custom Setting g13 [Zebra pattern]. [Pattern tone range] Choose the tone range shown by the zebra pattern. • [Highlights]: Highlights (the brightest portions of the image) are shown by a zebra pattern. Highlights can be defined using [Highlight threshold].
Controls and Displays, Continued Grid Type Choose a framing grid for video mode. i-button menu Camera controls Other menus — — i-button menu Camera controls Other menus — — 4 The grid can be selected using Custom Setting g15 [Grid type].
Controls and Displays, Continued Custom Shooting Displays Choose the shooting displays accessible by pressing the DISP button in video mode. The displays can be tailored to different conditions. Display 1 Display 2 Display 4 Display 3 i-button menu Camera controls Other menus — — 4 The monitor and viewfinder displays can be customized using Custom Settings g18 [Custom monitor shooting display] and g19 [Custom viewfinder shooting display], respectively.
Controls and Displays, Continued ■ Brightness Information Selecting (M) [Brightness information] displays brightness information. The display type can be selected using Custom Setting g16 [Brightness information display] (0 71). ■ Framing Grid Selecting (M) [Framing grid] displays a framing grid. The type of grid can be selected using Custom Setting g15 [Grid type] (0 71). ■ Center Indicator Selecting (M) [Center indicator] displays crosshairs at the center of the frame.
Controls and Displays, Continued Viewfinder Display Size Select a magnification for the viewfinder display from [Standard] and [Small]. i-button menu Camera controls Other menus — — i-button menu Camera controls Other menus — — 4 Settings can be adjusted using [Viewfinder display size] in the setup menu. ● Selecting [Small] makes it easier to see the entire subject.
Controls and Displays, Continued Monitor Mode Press the M (monitor mode) button to cycle between viewfinder and monitor displays. The choice of modes can be restricted if desired. i-button menu Camera controls Other menus — 4 — Press the M button to cycle through the displays as follows. [Automatic display switch]: The camera automatically switches between the viewfinder and monitor displays based on information from the eye sensor.
Controls and Displays, Continued Limit Monitor Mode Selection You can limit the choice of monitor modes available using the [Limit monitor mode selection] item in the setup menu. Highlight options and press J or 2 to select (M) or deselect (U). Options marked with a check (M) can be selected via the monitor mode button.
HDMI Output The camera can record video directly to connected HDMI recorders. A third-party type A HDMI cable is required. The cable HDMI connector for connection to camera must be purchased separately. Always turn the camera off before connecting or disconnecting a cable. ● If a memory card is inserted in the camera when it is connected to a recorder, video will be recorded both to the recorder and the memory card. If no memory card is inserted, the footage will be recorded only to the external device.
HDMI Output, Continued ■ When “Auto” Is Selected for Output Resolution [Auto] is selected for [HDMI] > [Output resolution] in the setup menu, the camera automatically detects whether the external recorder supports the frame size and rate selected on the camera. If it does not, the camera will search for a supported resolution and frame rate. If no supported resolution and frame rate is found, output will be suspended.
HDMI Output, Continued ■ When an Option Other Than “Auto” Is Selected for Output Resolution The signal will be output at the selected resolution.
HDMI Output, Continued ■ YCbCr and Bit Depth The YCbCr value and bit depth for footage output to external HDMI devices varies with the options selected for [Video file type] and [Frame size/frame rate] in the video recording menu. Video file type Frame size/frame rate 8256×4644 4128×2322 N-RAW 12-bit (NEV) 5392×3032 3840×2160 4128×2322 ProRes RAW HQ 12-bit (MOV) 5392×3032 3840×2160 3840×2160 ProRes 422 HQ 10-bit (MOV) 1920×1080 7680×4320 3840×2160 120p/100p H.
HDMI Output, Continued External Recording Control: External Rec. Cntrl (HDMI) Choose whether camera controls can be used to start and stop recording on the external recorder. i-button menu Camera controls Other menus — — 4 Settings can be adjusted using [External rec. cntrl (HDMI)] in the video recording menu. ● For information on whether your recorder supports external recording control, consult the manufacturer.
Viewing Videos Video Playback Video playback controls are described below. Pause Resume Rewind/advance Start slow-motion playback Jog rewind/advance Skip 10 s Skip 10 frames Skip to last or first frame Zoom in Adjust volume Edit video Exit Exit to shooting mode Press 3 to pause playback. Press the J button to resume playback when playback is paused or during rewind/advance. Press 4 to rewind, 2 to advance. Speed increases with each press, from 2× to 4× to 8× to 16×.
Video Stills Stills can be created from individual frames of videos shot with [H.265 8-bit (MOV)] or [H.264 8-bit (MP4)] selected for [Video file type] in the video recording menu. You can create a single still from the current frame or a series of stills from a selected length of footage. Creating a Still from the Current Frame 1 Display a video full frame. 2 Pause the video on the desired frame. ●Press 3 to pause playback.
Video Stills, Continued Creating Stills from Selected Footage 1 Display a video full frame. 2 Pause the video on the desired frame. ●Press 3 to pause playback. ●Your approximate position in the video can be ascertained from the video progress bar. ●Press 4 or 2 or rotate the command dials to locate the desired frame. 3 Press the i button, highlight [Save consecutive frames], and press 2. 4 Choose a destination. ●Choose the destination. ●Press 1 or 3 to highlight a card slot and press J.
Full-Frame Playback Flicks Choose the role assigned to the flick up and flick down gestures during full-frame playback. Settings can be adjusted using Custom Setting f13 [Full-frame playback flicks] > [Flick up] and [Flick down]. ■ Flick Up/Flick Down Options c [Rating] [Select for upload to computer] [Select for upload N (FTP)] g [Protect] W [Voice memo] [None] K Assign the current picture a pre-selected rating. • The rating can be chosen by pressing 2.
Filtered Playback View only pictures that meet the criteria chosen for [Filtered playback criteria]. 1 With the camera in playback mode, press the i button and then highlight [Filtered playback criteria] and press 2. ●Options will be displayed. 2 Highlight options using 1 and 3. ●Press J to select (M) or deselect (U). ●During filtered playback, only pictures that meet all the criteria selected (M) for [Filtered playback criteria] will be displayed.
Appendix Troubleshooting Image Artifacts ● You may notice the following in the shooting display during filming.