
Reference Guide (PDF Edition)
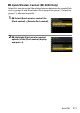
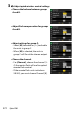
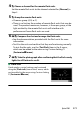
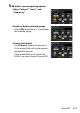
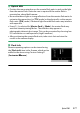
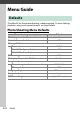
Table Of Contents
- When Your First Photo Can’t Wait
- Package Contents
- About This Document
- Table of Contents
- For Your Safety
- Notices
- Getting to Know the Camera and Its Menus
- First Steps
- Basic Photography and Playback
- Shooting Settings
- Video Recording
- Viewing and Retouching Pictures
- Voice Memos
- Connecting to HDMI TVs and Recorders
- Connecting to Smart Devices
- Connecting to Computers or FTP Servers
- Connecting to Other Cameras
- Flash Photography
- Remote Flash Photography
- Menu Guide
- Defaults
- The Photo Shooting Menu: Shooting Options
- Shooting Menu Bank
- Extended Menu Banks
- Storage Folder
- File Naming
- Role Played by Card in Slot 2
- Image Area
- Image Quality
- Image Size
- RAW Recording
- ISO Sensitivity Settings
- White Balance
- Set Picture Control
- Manage Picture Control
- Color Space
- Active D-Lighting
- Long Exposure NR
- High ISO NR
- Vignette Control
- Diffraction Compensation
- Auto Distortion Control
- Photo Flicker Reduction
- Metering
- Flash Control
- Focus Mode
- AF-Area Mode
- AF Subject Detection Options
- Vibration Reduction
- Auto Bracketing
- Multiple Exposure
- HDR Overlay
- Interval Timer Shooting
- Time-Lapse Video
- Focus Shift Shooting
- The Video Recording Menu: Video Recording Options
- Shooting Menu Bank
- Extended Menu Banks
- Storage Folder
- File Naming
- Destination
- Video File Type
- Frame Size/Frame Rate
- Video Quality (N-RAW)
- Image Area
- Extended Oversampling
- ISO Sensitivity Settings
- White Balance
- Set Picture Control
- Manage Picture Control
- HLG Quality
- Active D-Lighting
- High ISO NR
- Vignette Control
- Diffraction Compensation
- Auto Distortion Control
- Video Flicker Reduction
- Metering
- Focus Mode
- AF-Area Mode
- AF Subject Detection Options
- Vibration Reduction
- Electronic VR
- Microphone Sensitivity
- Attenuator
- Frequency Response
- Wind Noise Reduction
- Mic Jack Plug-in Power
- Headphone Volume
- Timecode
- External Rec. Cntrl (HDMI)
- Custom Settings: Fine-Tuning Camera Settings
- Custom Settings Bank
- a: Focus
- a1: AF-C Priority Selection
- a2: AF-S Priority Selection
- a3: Focus Tracking with Lock-On
- a4: Focus Points Used
- a5: Store Points by Orientation
- a6: AF Activation
- a7: Focus Point Persistence
- a8: Limit AF-Area Mode Selection
- a9: Focus Mode Restrictions
- a10: Focus Point Wrap-Around
- a11: Focus Point Display
- a12: Built-in AF-Assist Illuminator
- a13: Focus Peaking
- a14: Focus Point Selection Speed
- a15: Manual Focus Ring in AF Mode
- b: Metering/Exposure
- c: Timers/AE Lock
- d: Shooting/Display
- d1: Continuous Shooting Speed
- d2: Maximum Shots per Burst
- d3: Limit Release Mode Selection
- d4: C30/C120 Options
- d5: Sync. Release Mode Options
- d6: Extended Shutter Speeds (M)
- d7: Limit Selectable Image Area
- d8: File Number Sequence
- d9: View Mode (Photo Lv)
- d10: Starlight View (Photo Lv)
- d11: Warm Display Colors
- d12: LCD Illumination
- d13: View All in Continuous Mode
- d14: Release Timing Indicator
- d15: Image Frame
- d16: Grid Type
- d17: Virtual Horizon Type
- d18: Custom Monitor Shooting Display
- d19: Custom Viewfinder Shooting Display
- d20: High FPS Viewfinder Display
- e: Bracketing/Flash
- f: Controls
- f1: Customize i Menu
- f2: Custom Controls (Shooting)
- f3: Custom Controls (Playback)
- f4: Control Lock
- f5: Reverse Dial Rotation
- f6: Release Button to Use Dial
- f7: Reverse Indicators
- f8: Reverse Ring for Focus
- f9: Focus Ring Rotation Range
- f10: Control Ring Response
- f11: Switch Focus/Control Ring Roles
- f12: Full-Frame Playback Flicks
- f13: Prefer Sub-selector Center
- g: Video
- g1: Customize i Menu
- g2: Custom Controls
- g3: Control Lock
- g4: Limit AF-Area Mode Selection
- g5: Focus Mode Restrictions
- g6: AF Speed
- g7: AF Tracking Sensitivity
- g8: Fine ISO Control (Mode M)
- g9: Extended Shutter Speeds (Mode M)
- g10: View Assist
- g11: Zebra Pattern
- g12: Limit Zebra Pattern Tone Range
- g13: Grid Type
- g14: Brightness Information Display
- g15: Custom Monitor Shooting Display
- g16: Custom Viewfinder Shooting Display
- g17: Red REC Frame Indicator
- The Playback Menu: Managing Pictures
- The Setup Menu: Camera Setup
- Format Memory Card
- Language
- Time Zone and Date
- Monitor Brightness
- Monitor Color Balance
- Viewfinder Brightness
- Viewfinder Color Balance
- Finder Display Size (Photo Lv)
- Limit Monitor Mode Selection
- Auto Rotate Info Display
- AF Fine-Tuning Options
- Non-CPU Lens Data
- Save Focus Position
- Auto Temperature Cutout
- Sensor Shield Behavior at Power Off
- Clean Image Sensor
- Image Dust Off Ref Photo
- Pixel Mapping
- Image Comment
- Copyright Information
- IPTC
- Voice Memo Options
- Camera Sounds
- Silent Mode
- Touch Controls
- HDMI
- USB Connection Priority
- Location Data (Built-In)
- Wireless Remote (WR) Options
- Assign Remote (WR) Fn Button
- Conformity Marking
- Battery Info
- USB Power Delivery
- Energy Saving (Photo Mode)
- Slot Empty Release Lock
- Save/Load Menu Settings
- Reset All Settings
- Firmware Version
- The Network Menu: Network Connections
- My Menu/Recent Settings
- Troubleshooting
- Technical Notes
- Compatible Lenses and Accessories
- Camera Displays
- Compatible Flash Units
- Compatible Accessories
- Software
- Caring for the Camera
- Caring for the Camera and Battery: Cautions
- Specifications
- Approved Memory Cards
- Memory Card Capacity
- Battery Endurance
- Trademarks and Licenses
- Cautions: Location Data (GPS/GLONASS)
- Notices
- Bluetooth and Wi-Fi (Wireless LAN)
- Index

477
Optical AWL
D
Optical AWL
•
Position the sensor windows on the remote flash units to pick up the light
from the master flash. Particular care is required if the master flash is
mounted on a hand-held camera.
•
Be sure that direct light or strong reflections from the remote flash units do
not enter the camera lens (in [TTL] mode) or the photocells on the remote
flash units ([
q
A] mode). Otherwise light from the flash units may interfere
with exposure.
•
Even if [--] is selected for [Master flash]> [Mode], the master flash may
emit low-intensity timing flashes. These flashes may appear in
photographs taken at short range. This can be prevented by choosing low
ISO sensitivities or small apertures (high f-numbers).
•
After positioning the remote flash units, take a test shot and view the
results in the camera display.
A
Flash Info
Remote repeating options can be viewed using
the [Flash info] item in the
i
menu, which can be
added to the menu using Custom Setting f1
[Customize
i
menu].