
Manual cu modificările aduse de actualizarea firmware

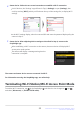
Table Of Contents
- Table of Contents
- Changes with “C” Firmware Version 5.00
- Features Available with “C” Firmware Version 5.00
- Changes Made with “C” Firmware Version 5.00
- New Picture Control Item: “Rich Tone Portrait”
- New High-Speed Frame Capture + Option: C15
- New Image Quality Item Added for High-Speed Frame Capture + Shooting
- New Photo Shooting Menu Item to Select Noise Reduction Mode: “High ISO NR Mode”
- “Skin Softening” Added to Photo Shooting and Video Recording Menus
- “Portrait Impression Balance” Added to Photo Shooting and Video Recording Menus
- Frequency Setting Mode Added to High-Frequency Flicker Reduction Function
- Changes and Additions to Auto Capture Functions
- Compatibility with the Camera’s Manual Focus Setting
- DX Image Area Support
- New Release Mode Options : “C15” and “C60”
- Changes to Settings Displays and Setting Names
- Range Extended for “Advanced: Distance”
- Airplanes Added to Subject Detection Types
- “Set Start Day/Time” Added
- Yellow Frame During Auto Capture
- Profoto A10 Now Usable as AF-Assist Illuminator
- Changes to Hi-Res Zoom
- New Video Playback i Menu Item: “Playback Speed”
- “Customize Retouch Options” Added to “Retouch” Playback i Menu
- New Item for “Series Playback” in Playback Menu: ”Auto Series Playback Options”
- New Playback Menu Item: “Auto Image Rotation”
- Separate Shooting Modes Now Configurable for Photo and Video Modes
- “Focus Point Border Width” Added to Custom Setting a11 “Focus Point Display”
- New Custom Setting: a14 “Max. Aperture Lv During MF”
- New Custom Settings: d19/g17 “Half-Press to Cancel Zoom (MF)”
- New Options for Custom Settings f1/g1 “Customize i Menu”
- Exposure Compensation and White Balance Now Changeable During Shooting Function Recall
- New Roles for Custom Settings f2 “Custom Controls (Shooting)” and g2 “Custom Controls”
- New Roles for Custom Setting f3 “Custom Controls (Playback)”
- Changes in Full Formatting Procedures for “Format Memory Card” in the Setup Menu
- Shooting Display Maximum Zoom Now 400%
- Memory Card High-Temperature Warning Position Changed
- New Smart Device Connection Method: “Wi-Fi Connection (STA Mode)”
- FTP Port Number Now Specifiable in FTP Connection Settings
- New Option for “Connect to FTP Server” in Network Menu: “Upload in HEIF Format”
- Using AirGlu Accessories While MC-N10 Remote Grips Connected
- Menu Items and Defaults for “C” Firmware Version 5.00
- Post-Upgrade Specifications for “C” Firmware Version 5.00
- Index

The camera will display a message stating that the
connection is complete.
Smart device: Follow the on-screen instructions to establish a Wi-Fi connection.
On iOS devices, the “Settings” app will launch. Tap [< Settings] t
o open [Settings], then
scroll up and tap [Wi-Fi] (which you’ll find near the top of the settings list) to display Wi-Fi
settings.
In the Wi-Fi settings display, select the camera SSID and enter the password displayed by the
camera in Step 3.
Smar
t device: After adjusting device settings as described in Step 4, return to the
SnapBridge app.
After establishing a Wi-Fi connection to the camera, the smart device will display Wi-Fi
access point mode options.
The camera and smart device are now connected via Wi-Fi.
For information on using the SnapBridge app, see online help.
Terminating Wi-Fi Station/Wi-Fi Access Point Mode
To end the Wi-Fi connection, tap in the SnapBridge tab. After the icon changes to , tap ,
and select [Disconnect] or [Exit Wi-Fi STA mode].
52
New Smart Device Connection Method: “Wi-Fi
Connection (ST
A Mode)”
4
5