Z 9 Reference Guide (Supplement for Firmware Version 5.
Table of Contents Changes with “C” Firmware Version 5.00. . . . . . . . . . . . . . . . . . . . . . . . . . . . . . . . . . . . . . . . . . . . . . 5 Features Available with “C” Firmware Version 5.00. . . . . . . . . . . . . . . . . . . . . . . . . . . . . . . . . . . . . . . . . . . . 5 “Firmware Version”. . . . . . . . . . . . . . . . . . . . . . . . . . . . . . . . . . . . . . . . . . . . . . . . . . . . . . . . . . . . . . . . . . . . 5 Changes Made with “C” Firmware Version 5.00. . . . . . . . . . . .
Yellow Frame During Auto Capture. . . . . . . . . . . . . . . . . . . . . . . . . . . . . . . . . . . . . . . . . . . . . . . . . . . . . 24 Profoto A10 Now Usable as AF-Assist Illuminator. . . . . . . . . . . . . . . . . . . . . . . . . . . . . . . . . . . . . . . . . . . 25 Changes to Hi-Res Zoom. . . . . . . . . . . . . . . . . . . . . . . . . . . . . . . . . . . . . . . . . . . . . . . . . . . . . . . . . . . . . . . . 26 New Color for the In-Focus Display. . . . . . . . . . . . . . . . . . . . . . . .
Custom Settings Menu. . . . . . . . . . . . . . . . . . . . . . . . . . . . . . . . . . . . . . . . . . . . . . . . . . . . . . . . . . . . . . . . 60 Playback Menu. . . . . . . . . . . . . . . . . . . . . . . . . . . . . . . . . . . . . . . . . . . . . . . . . . . . . . . . . . . . . . . . . . . . . . 67 Setup Menu. . . . . . . . . . . . . . . . . . . . . . . . . . . . . . . . . . . . . . . . . . . . . . . . . . . . . . . . . . . . . . . . . . . . . . . . . 68 Network Menu. . . . . . . . . . . . . . . .
Changes with “C” Firmware Version 5.00 Features Available with “C” Firmware Version 5.00 The Z 9 Reference Guide is for “C” firmware version 3.00 (the latest version of the Z 9 Reference Guide is available on the Nikon Download Center). The Z 9 Reference Guide (Supplement for Firmware Versions 4.00 and 4.10) details the new features and changes introduced with camera “C” firmware versions 4.00 and 4.10. The supplementary documentation can be downloaded from the Nikon Download Center.
Changes Made with “C” Firmware Version 5.00 The features added or updated with camera “C” firmware version 5.00 are summarized below. More information is available on the pages listed. For information on the menu items and defaults for “C” firmware version 5.00, see ‘Menu Items and Defaults for “C” Firmware Version 5.00’ (0 56).
Controls Separate Shooting Modes Now Configurable for Photo and Video Modes (0 31) “Focus Point Border Width” Added to Custom Setting a11 “Focus Point Display” (0 32) New Custom Setting: a14 “Max.
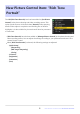
New Picture Control Item: “Rich Tone Portrait” The 4 [Rich Tone Portrait] item has been added to [Set Picture Control] in the photo shooting and video recording menus. This option produces more vivid results than [Portrait] while capturing details of the subject’s complexion and avoiding loss of detail in highlights. It is also suitable for pictures that will later be processed or retouched. [Rich Tone Portrait] has also been added to [Manage Picture Control] in the photo shooting and video recording menus.
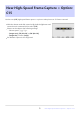
New High-Speed Frame Capture + Option: C15 Use the new [C15] high-speed frame capture + option to take pictures at 15 frames a second. With the release mode dial rotated to c, hold the c button and rotate the main command dial to select [C15]. Photos can be taken at the following settings: - Shutter speed: ¹/₃₂₀₀₀–¹/₆₀ s - [Image area]: [FX (36×24)] or [DX (24×16)] - [Image size]: Fixed at [Large] Pre-Release Capture is also supported.
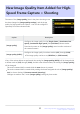
New Image Quality Item Added for HighSpeed Frame Capture + Shooting The name of the [Image quality] item in the photo shooting menu has been changed to [Image quality settings], and the image quality for high-speed frame capture + can now be configured separately from other release modes. Option Description [Image quality] Configure the image quality for the [Single frame], [Continuous lowspeed], [Continuous high-speed], and [Self-timer] release modes.
New Photo Shooting Menu Item to Select Noise Reduction Mode: “High ISO NR Mode” The [High ISO NR mode] item has been added to the photo shooting menu. This setting allows you to select the noise reduction processing mode for [High ISO NR]. Option Description [Type A] This mode applies a conventional noise reduction process. [Type B] In this option, the noise appears differently from the conventional mode.
“Skin Softening” Added to Photo Shooting and Video Recording Menus The [Skin softening] item has been added to the photo shooting and video recording menus. Pictures taken when the face of a human portrait subject is detected will automatically be processed to soften the subject’s complexion. Option [Same as photo settings] (video recording menu only) [High] [Normal] [Low] Description Use the option currently selected for photos.
D Restrictions on Skin Softening in Video Mode Skin softening will not be performed if: [N‑RAW 12-bit (NEV)] or [ProRes RAW HQ 12-bit (MOV)] is selected for [Video file type] in the video recording menu, or [N-Log] is chosen for tone mode when [ProRes 422 HQ 10-bit (MOV)] or [H.265 10-bit (MOV)] is selected for [Video file type] in the video recording menu.
“Portrait Impression Balance” Added to Photo Shooting and Video Recording Menus The [Portrait impression balance] item has been added to the photo shooting and video recording menus. Fine-tune hue and brightness settings for human portrait subjects and save the results for application during shooting as [Mode 1], [Mode 2], or [Mode 3]. Creating Portrait Impression Balance Modes 1 Select [Portrait impression balance] in the photo shooting menu.
4 Save changes. Press J to save changes and exit to the menus. Modes that have been altered from default values are indicated by asterisks (“U”). Repeat Steps 1 through 4 to create additional modes. Applying Saved Modes To enable portrait impression balance during shooting, select the desired mode ([Mode 1] through [Mode 3]) for [Portrait impression balance] in the photo shooting menu.
Frequency Setting Mode Added to HighFrequency Flicker Reduction Function A frequency setting mode has been added to the high-frequency flicker reduction function in photo mode, allowing you to configure the frequency of the light source. Reduce the flicker effect by selecting a frequency that is suitable for the light source. Once you have configured a frequency, only values that are integer multiples of the cycle of the configured frequency can be selected for the shutter speed during shooting.
3 Switch the frequency. Rotate the sub-command dial to switch between [PRE1], [PRE2], [PRE3], [PRE4], and [OFF]. [PRE1] through [PRE4] are configured to the following frequencies by default. Reduce the flicker effect by selecting a frequency suited to the light source or high-frequency LED display. - [PRE1]: 7680 Hz - [PRE2]: 3840 Hz - [PRE3]: 2880 Hz - [PRE4]: 1920 Hz If none of the options from [PRE1] to [PRE4] are successful in reducing the flicker effect, use a custom frequency value (0 18).
Adjusting the Frequency Value The frequencies configured for [PRE1] through [PRE4] can be adjusted. 1 Press and hold the control to which [High-frequency flicker reduction] is assigned to enter frequency setting mode. 2 Select an option from [PRE1] through [PRE4] to adjust the frequency. 3 Press the DISP button. 4 Enter the frequency value. Press 4 or 2 to highlight digits and press 1 or 3 to change. The frequency can be set between 30 and 9999 Hz.
5 Press the DISP or the J button. Press the DISP button to save the frequency and return to frequency setting mode. Press the J button to save the frequency, exit frequency setting mode, and return to the shooting display. Using the Photo Shooting Menu The frequency can also be configured from [High-frequency flicker reduction] in the photo shooting menu. 1 Highlight [High-frequency flicker reduction] in the photo shooting menu and press 2. 2 Highlight [On (shutter speed fine-tuning)] and press 2.
D Adjusting the Frequency from “High-Frequency Flicker Reduction" in the Photo Shooting Menu Highlight an option from [PRE1] through [PRE4] in [Highfrequency flicker reduction] > [On (shutter speed fine-tuning)] and press 2 to adjust the frequency. Press 4 or 2 to highlight digits and press 1 or 3 to change. The frequency can be set between 30 and 9999 Hz. Press the J button to save the frequency and return to the menu.
Changes and Additions to Auto Capture Functions Changes and additions have been made to the [Auto capture] functions in the photo shooting and video recording menus. Compatibility with the Camera’s Manual Focus Setting In earlier versions of the camera firmware, when shooting with manual focus, the camera required you to set the lens focus-mode switch to [M], but starting with “C” firmware version 5.00, you can focus manually by simply selecting manual focus on the camera.
Changes to Settings Displays and Setting Names Some settings displays and setting names have been changed. Motion Settings Display [Speed] has been changed to [Slowest]. [Subject Size] has been changed to [Smallest]. Subject Detection Display [Subject Size] has been changed to [Smallest]. Distance Criteria Display [Near] has been changed to [Nearest]. [Far] has been changed to [Farthest].
Range Extended for “Advanced: Distance” In earlier versions of the camera firmware, the values that could be configured for the range over which the camera would detect a subject depended on the focal length. Starting from “C” firmware version 5.00, this setting can be configured within a range of 0.1 to 999 m, regardless of the focal length. The value for [Nearest] can be adjusted by rotating the main command dial, and the value for [Farthest] can be adjusted by rotating the sub-command dial.
“Set Start Day/Time” Added You can now configure the date and time to start auto capture by pressing the g (Fn4) button on the settings confirmation dialog. Auto capture will be performed for the configured duration starting on the set date and time. Option [Set start day/time] Description Select [Yes] to perform auto capture shooting for the configured duration starting on the set date and time. [Start day/time] Specify the date, hour, and minute to start shooting.
Profoto A10 Now Usable as AF-Assist Illuminator The Profoto A10's continuous LED light can now be used as an AF-assist illuminator when the Profoto A10 (on-camera flash) is attached to the camera. When a Profoto A10 configured to act as an AF-assist illuminator is attached, it will light regardless of the setting for Custom Setting a12 [Built-in AF-assist illuminator].
Changes to Hi-Res Zoom The Hi-Res Zoom function for videos has been changed. New Color for the In-Focus Display The color of the in-focus AF-area brackets shown on the shooting display when [ON] is selected for [Hi-Res Zoom] in the video recording menu has been changed. While in earlier versions of the camera firmware, these brackets were shown in red, from “C” firmware version 5.00 they are shown in green.
New Video Playback i Menu Item: “Playback Speed” A [Playback speed] item has been added to the video playback i menu. Select the video playback speed from [Original speed], [1/2× speed], and [1/4× speed]. Playback will proceed in slow motion at 1/2× speed or 1/4× speed if [1/2× speed] or [1/4× speed] is selected, respectively. Additionally, video playback speed can be changed during playback when the video is paused, using [Playback speed] in the playback i menu.
“Customize Retouch Options” Added to “Retouch” Playback i Menu [Customize retouch options] has been added to [Retouch] in the playback i menu. This allows you to configure the retouch options displayed in the [Retouch] menu. Highlight options and press 2 to select (M) or deselect (U). Only items marked with a check (M) will appear in the [Retouch] menu. Press J to save the changes.
New Item for “Series Playback” in Playback Menu: ”Auto Series Playback Options” [Auto series playback options] has been added to the options available for [Series playback] in the playback menu. Choose options for viewing bursts when [Auto series playback] is set to [ON]. Option [Loop playback] Description If [ON] is selected, the current series will playback repeatedly.
New Playback Menu Item: “Auto Image Rotation” [Auto image rotation] has been added to the playback menu. When set to [ON], the orientation information of the camera at the time of shooting is stored in pictures. When viewed on a camera or computer, the pictures are automatically rotated according to the stored orientation information. When set to [OFF], the orientation information of the camera at the time of shooting is not stored in pictures.
Separate Shooting Modes Now Configurable for Photo and Video Modes When [Extended menu banks] is set to [ON] in the photo shooting menu or video recording menu, separate shooting modes can now be set for photo mode and video mode. The shooting modes in all shooting banks “A” through “D” are set to P right after the firmware is upgraded.
“Focus Point Border Width” Added to Custom Setting a11 “Focus Point Display” [Focus point border width] has been added to Custom Setting a11 [Focus point display]. This option allows you to configure the thickness of the focus point border from [1] to [3].
New Custom Setting: a14 “Max. Aperture Lv During MF” A [Max. aperture Lv during MF] item has been added to the Custom Settings menu at position a14. When set to [On], the shooting display in the viewfinder or monitor is always displayed with the maximum aperture when the focus mode is set to MF. When the shutter-release button is pressed all the way down, the aperture will be adjusted to the configured aperture value before shooting. D Cautions: When “Max.
New Custom Settings: d19/g17 “Half-Press to Cancel Zoom (MF)” A [Half-press to cancel zoom (MF)] item has been added to the Custom Settings menu at positions d19 and g17. If [ON] is selected while focus mode is set to manual focus and the view through the lens is zoomed in, zoom can be cancelled by pressing the shutter-release button halfway.
New Options for Custom Settings f1/g1 “Customize i Menu” The following items can now be assigned to the i menu in Custom Settings f1 and g1 [Customize i Menu].
Exposure Compensation and White Balance Now Changeable During Shooting Function Recall Exposure compensation and white balance settings can now be changed while recalling the shooting function settings by pressing the button assigned the role of [Recall shooting functions (hold)] in Custom Setting f2 [Custom controls (shooting)]. To change the exposure compensation value, rotate a command dial while pressing the E button (or the button to which the exposure compensation role is assigned).
New Roles for Custom Settings f2 “Custom Controls (Shooting)” and g2 “Custom Controls” Additions have been made to the roles available for Custom Settings f2 [Custom controls (shooting)] and g2 [Custom controls]. Option r [Cycle AF-area mode] Description Press the control to cycle the AF-area mode. To choose the AF-area modes to be cycled, highlight [Cycle AF-area mode] and press 2. Highlight options and press J or 2 to select (M) or deselect (U).
New Roles for Custom Setting f3 “Custom Controls (Playback)” Additions have been made to the roles available and the controls to which they can be assigned for Custom Setting f3 [Custom controls (playback)].
New Roles Additional roles can now be assigned to buttons or the command dials.
Roles Available for “Main Command Dial”/“Sub-Command Dial” Option Description Choose how the camera centers the display when either the [Frame advance zoom position] [Playback zoom face selection] main or sub-command dial is rotated to scroll through pictures during playback zoom. [Keep current zoom position]: Center the display on the current zoom location. [Prefer focus point]: Center the display on the focus point active when the photograph was taken.
Functions Added to “Main Command Dial”/“Sub-Command Dial” > “Frame Advance” Option Description Skip to the next or previous picture that has been uploaded to an FTP [Uploaded to FTP] server. [Uploaded to computer] Skip to the next or previous picture that has been uploaded to a computer. Functions Added to “Main Command Dial”/“Sub-Command Dial” > “Video Playback” Option [Playback speed] Description Choose the video playback speed. You can switch between original speed, 1/2x speed, and 1/4x speed.
Changes in Full Formatting Procedures for “Format Memory Card” in the Setup Menu Changes have been made to how a full format is performed with [Format memory card] in the setup menu when using a CFexpress memory card compatible with full format. 1 Highlight [Format memory card] in the setup menu and press 2. 2 Highlight [Slot 1] or [Slot 2] and press 2. 3 Press O (Q) to proceed when the options are displayed. 4 Highlight [Yes] and press J.
Shooting Display Maximum Zoom Now 400% While in earlier versions of the camera firmware, the maximum shooting display zoom was 200%, from “C” firmware version 5.00 the maximum magnification is 400%. Use the X and W (Q) buttons to zoom in and out.
Memory Card High-Temperature Warning Position Changed The position of the memory card high-temperature warning that appears when the memory card becomes hot during video recording has been changed. “C” firmware version 4.xx and earlier “C” firmware version 5.
New Smart Device Connection Method: “Wi-Fi Connection (STA Mode)” Wi-Fi station mode has been added as a connection method, allowing you to connect the camera to the smart device via a wireless LAN access point. The existing method of connecting the camera and the smart device directly has been renamed Wi-Fi access point mode. A compatible version of SnapBridge is required to establish connections in Wi-Fi station mode and Wi-Fi access point mode. Be sure to use the latest version of the SnapBridge app.
2 Camera: Name the new profile. To proceed to the next step without changing the default name, press X. Whatever name you choose will appear in the network menu [Connect to smart device] > [Wi-Fi connection (STA mode)] list. To rename the profile, press J. 3 Camera: Highlight [Search for Wi-Fi network] and press J. The camera will search for networks currently active in the vicinity and list them by name (SSID). D “Easy Connect” To connect without entering an SSID or encryption key, press X in Step 3.
4 Camera: Choose a network. Highlight a network SSID and press J. The band on which each SSID operates is indicated by an icon. Encrypted networks are indicated by a h icon. If the selected network is encrypted (h), you will be prompted to enter the encryption key. If the network is not encrypted, proceed to Step 6. If the desired network is not displayed, press X to search again. D Hidden SSIDs Networks with hidden SSIDs are indicated by blank entries in the network list.
5 Camera: Enter the encryption key. Press J and enter the encryption key for the wireless router. For more information on the wireless router encryption key, see the documentation for the wireless router. Press X when entry is complete. Press X again to initiate the connection. A message will be displayed for a few seconds when the connection is established.
6 Camera: Obtain or select an IP address. Highlight one of the following options and press J. Option Description [Obtain automatically] Select this option if the network is configured to supply the IP address automatically. A “configuration complete” message will be displayed once an IP address has been assigned. Enter the IP address and sub-net mask manually. Press J; you will be prompted to enter the IP address. Rotate the main command dial to highlight segments.
10 Smart device: Select the camera. Select the camera name displayed on the camera in Step 8. 11 Camera/smart device: Establish the Wi-Fi connection. When the camera displays the dialog as shown, press J. After establishing a Wi-Fi connection to the camera, the smart device will display Wi-Fi station mode options. The camera will display a message stating that the connection is complete. The camera and smart device are now connected via Wi-Fi.
Direct Wireless Connection to a Smart Device (WiFi Access Point Mode) Connect the camera and a smart device directly via Wi-Fi. The camera acts as a wireless LAN access point, allowing you to connect when working outdoors and in other situations in which the smart device is not already connected to a wireless network and eliminating the need for complicated adjustments to settings. The smart device cannot connect to the Internet while connected to the camera.
4 Smart device: Follow the on-screen instructions to establish a Wi-Fi connection. On iOS devices, the “Settings” app will launch. Tap [< Settings] to open [Settings], then scroll up and tap [Wi-Fi] (which you’ll find near the top of the settings list) to display Wi-Fi settings. In the Wi-Fi settings display, select the camera SSID and enter the password displayed by the camera in Step 3. 5 Smart device: After adjusting device settings as described in Step 4, return to the SnapBridge app.
FTP Port Number Now Specifiable in FTP Connection Settings Port numbers can now be specified when configuring a connection to an FTP server using the connection wizard in [Connect to FTP server] in the network menu. After entering the FTP server address, press the X button to connect the camera to the FTP server. When a connection is successfully established, you will be prompted to enter a port number. A value between 0 and 65535 can be configured.
New Option for “Connect to FTP Server” in Network Menu: “Upload in HEIF Format” [Upload in HEIF format] has been added to the [Connect to FTP server] > [Options] in the network menu. The options are [High compression], [Medium compression], [Low compression], and [Off]. When a setting other than [Off] is selected, the captured RAW or JPEG image is converted to HEIF format with the specified compression ratio before it is uploaded to the FTP server. Converted HEIF images are not stored on the memory card.
Using AirGlu Accessories While MC-N10 Remote Grips Connected In earlier versions of the camera firmware, all Bluetooth functions were disabled while an MC-N10 was connected to the camera, but from “C” firmware version 5.00, Atomos UltraSync BLUE AirGlu accessories can be used via Bluetooth.
Menu Items and Defaults for “C” Firmware Version 5.00 The menus and default settings following upgrade to “C” firmware version 5.00 are listed below.
[High ISO NR]: Normal [Vignette control]: Normal [Diffraction compensation]: ON [Auto distortion control]: ON [Skin softening]: Off [Portrait impression balance]: Off [Photo flicker reduction]: OFF [High-frequency flicker reduction]: Off [Metering]: Matrix metering [Flash control] - [Flash control mode]: TTL - [Wireless flash options]: Off - [Remote flash control]: Group flash [Focus mode]: Single AF [AF-area mode]: Single-point AF [AF subject detection options]: Auto [Vibration reduction]: Sport [Auto brac
[Time-lapse video] - [Interval]: 5 s - [Shooting time]: 25 min. - [Exposure smoothing]: ON - [Choose image area]: FX - [Video file type]: H.265 8-bit (MOV) - [Frame size/frame rate]: 3840×2160; 30p - [Interval priority]: OFF - [Focus before each shot]: OFF - [Destination]: Slot 1 [Focus shift shooting] - [No.
- [ISO sensitivity (mode M)]: 100 [White balance]: Same as photo settings [Set Picture Control]: Same as photo settings [Manage Picture Control]: – [HLG quality] - [Quick sharp]: 0 - [Contrast]: 0 - [Saturation]: 0 - [Hue]: 0 [Active D-Lighting]: Off [High ISO NR]: Normal [Vignette control]: Normal [Diffraction compensation]: ON [Auto distortion control]: ON [Skin softening]: Same as photo settings [Portrait impression balance]: Off [Video flicker reduction]: Auto [High-frequency flicker reduction]: Off [Me
Custom Settings Menu [Custom Settings bank]: A a [Focus] - a1 [AF-C priority selection]: Release - a2 [AF-S priority selection]: Focus - a3 [Focus tracking with lock-on] - [Blocked shot AF response]: 3 - [Subject motion]: Steady - a4 [Focus points used]: All points - a5 [Store points by orientation]: Off - a6 [AF activation]: Shutter/AF-ON - a7 [Focus point persistence]: Auto - a8 [Limit AF-area mode selection] - [Pinpoint AF]: M - [Single-point AF]: L (cannot be deselected) - [Dynamic-area AF (S)]: M - [Dy
b [Metering/exposure] - b1 [ISO sensitivity step value]: 1/3 step - b2 [EV steps for exposure cntrl]: 1/3 EV steps (comp. 1/3 EV) - b3 [Easy exposure compensation]: Off - b4 [Matrix metering face detection]: ON - b5 [Center-weighted area]: Standard - b6 [Fine-tune optimal exposure] - [Matrix metering]: 0 - [Center-weighted metering]: 0 - [Spot metering]: 0 - [Highlight-weighted metering]: 0 - b7 [Keep exp.
- [FX (36×24)]: L (cannot be deselected) - [DX (24×16)]: M - [1:1 (24×24)]: M - [16:9 (36×20)]: M - d9 [File number sequence]: On - d10 [View mode (photo Lv)]: Show effects of settings - [Show effects of settings]: Only when flash is not used - [Adjust for ease of viewing]: Auto - d11 [Starlight view (photo Lv)]: OFF - d12 [Warm display colors] - [Warm display color options]: Off - [Warm color display brightness]: 0 - d13 [LCD illumination]: OFF - d14 [View all in continuous mode]: ON - d15 [Release timing
- f1 [Customize i menu]: Set Picture Control, White balance, Image quality, Image size, AF-area mode/subj.
- [Audio button]: Voice memo [OK button]: Zoom on/off [WB button]: Select for upload to computer [QUAL button]: Rating [Vertical shooting multi selector]: Unswitch [Playback button]: Resume shooting [Main command dial] - [Frame advance]: 1 frame - [Video playback]: 10 frames - [Frame advance zoom position]: Keep current zoom position - [Sub-command dial] - [Frame advance]: 1 frame - [Video playback]: 10 s - [Frame advance zoom position]: Keep current zoom position - [Playback zoom face selection]: ON - [V
g [Video] - g1 [Customize i menu]: Set Picture Control, White balance, Frame size/frame rate, Microphone sensitivity, AF-area mode/subj.
- [Single-point AF]: L (cannot be deselected) - [Wide-area AF (S)]: M - [Wide-area AF (L)]: M - [Wide-area AF (C1)]: M - [Wide-area AF (C2)]: M - [Subject-tracking AF]: M - [Auto-area AF]: M - g5 [Focus mode restrictions]: No restrictions - g6 [AF speed]: 0 - [When to apply]: Always - g7 [AF tracking sensitivity]: 4 - g8 [Hi-Res Zoom speed]: 0 - g9 [Assign power zoom buttons] - - - [Use x/w buttons]: OFF - [Power zoom speed] - [Pre/post recording]: +3 - [During recording]: 0 g10 [Fine ISO control (mode M
Playback Menu [Delete]: – [Playback folder]: All [Playback display options] - [Focus point]: U - [Mark first shot in series]: U - [Exposure info]: U - [Highlights]: U - [RGB histogram]: U - [Shooting data]: U - [Overview]: U - [None (picture only)]: M - [File info]: U - [Basic shooting data]: M - [Flash data]: M - [Picture Control/HLG data]: M - [Other shooting data]: M - [Copyright info]: M - [Location data]: M - [IPTC data]: M [Delete pictures from both slots]: Yes (confirmation required) [Dual-format rec
[Auto image rotation]: ON [Auto-rotate pictures]: ON [Copy image(s)]: – Setup Menu [Format memory card]: – [Language]: (Default varies with country of purchase) [Time zone and date] - [Time zone]: (Default varies with country of purchase) - [Date and time]: – - [Date format]: (Default varies with country of purchase) - [Daylight saving time]: OFF [Monitor brightness]: 0 [Monitor color balance]: A-B: 0, G-M: 0 [Viewfinder brightness]: Auto [Viewfinder color balance]: A-B: 0, G-M: 0 [Viewfinder display size]
- [Automatic cleaning]: Clean at shutdown [Image Dust Off ref photo]: – [Pixel mapping]: – [Image comment] - [Attach comment]: OFF [Copyright information] - [Attach copyright information]: OFF [IPTC] - [Edit/save]: – - [Delete]: – - [Auto embed during shooting]: Off - [Load/save]: – [Voice memo options] - [Voice memo control]: Press and hold - [Audio output (playback)]: Speaker/headphones [Camera sounds] - [Shutter sound]: ON - [Volume]: 3 - [Type]: Type A - [Beep]: Off - [Volume]: 2 - [Pitch]: Low [Silent
[Conformity marking]: – [Battery info]: – [USB power delivery]: ON [Energy saving (photo mode)]: OFF [Slot empty release lock]: Enable release [Save/load menu settings]: – [Reset all settings]: – [Firmware version]: – Network Menu [Airplane mode]: OFF [Wired LAN]: OFF [Connect to smart device] - [Pairing (Bluetooth)] - [Bluetooth connection]: OFF - [Select pictures for upload] - [Auto select for upload]: ON - [Wi-Fi connection (AP mode)]: – - [Wi-Fi connection (STA mode)]: – - [Upload while off]: ON - [Loc
- [Protect if marked for upload]: OFF - [Upload marking]: OFF - [Upload in HEIF format]: Off - [Upload folder]: – - [Deselect all?]: – - [Keep connection]: OFF - [Manage root certificate]: – [Connect to other cameras] - [Synchronized release]: ON - [Network settings]: – - [Master/remote]: Master camera - [Group settings]: – - [Group name]: – - [Synchronize date and time]: – - [Overwrite copyright info]: – [ATOMOS AirGlu BT options] - [Connect to ATOMOS AirGlu BT]: OFF - [Save ATOMOS AirGlu BT pairing info]:
Post-Upgrade Specifications for “C” Firmware Version 5.00 Product specifications following upgrade to “C” firmware version 5.00 are listed below. Type Type Digital camera with support for interchangeable lenses Lens mount Nikon Z mount Lens Compatible lenses Z mount NIKKOR lenses F mount NIKKOR lenses (mount adapter required; restrictions may apply) Effective pixels Effective pixels 45.7 million Image sensor Type 35.9 × 23.9 mm CMOS sensor (Nikon FX format) Total pixels 52.
Storage Image size (pixels) [FX (36 × 24)] selected for image area: - 8256 × 5504 (Large: 45.4 M) - 6192 × 4128 (Medium: 25.6 M) - 4128 × 2752 (Small: 11.4 M) [DX (24 × 16)] selected for image area: - 5392 × 3592 (Large: 19.4 M) - 4032 × 2688 (Medium: 10.8 M) - 2688 × 1792 (Small: 4.8 M) [1:1 (24 × 24)] selected for image area: - 5504 × 5504 (Large: 30.3 M) - 4128 × 4128 (Medium: 17.0 M) - 2752 × 2752 (Small: 7.6 M) [16:9 (36 × 20)] selected for image area: - 8256 × 4640 (Large: 38.
Storage Media Dual card slots File system CFexpress (Type B) and XQD memory cards The card in Slot 2 can be used for overflow or backup storage, for separate storage of NEF (RAW) and JPEG pictures, or for storage of duplicate JPEG pictures at different sizes and image qualities; pictures can be copied between cards. DCF 2.0, Exif 2.32 Viewfinder Viewfinder 1.27-cm/0.5-in. approx.
Shutter Type Electronic shutter with shutter sound and sensor shield Speed ¹⁄₃₂₀₀₀ – 30 s (choose from step sizes of ¹⁄₃, ¹⁄₂, and 1 EV, extendable to 900 s in mode M), bulb, time Flash sync speed Flash synchronizes with shutter at speeds of ¹⁄₂₅₀ or ¹⁄₂₀₀ s or slower (but note that the guide number drops at speeds of ¹⁄₂₀₀ to ¹⁄₂₅₀ s); sync speeds as fast as ¹⁄₈₀₀₀ s are supported with auto FP highspeed sync Release Release mode Single frame, continuous low-speed, continuous high-speed, highspeed fr
Exposure Metering system TTL metering using camera image sensor Matrix metering Center-weighted metering: Weight of 75% given to 12 or Metering mode 8 mm circle in center of frame or weighting can be based on average of entire frame Spot metering: Meters circle with a diameter of approximately 4 mm centered on selected focus point Highlight-weighted metering Range * −3 – +17 EV * Figures are for ISO 100 and f/2.
Autofocus Type Detection range * Lens servo Hybrid phase-detection/contrast AF with AF assist −7 – +19 EV (−9 – +19 EV with starlight view) * Measured in photo mode at ISO 100 and a temperature of 20 °C/68 °F using single-servo AF (AF‑S) and a lens with a maximum aperture of f/1.
Flash Flash control TTL: i‑TTL flash control; i‑TTL balanced fill-flash is used with matrix, center-weighted, and highlight-weighted metering, standard i‑TTL fill-flash with spot metering Flash mode Front-curtain sync, slow sync, rear-curtain sync, red-eye reduction, red-eye reduction with slow sync, off Flash compensation −3 – +1 EV (choose from step sizes of ¹⁄₃ and ¹⁄₂ EV) Flash-ready indicator Lights when optional flash unit is fully charged; flashes as underexposure warning after flash is fired
Other options for still photography Other options for still photography Vignette control, diffraction compensation, auto distortion control, skin softening, portrait impression balance, interval-timer photography, focus-shift photography, and auto capture Video Metering system TTL metering using camera image sensor Metering mode Matrix, center-weighted, or highlight-weighted Frame size (pixels) and frame rate 7680 × 4320 (8K UHD): 30p (progressive)/25p/24p 3840 × 2160 (4K UHD): 120p/100p/60p/50p/30p/
Video Audio recording device Built-in stereo or external microphone with attenuator option; sensitivity adjustable Exposure compensation −3 – +3 EV (choose from step sizes of ¹⁄₃ and ¹⁄₂ EV) ISO sensitivity (Recommended Exposure Index) Active D‑Lighting Other options for video recording Mode M: Manual selection (ISO 64–25600; choose from step sizes of ¹⁄₆, ¹⁄₃ and 1 EV); with additional options available equivalent to approximately 0.3, 0.
Interface USB Type C SuperSpeed USB connector; connection to built-in USB ports is recommended HDMI output Type A HDMI connector Audio input Stereo mini-pin jack (3.5 mm diameter; plug-in power supported) Audio output Stereo mini-pin jack (3.5 mm diameter) Ten-pin remote terminal Built-in (can be used with MC-30A/MC-36A remote cords and other optional accessories) Wired LAN RJ-45 connector Standards: IEEE 802.3ab (1000BASE-T), IEEE 802.3u (100BASETX), IEEE 802.
Wi-Fi/Bluetooth Wi-Fi Standards: - IEEE 802.11b/g/n (Africa, Asia, and Oceania) - IEEE 802.11b/g/n/a/ac (Europe, U.S.A., Canada, Mexico) - IEEE 802.11b/g/n/a (other countries in the Americas) Operating frequency: - 2412–2462 MHz (channel 11; Africa, Asia, and Oceania) - 2412–2462 MHz (channel 11) and 5180–5825 MHz (U.S.A.
Location Data Supported GNS systems GPS (USA), GLONASS (Russia), QZSS (Japan) Data acquired Latitude, longitude, altitude, UTC (Universal Coordinated Time) Clock synchronization Camera clock can be set to time acquired via GNSS Track logs NMEA-compliant Log interval 15 s, 30 s, 1 min., 2 min., 5 min.
Dimensions/weight Dimensions (W × H × D) Approx. 149 × 149.5 × 90.5 mm/5.9 × 5.9 × 3.6 in. Weight Approx. 1340 g (2 lb. 15.3 oz.) with battery and memory card but without body cap and accessory shoe cover; approx. 1160 g/2 lb. 9 oz. (camera body only) Operating environment Temperature −10 °C– 40 °C (+14 °F – 104 °F) Humidity 85% or less (no condensation) Unless otherwise stated, all measurements are performed in conformity with Camera and Imaging Products Association (CIPA) standards or guidelines.
Index Index H A Half-press to cancel zoom (MF) (0 34) High ISO NR mode (0 11) High-frequency flicker reduction (0 16) High-Speed Frame Capture + (0 9) Hi-Res Zoom (0 26) Auto capture (0 21) Auto image rotation (0 30) Auto series playback options (0 29) C I C15 (0 9) Custom controls (0 37) Custom controls (playback) (0 38) Custom controls (shooting) (0 37) Customize i menu (0 35) Customize retouch options (0 28) Image quality (0 10) Image quality (HSFC) (0 10) Image quality settings (0 10) M E Max.
R U Recall shooting functions (hold) (0 36) Rich Tone Portrait (0 8) Upload in HEIF format (0 54) W S Wi-Fi AP mode (0 45) Wi-Fi STA mode (0 45) Skin softening (0 12) 86 Index
No reproduction in any form of this document, in whole or in part (except for brief quotation in critical articles or reviews), may be made without written authorization from NIKON CORPORATION.