
Setting Guide (Auto Capture Edition)
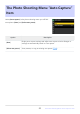
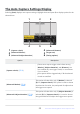
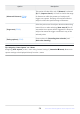
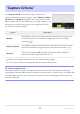
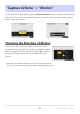
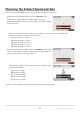
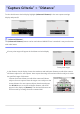
Table Of Contents
- Table of Contents
- Auto Capture: An Overview
- Using Auto Capture
- Using Auto Capture: Workflow
- Getting Ready
- Adjusting Camera Settings
- The Photo Shooting Menu “Auto Capture” Item
- “Capture Criteria”
- “Capture Criteria” > “Motion”
- “Capture Criteria” > “Distance”
- “Capture Criteria” > “Subject Detection”
- “Target Area”
- “Timing Options”
- The “View Settings” Dialog
- Choosing Start Day and Time
- Initiating Auto Capture
- User Presets
- Recommended Trigger Criteria
- Troubleshooting

A focus-point target will appear in the distance criteria display.
Focus-point target
Choose the closest distance at which the camera will detect
subjects for auto capture. Place the target over a subject at the
closest distance for auto capture subject detection and press
the AF-ON button to set the minimum distance, which will
appear in the display as [Nearest]. The minimum distance can
be fine-tuned by rotating the main command dial.
“Capture Criteria”> “Distance”
To view the distance criteria display, highlight [Advanced: Distance] in the auto capture settings
display and press J.
D “Advanced: Distance”
The [Advanced: Distance] feature can be used when a NIKKOR Z lens is attached. It may not function
with other lenses.
In the distance criteria display, choose the maximum and minimum distances at which the camera
will detect subjects for auto capture. Auto capture shooting will continue while the subject is within
the specified range of distances.
30
“Capture Criteria”> “Distance”
-