
Setting Guide (Auto Capture Edition)
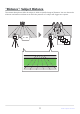
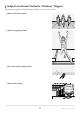
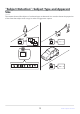
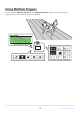
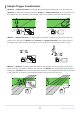
Table Of Contents
- Table of Contents
- Auto Capture: An Overview
- Using Auto Capture
- Using Auto Capture: Workflow
- Getting Ready
- Adjusting Camera Settings
- The Photo Shooting Menu “Auto Capture” Item
- “Capture Criteria”
- “Capture Criteria” > “Motion”
- “Capture Criteria” > “Distance”
- “Capture Criteria” > “Subject Detection”
- “Target Area”
- “Timing Options”
- The “View Settings” Dialog
- Choosing Start Day and Time
- Initiating Auto Capture
- User Presets
- Recommended Trigger Criteria
- Troubleshooting

In photo mode, select a release mode from [Continuous high-
speed], [Continuous low-speed], or high-speed frame capture +.
Adjusting Camera Settings
Before adjusting auto capture settings, frame the shot, choose release and AF-area modes, and adjust
exposure.
You should also adjust white balance, metering, and other settings as required.
Frame the Shot
Frame the shot and fix the camera in place. If it’s hard to predict exactly where your subject will make
its appearance, we recommend that you frame the shot wide and crop as necessary after shooting.
D Image Area
FX and DX image areas are available. Auto capture cannot be used when the image area is set to [1:1
(24×24)] or [16:9 (36×20)] in photo mode.
Choose a Release Mode
If single-frame or self-timer mode is selected, the camera will temporarily switch to continuous
high-speed mode when auto capture begins.
If you selected continuous low-speed or continuous high-speed mode, choose the frame advance
rate before proceeding.
Tip: Pre-Release Capture
The settings selected for Custom Setting d4 [Pre-Release Capture options] apply when high-speed
frame capture + is selected for release mode.
20
Adjusting Camera Settings