
Setting Guide (Auto Capture Edition)
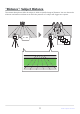
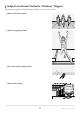
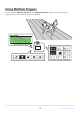
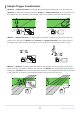
Table Of Contents
- Table of Contents
- Auto Capture: An Overview
- Using Auto Capture
- Using Auto Capture: Workflow
- Getting Ready
- Adjusting Camera Settings
- The Photo Shooting Menu “Auto Capture” Item
- “Capture Criteria”
- “Capture Criteria” > “Motion”
- “Capture Criteria” > “Distance”
- “Capture Criteria” > “Subject Detection”
- “Target Area”
- “Timing Options”
- The “View Settings” Dialog
- Choosing Start Day and Time
- Initiating Auto Capture
- User Presets
- Recommended Trigger Criteria
- Troubleshooting

Using Auto Capture
Using Auto Capture: Workflow
The chief steps in the auto capture workflow are described below.
Ready the camera (0 19).
Ready a power source, memory card, and tripod and otherwise prepare the camera for use.
Position the camera and adjust settings (0 20).
Position the camera, frame the shot, choose a release mode, and adjust focus, exposure, and
other settings.
Select [Auto capture] in the photo shooting menu (0 22).
Choose options for [Capture criteria] (0 25).
Choose auto capture trigger criteria from among [Motion], [Distance], and [Subject detection].
You can combine any two trigger criteria, or use all three if you so desire.
[Motion] (0 26)
[Distance] (0 30)
[Subject detection] (0 32)
Choose target areas (0 35).
Choose the focus points used for subject detection when using manual focus or when selecting
[Auto-area AF] for AF-area mode. Use target-area selection to disable points in areas of the
frame that are blocked by obstacles or can otherwise be ignored to ensure reliable detection of
the desired subject.
17
Using Auto Capture: Workflow
1
2
3
4
5