
Manual cu modificările aduse de actualizarea firmware
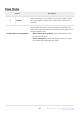
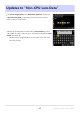
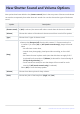
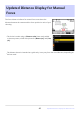
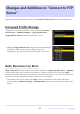
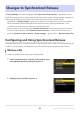
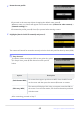
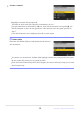
Table Of Contents
- Table of Contents
- Changes with “C” Firmware Version 4.00
- Features Available with “C” Firmware Version 4.00
- Changes Made with “C” Firmware Version 4.00
- New Bracketing Increments
- More Time for Pre-Release Capture
- New Large Size Option for JPEG + JPEG Recording
- New Menu Item: “Auto Capture”
- Low ISO Sensitivity Settings for N-Log Video
- New Options for Hi-Res Zoom Speed
- New: Slow-Motion Videos
- Changes to i-Menu “Select for Upload” Options
- "Priority Upload" Options Added to i Menu
- Support for Power Zoom
- New Custom Setting: d6 “Exposure Delay Mode”
- New Options for Custom Settings f2 “Custom Controls (Shooting)” and g2 “Custom Controls”
- New Options for Custom Setting f3: “Custom Controls (Playback)”
- Updates to “Non-CPU Lens Data”
- Increased Character Limit for IPTC “Category” Entries
- New Shutter Sound and Volume Options
- Support for “Viewfinder Display Size” Selection in Video Mode
- Updated Distance Display for Manual Focus
- Changes and Additions to “Connect to FTP Server”
- Changes to Synchronized Release
- New “Overwrite Copyright Info” Option for Master Cameras
- Menu Items and Defaults for “C” Firmware Version 4.00
- Post-Upgrade Specifications for “C” Firmware Version 4.00
- Changes with “C” Firmware Version 4.10
- Index

Select [Connect to other cameras] in the network menu,
then highlight [Network settings
] and press 2.
Highlight [Create profile] and press J.
Changes to Synchronized Release
A [Group settings] item has been added under [Connect t
o other cameras] in the network menu.
Cameras can be grouped for synchronized release and remote camera settings adjusted separately for
each group. Switching groups switches the remote cameras the master camera controls.
The addition of [Group settings] changes how cameras are configured for synchronized release.
The procedure described below replaces that described under “Synchronized Release” in the
“Connecting to Other Cameras” chapter of the Reference Guide.
Remote cameras can now be grouped. [Remote camera list] has consequently been moved from
its former location directly under [Connect to other cameras] in earlier firmware versions and
placed in [Connect to other cameras]>[Group settings]> (group name)> [Remote camera list].
Configuring and Using Synchronized Release
Follow the steps below to cr
eate host profiles for synchronized release. Each camera saves the pictures
it takes to its own memory card. Repeat the process to create identical profiles for each camera.
Wireless LAN
To create host profiles when connecting via wireless LAN:
48
Changes to Synchronized Release
1
2