
Manual cu modificările aduse de actualizarea firmware
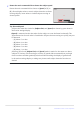
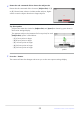

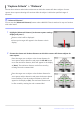
Table Of Contents
- Table of Contents
- Changes with “C” Firmware Version 4.00
- Features Available with “C” Firmware Version 4.00
- Changes Made with “C” Firmware Version 4.00
- New Bracketing Increments
- More Time for Pre-Release Capture
- New Large Size Option for JPEG + JPEG Recording
- New Menu Item: “Auto Capture”
- Low ISO Sensitivity Settings for N-Log Video
- New Options for Hi-Res Zoom Speed
- New: Slow-Motion Videos
- Changes to i-Menu “Select for Upload” Options
- "Priority Upload" Options Added to i Menu
- Support for Power Zoom
- New Custom Setting: d6 “Exposure Delay Mode”
- New Options for Custom Settings f2 “Custom Controls (Shooting)” and g2 “Custom Controls”
- New Options for Custom Setting f3: “Custom Controls (Playback)”
- Updates to “Non-CPU Lens Data”
- Increased Character Limit for IPTC “Category” Entries
- New Shutter Sound and Volume Options
- Support for “Viewfinder Display Size” Selection in Video Mode
- Updated Distance Display for Manual Focus
- Changes and Additions to “Connect to FTP Server”
- Changes to Synchronized Release
- New “Overwrite Copyright Info” Option for Master Cameras
- Menu Items and Defaults for “C” Firmware Version 4.00
- Post-Upgrade Specifications for “C” Firmware Version 4.00
- Changes with “C” Firmware Version 4.10
- Index

Choose a [Subject Size] from values [1] thr
ough [5]. Choose
lower values to include smaller subjects, higher values to
restrict subject detection to larger subjects.
The apparent subject size (as a percentage of the angle of
view) for each setting is listed below.
[
1]: 2.5% or more
[2]: 5% or more
[3]: 10% or more
[4]: 15% or more
[5]: 20% or more
-
-
-
-
-
Subject detected at size of
20%
Rotate the main command dial to choose the subject size.
Tip: Size Options
Subjects that meet the criterion for [Subject Size] ar
e shown by green boxes in the subject
detection display.
A [Subject Size] of [1] makes it easier for the camera to detect subjects of a variety of sizes.
We recommend that you begin from a low value and then gradually raise it while checking
the display of green boxes in the subject detection display or taking test pictures until subject
detection functions as desired.
Press the i button.
The camera will save the changes and return you to the auto capture settings display.
D Caution: Subject Detection
If “auto” or “people” is selected, auto capture will begin when human portrait subjects are detected,
whether or not they are facing the camera.
25
New Menu Item: “Auto Capture”
3
4