
Manual cu modificările aduse de actualizarea firmware
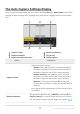
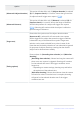
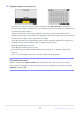
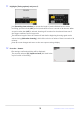
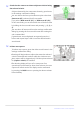
Table Of Contents
- Table of Contents
- Changes with “C” Firmware Version 4.00
- Features Available with “C” Firmware Version 4.00
- Changes Made with “C” Firmware Version 4.00
- New Bracketing Increments
- More Time for Pre-Release Capture
- New Large Size Option for JPEG + JPEG Recording
- New Menu Item: “Auto Capture”
- Low ISO Sensitivity Settings for N-Log Video
- New Options for Hi-Res Zoom Speed
- New: Slow-Motion Videos
- Changes to i-Menu “Select for Upload” Options
- "Priority Upload" Options Added to i Menu
- Support for Power Zoom
- New Custom Setting: d6 “Exposure Delay Mode”
- New Options for Custom Settings f2 “Custom Controls (Shooting)” and g2 “Custom Controls”
- New Options for Custom Setting f3: “Custom Controls (Playback)”
- Updates to “Non-CPU Lens Data”
- Increased Character Limit for IPTC “Category” Entries
- New Shutter Sound and Volume Options
- Support for “Viewfinder Display Size” Selection in Video Mode
- Updated Distance Display for Manual Focus
- Changes and Additions to “Connect to FTP Server”
- Changes to Synchronized Release
- New “Overwrite Copyright Info” Option for Master Cameras
- Menu Items and Defaults for “C” Firmware Version 4.00
- Post-Upgrade Specifications for “C” Firmware Version 4.00
- Changes with “C” Firmware Version 4.10
- Index

Highlight [Target area] and press J.
Choose the focus points used for subject detection when [Auto-ar
ea AF] is selected for
AF-area mode. Target-area selection is not available in other AF-area modes. If another mode
is selected, proceed to Step 11.
Target-area selection can be used to disable focus points in areas of the frame that are
blocked by obstacles or can otherwise be ignored for purposes of subject detection, ensuring
that the desired subject can be detected more reliably.
Press J to prevent focus points being used for subject detection (disabled focus points are
displayed in red). Press J again to clear (re-enable) the focus point.
Press X to enable all focus points.
Press W (Q) to disable all focus points.
Focus points can be enabled and disabled nine at a time (in 3× 3 grids) by tapping the
monitor.
Press i to save changes and return to the auto capture settings display.
D Disabled Focus Points
Subjects meeting the [Capture criteria] will be detected only in the vicinity of the chosen
focus points. For example, the camera will ignore motion in disabled focus points even when
[Motion] is enabled (M).
17
New Menu Item: “Auto Capture”
10