Professional Technical Guide —Pixel Shift Edition— © 2024 Nikon Corporation
Table of Contents Pixel Shift. . . . . . . . . . . . . . . . . . . . . . . . . . . . . . . . . . . . . . . . . . . . . . . . . . . . . . . . . . . . . . . . . . . . . . . . 4 What Is “Pixel Shift”?. . . . . . . . . . . . . . . . . . . . . . . . . . . . . . . . . . . . . . . . . . . . . . . . . . . . . . . . . . . . . . . . . . . . . 4 How Pixel Shift Works. . . . . . . . . . . . . . . . . . . . . . . . . . . . . . . . . . . . . . . . . . . . . . . . . . . . . . . . . . . . . . . . . .
Adjust Merged Pixel Shift Images. . . . . . . . . . . . . . . . . . . . . . . . . . . . . . . . . . . . . . . . . . . . . . . . . . . . . . 31 Export Merged Pixel Shift Images. . . . . . . . . . . . . . . . . . . . . . . . . . . . . . . . . . . . . . . . . . . . . . . . . . . . . . 33 Using Third-Party Software. . . . . . . . . . . . . . . . . . . . . . . . . . . . . . . . . . . . . . . . . . . . . . . . . . . . . . . . . . . . . . .
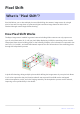
Pixel Shift What Is “Pixel Shift”? Pixel shift allows you to take multiple pictures while shifting the camera's image sensor by a single pixel or less and to merge them to generate a higher-resolution image than that which can be obtained through normal single-frame shooting. How Pixel Shift Works The Bayer image sensor installed in general cameras including Nikon cameras can only capture one type of color information (R, G, or B) per pixel.
VW VKRW QG VKRW UG VKRW WK VKRW 6HQVRU DUHD The image sensor can also be shifted by units smaller than a single pixel. Since the camera captures more detailed information, higher-resolution images than those captured by shifting one pixel unit can be generated. Nikon cameras can shift the image sensor by 0.5 pixels.
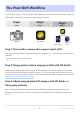
The Pixel Shift Workflow Pictures taken using pixel shift cannot be merged within the camera. NX Studio allows you to generate high-resolution images by merging pictures taken with pixel shift. Step1 Step2 Step3 6KRRW 0HUJH $GMXVW 1; 6WXGLR &DPHUD 1; 6WXGLR $GREH 3KRWRVKRS &DSWXUH 2QH Step 1: Shoot with a camera that supports pixel shift Take pictures using pixel shift to generate images for merging (0 19). The following cameras support pixel shift: Z 8 (firmware version C:2.
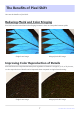
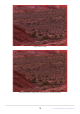
The Benefits of Pixel Shift Here are the benefits of pixel shift. Reducing Moiré and Color Fringing Pixel shift can reduce moiré and color fringing because it does not interpolate between pixels. Single frame image Merged pixel shift image Improving Color Reproduction of Details Pixel shift does not interpolate between pixels regardless of whether it merges 4, 8, 16, or 32 pictures, so color reproduction of details can be improved when compared to single frame shooting.
Improving Resolution By using pixel shift, more detailed information can be captured, resulting in high-resolution and high-definition images. Single frame image Merged pixel shift image Reducing Noise Noise can be noticeably reduced by merging 8 or 32 pictures with NX Studio.
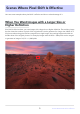
Scenes Where Pixel Shift Is Effective Here are some examples where pixel shift is effective and how to take advantage of it. When You Want Images with a Larger Size or Higher Definition Pixel shift is effective when you want images with a larger size or higher definition. The resulting image has four times the number of pixels of the original and it can be generated in a larger size.
Single frame image Merged pixel shift image with quadruple the number of pixels 10 Scenes Where Pixel Shift Is Effective
When You Want High Quality Images with the Same Size as Single Frame Shooting Pixel shift is effective even when a large image is not needed. "Oversampling," in which higherresolution data is taken and then resized to a smaller size, can generate a high-definition and highquality image at a high resolution while having the same image size as single frame shooting.
Single frame image Merged pixel shift image from 8 shots Merged pixel shift image from 32 shots, resized to a single frame image size Merged pixel shift image from 32 shots 12 Scenes Where Pixel Shift Is Effective
When You Shoot Subjects that Cause Moiré Moiré occurs due to the relationship between the fineness (frequency) of a subject’s structure, its colors, and the performance of the camera. It is difficult to eliminate moiré from pictures after shooting, so it is important to prevent it during shooting. Pixel shift is effective when shooting subjects with repeated fine structures, such as textiles, building roofs, or tile walls.
Single frame image Merged pixel shift image 14 Scenes Where Pixel Shift Is Effective
When You Need a Deeper Depth of Field or a Wider Angle of View Pixel shift is effective when you want to increase the area in focus or to include a wider area in the picture. It can generate images with approximately four times the resolution of a single frame shot. Therefore, it is possible to shoot away from the subject while maintaining the equivalent resolution of a single frame shot.
Tip: The Number of Pictures Taken during Pixel Shift Shooting In pixel shift shooting, you can select the number of pictures taken from 4, 8, 16, or 32. This provides several advantages during a pixel shift merge, depending on the number of pictures taken. More advantages can be gained as more pictures are taken. Number of shots Advantages Reducing moiré, color fringing, improving color reproduction of details, and resolution.
Number of shots Advantages Reducing moiré and color fringing, improving color reproduction of details, resolution, and doubling the image size. 16 Merged pixel shift image from 4 shots Merged pixel shift image from 16 shots Reducing moiré, color fringing, noise, improving color reproduction of details, resolution, and doubling the image size.
Notes on Pixel Shift Pixel shift is a technique that takes multiple pictures of the same subject while gradually changing in-camera settings and merges them into an image. Therefore, if some changes occur with the subject during pixel shift shooting, the pictures cannot be successfully merged. It is recommended to use pixel shift only when shooting a completely static subject with the camera fixed on a tripod or similar device.
Pixel Shift Shooting Before Pixel Shift Shooting Note the following before starting pixel shift shooting. Choose a Static Subject As mentioned in "Notes on Pixel Shift" (0 18), choose a static object as the subject. Examples of subjects suitable for pixel shift merge include: Buildings Objects Specimens and taxidermy mounts Landscapes Fix the Camera Be sure to fix the camera on a tripod or with a camera arm so that it will not move during pixel shift shooting.
Perform Pixel Mapping If unexpected bright spots appear in a shot taken during pixel shift shooting, performing a pixel shift merge may cause them to be more noticeable. We recommend using [Pixel mapping] in the setup menu before shooting. Set Functions That Can Be Used with Pixel Shift Shooting The following camera features can be used in combination with pixel shift shooting. Configure the settings before shooting begins.
Image Area Image areas can be selected using [Image area] in the photo shooting menu. Image areas other than [FX (36 x 24)] can also be set for pixel shift shooting.
Pixel Shift Shooting Settings Set the camera for pixel shift shooting in [Pixel shift shooting] in the photo shooting menu. Option [Pixel shift shooting mode] Description [On (series)]: Take multiple series of pixel shift pictures. To end pixel shift photography, select [Pixel shift shooting mode] again and choose [Off]. [On (single photo)]: End pixel shift photography after recording a single series. [Off]: End pixel shift photography.
Tip: Functions and Settings Useful for Creating Shortcuts for Pixel Shift Shooting Here are recommended functions and settings useful for creating shortcuts for pixel shift shooting. Assigning [Pixel shift shooting] to the i menu: Assign [Pixel shift shooting] using Custom Setting f1 [Customize i menu] to promptly move to the [Pixel shift shooting] settings display.
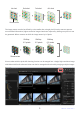
Merge Pictures Taken Using Pixel Shift Merge Pictures Taken Using Pixel Shift with NX Studio Merge pictures taken using pixel shift with NX Studio. The software will detect the pixel shift sequence of the selected picture and the pictures in the sequence can be merged into a single file. Using Pixel Shift Merge 1 Display the folder containing the pixel shift sequence, and click [Pixel shift merge] in the toolbar.
2 In the [Pixel Shift Merge] dialog, adjust settings such as "Merge mode" (number of generated images) and "Chromatic aberration correction" (0 26). 3 Click [Start] to save merged pixel shift images in the selected destination folder.
Pixel Shift Merge Setting Options Set options in the [Pixel Shift Merge] dialog as follows: Option Description Pixel shift sequence Select the sequence to merge. If there are multiple sequences in the view area, they can be selected and merged at the same time. [Merge mode] Select the number of images to generate after merging. The number of images depends on the number of pictures to be merged (0 27). [Chromatic aberration correction] Select [On] to reduce lateral color aberrations.
Number of Images Generated The number of generated images that can be selected varies as follows according to the number of pictures to be merged: No. of original pictures 4 No. of generated images Details 1 One merge to generate 1 image from 4 pictures. 1 One merge to generate 1 image from 8 pictures. 2 Two merges to generate 2 images from 4 pictures. 1 One merge to generate 1 image from 16 pictures. The resulting height and width are double those of the original pictures.
Tip: When the Merged Image Is Partially Disrupted If the camera, the subjects, or the light source moves during a pixel shift shooting, the merged image may be partially disrupted. The following figure shows how 32 pictures are merged into a single image. 1 2 3 4 5 6 7 8 9 10 11 12 13 14 15 16 17 18 19 20 21 22 23 24 25 26 27 28 29 30 31 32 If a merge includes pictures disrupted, the resulting image will be partially disrupted.
No.
generated using the 17th to 32nd pictures, so the first merged image, which does not include the 17th disrupted picture, will not be disrupted. The desired result is more likely to be achieved by generating a single image that produces the highest image quality first, and if disruption occurs, by increasing the number of generated images in the order of 2 images, 4 images, and 8 images. It is also recommended to always take 32 shots unless there is a particular reason not to.
Take Advantage of Pictures Taken Using Pixel Shift Adjust/Export the Images with NX Studio Pixel shift images merged with NX Studio can be adjusted in the adjustments/info palette [Adjustments] pane. Exported (converted) images can be adjusted or processed with third-party image editing software. Adjust Merged Pixel Shift Images Adjust images using tools in the [Adjustments] pane. Adjust settings such as [Picture Control], [Exposure Comp.], and [White Balance] as necessary.
Noise Reduction With the [Noise Reduction] item, you can set the amount of processing to reduce noise in the merged images. For merged pixel shift images, select [Resolution-priority pixel shift merge] to completely disable [Noise Reduction]. Since noise reduction is not performed, noise remains in the image, but the resolution of the image is maintained.
Export Merged Pixel Shift Images Click [Export] in the toolbar to export merged pixel shift images in JPEG, HEIF, or TIFF format. Choose a format, adjust image quality, size, and other settings, and click [Export] to export the files to the selected destination folder.
Tip: Using Third-Party Image Editing Software That Supports the NEFX Format When using third-party image editing software that supports images in the NEFX (merged pixel shift) format (extension: .nefx), save the image using [Save] or [Save As] in the [File] menu. In these cases, select [Save adjustments, labels, and ratings to the original image file] in the [Save] category of the options dialog before saving the image.
Using Third-Party Software Exported image files can be further processed and edited using third-party image editing software. Use image editing software that supports images in NEFX (merged pixel shift) format (extension: .nefx) to open a merged pixel shift image as is without converting it to JPEG or TIFF format. Software Manufacturers Providing Image Editing Software That Supports the NEFX Format The following software manufacturers provide image editing software that supports the NEFX format.
Appendix Recommended Settings Here are recommended settings for pixel shift shooting and merging images. Camera “Pixel Shift Shooting“ In the Photo Shooting Menu (0 22) Option Settings Description [Pixel shift shooting mode] [On (series)] Take multiple series of pixel shift pictures. [Number of shots] 32 pictures Merging 32 pictures generates the highest quality images. There will also be more options for the number of images to be generated than other settings.
NX Studio “Pixel Shift Merge“ (0 26) Option Settings Description [Merge mode] [Generate one image] By merging all the pictures in series, a merged image with the highest image quality is generated (0 26). [Chromatic aberration correction] [On] Perform accurate lateral color aberration corrections suitable for pixel shift shooting. “Noise Reduction“ (0 32) Option Settings Description Emphasize fine colors and details. Recommended when shooting at low sensitivities from ISO 64 to ISO 500.
Other The longer the shooting time, the more susceptible the camera is to external factors, and it may not be able to produce the desired result. Better results can be achieved by raising the ISO sensitivity and shortening the shooting time (0 18).
Troubleshooting Solutions to common issues are listed below. Merged Images Show Disruption Such as Banding, Uneven Colors, Mosaic Patterns, or Other Distortions Example of uneven colors (When the subject moved) Example of mosaic patterns (When the camera moved) Example of bandings (When the brightness changed) Change the number of images to be generated in pixel shift merge and re-examine the combination of pictures to be merged (0 27). The pictures may not have been taken properly.