Professional Technical Guide —HLG Photo Edition— © 2023 Nikon Corporation
Table of Contents HLG Photos. . . . . . . . . . . . . . . . . . . . . . . . . . . . . . . . . . . . . . . . . . . . . . . . . . . . . . . . . . . . . . . . . . . . . . . 3 HLG Photos Defined. . . . . . . . . . . . . . . . . . . . . . . . . . . . . . . . . . . . . . . . . . . . . . . . . . . . . . . . . . . . . . . . . . . . . . 3 The Benefits of HLG. . . . . . . . . . . . . . . . . . . . . . . . . . . . . . . . . . . . . . . . . . . . . . . . . . . . . . . . . . . . . . . . . . . . . .
HLG Photos HLG Photos Defined “HLG photos” are photos that support a wider range of brightnesses (i.e., dynamic range) than do SDR (Standard Dynamic Range) JPEG pictures. The Z 8 supports HLG with two formats: RAW (extension “.NEF”) and HEIF (extension “.HIF”).
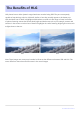
The Benefits of HLG HLG photos have a wider dynamic range than those recorded using SDR. They are consequently capable of reproducing colors in rich detail, similar to how they actually appear to the human eye. HLG minimizes loss of detail in highlights and shadows to render a richer range of tones in all areas of photos featuring scenes that include both bright and dark areas, such as, for example, sunsets and sunrises.
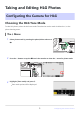
Taking and Editing HLG Photos Configuring the Camera for HLG Choosing the HLG Tone Mode To take HLG photos, select the HLG tone mode. The selection can be made via either the i or the photo shooting menu. The i Menu 1 Select photo mode by rotating the photo/video selector to C. 2 Press the i button or tap the i icon in the monitor to view the i menu for photo mode. 3 Highlight [Tone mode] and press J. Tone mode options will be displayed.
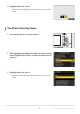
4 Highlight [HLG] and press J. This selects the highlighted option and returns you to the i menu. The Photo Shooting Menu 1 Press the G button to view the menus. 2 After highlighting the C tab to display the photo shooting menu, highlight [Tone mode], and press the multi selector right (2). 3 Highlight [HLG] and press J. This selects the highlighted option and returns you to the menus.
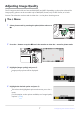
Adjusting Image Quality The Z 8 supports HLG with two formats: RAW (NEF) and HEIF. Depending on the option selected for image quality, photos can be recorded only in RAW (NEF) format, only in HEIF format, or in both formats. The selection can be made via either the i or the photo shooting menu. The i Menu 1 Select photo mode by rotating the photo/video selector to C. 2 Press the i button or tap the i icon in the monitor to view the i menu for photo mode. 3 Highlight [Image quality] and press J.
The Photo Shooting Menu 1 Press the G button to view the menus. 2 After highlighting the C tab to display the photo shooting menu, highlight [Image quality], and press the multi selector right (2). 3 Highlight the desired option and press J. This selects the highlighted option and returns you to the menus. For information on the options available, see “Image Quality Options” ( 0 9).
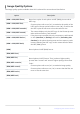
Image Quality Options The image quality options available when HLG is selected for tone mode are listed below. Option [RAW + JPEG/HEIF finem] [RAW + JPEG/HEIF fine] [RAW + JPEG/HEIF normalm] [RAW + JPEG/HEIF normal] [RAW + JPEG/HEIF basicm] [RAW + JPEG/HEIF basic] [RAW] Description Record two copies of each photo: an NEF (RAW) picture and an HEIF copy. Choose options with a star (“m”) to maximize the quality of the HEIF copies.
D Taking Photos in HLG Pictures taken with HLG selected for tone mode exhibit more “noise“ (in the form of randomlyspaced bright pixels, fog, and lines) than do pictures taken using SDR. The performance of subject-detection may drop during autofocus. The lowest value available for the [ISO sensitivity settings] > [Maximum sensitivity] item in the photo shooting menu is ISO 800. ISO sensitivities of Hi 0.3 through Hi 2.0 are not available. The video file type for time-lapse videos is fixed at [H.
Tip: Editing HLG Photos HLG photos can be edited on the Z 8 using the [Retouch] item in the playback i menu. The following options can be used: - RAW processing (current picture; NEF/RAW pictures only) - RAW processing (multiple pictures; NEF/RAW pictures only) - Trim - Resize (current picture) - Resize (multiple pictures) - D-Lighting - Straighten - Distortion control - Perspective control - Monochrome HLG photos can also be edited using Nikon’s NX Studio software.
Viewing HLG Photos on a Computer What You’ll Need The following are the system requirements for the correct display of tones when viewing HLG photos. Windows OS Windows 11 Windows 10 - Version 1709 or later - Latest graphics driver (WDDM) GPU HDR10 compatible with support for PlayReady digital rights management (DRM) Monitor DisplayHDR 1000 (recommended) Cable HDMI 2.0a or later DisplayPort 1.
● NX Studio To display HLG photos, you will need to install Nikon’s NX Studio software. Doing so allows you to view and edit photos and videos shot with Nikon digital cameras. Download the latest version of the NX Studio installer from the website below and follow the on-screen instructions to complete installation. https://downloadcenter.nikonimglib.com/ D Installing the Codec Viewing HLG photos in NX Studio requires the corresponding “Imaging Codec 01” codec.
macOS Monitor Liquid Retina XDR (including built-in MacBook Pro displays) or Pro Display XDR Software NX Studio (be sure to install the latest version) D Other Monitors Highlights in HLG photos may seem “washed out” if not viewed on a Liquid Retina XDR or Pro Display XDR monitor. This can sometimes be addressed by lowering display (monitor) brightness in the computer’s system settings. ● NX Studio To display HLG photos, you will need to install Nikon’s NX Studio software.
Viewing HLG Photos on a Computer HLG photos are identified by “HLG” icons in the NX Studio thumbnail list.
The [File Info 2] pane in the info tab of the adjustments/info palette lists the tone mode as “HLG”, while the [Image Settings] pane lists the color space as “BT.2100”.
Ensuring That Tones Are Displayed Correctly “HDR” icons appear at the bottom right corners of HLG photos displayed in single-frame view in NX Studio on HDR-compatible monitors. This indicates that tones are displayed correctly. D Monitors That Do Not Satisfy the DisplayHDR 1000 Standard Highlights in HLG photos may seem “washed out” when viewed on a Windows computer with a display that does not satisfy the DisplayHDR 1000 standard.
Editing (Enhancing) HLG Photos in NX Studio HLG photos can be edited (enhanced) using the tools in the [Adjustments] tab of the NX Studio adjustments/info palette. The following tools are available.
[Basic Edit Palettes] (RAW pictures only) Picture Controls White balance Exposure compensation [Levels & Curves] Contrast Tone curves (brightness) Color balance [Portrait Enhancements] (RAW pictures only) Skin softening Portrait impression balance 19 Editing (Enhancing) HLG Photos in NX Studio
[Adjust Details] (RAW pictures only) Noise reduction [Touch-up] Retouch brush [Adjust Composition] Crop Straighten Perspective control [Camera and Lens Corrections] Lateral color aberration Auto distortion control Vignette control Diffraction compensation (RAW pictures only) Fisheye 20 Editing (Enhancing) HLG Photos in NX Studio
Enhancing HLG Photos Enable [Adjust using HDR] in the [Adjustments] tab. Enabling this option allows edits to photos in the HDR tone range. Remove the check to use the SDR tone range.
Picture Controls (HLG) Enabling [Adjust using HDR] enables the [Set Picture Control (HLG)] Picture Control tool. Note that HLG Picture Controls are available only with RAW pictures taken with HLG selected for tone-mode. The Picture Control tool changes to [Set Picture Control] when [Adjust using HDR] is disabled.
Color reproduction process: Fixed at [Camera compatible]; cannot be changed. Picture Control: Choose a Picture Control for the pictures in the current selection. Picture Control parameters: Adjust Picture Control parameters. Note that even in the case of pictures taken under similar conditions, the results may vary with exposure and the position and size of the subject in the frame. [Reset]: Reset all parameters to their default values.
[Saturation] Control the vividness of colors. Choose lower values for more muted colors and higher values for more vivid colors. [Hue] Adjust hue. [Filter Effect] Simulate the effects of color filters on monochrome photos. This parameter is available only with the [[HLG MC] Monochrome] Picture Control. [Toning] Choose a base tint for results that mimic the effects of printing photos on tinted paper. This parameter is available only with the [[HLG MC] Monochrome] Picture Control.
Saving Pictures in Other Formats Using NX Studio NX Studio can be used to create JPEG, HEIF, or TIFF format copies of photos taken with HLG selected for tone mode. RAW (NEF) and HEIF photos can be viewed in third-party software that does not support these formats by converting them to JPEG or TIFF. If desired, entire folders can be selected for conversion to other formats. Saving Pictures in Other Formats: An Overview 1 Click [Export] in the toolbar.
2 A dialog will be displayed where you can adjust image quality, size, and other settings. For information on the options available, see “Export Options” ( 0 28).
3 Click [Export]. The copies will be saved in the selected folder. D RAW Pictures [Export] can be used to save RAW pictures in other formats. To save RAW pictures without converting them to other formats, use [Save] or [Save As] in the [File] menu. More options for use when saving pictures can be found in the [Save] section of the [Options] dialog.
Export Options The following settings can be adjusted: [Original Image] Export the pictures in the current selection or in selected folders. [Selected images]: Export the pictures in the current selection. [Selected folder]: Export all pictures in a selected folder. To choose the folder, click [Browse]. - [Include subfolders]: Include pictures in all sub-folders under the selected folder. - [Delete originals after operation]: Delete the original pictures from the folder once export is complete.
[Resolution] Export pictures at new resolutions. [Change image size] Resize pictures during export. Entering a value for [Long edge] automatically updates [Short edge] to maintain aspect ratios. The units can be selected from [pixels], [inch] (inches), and [cm] (centimeters). [Remove camera setting information] Strip shooting data from pictures during export. [Remove XMP/IPTC information] Strip XMP/IPTC information from pictures during export.
Converting Pictures to Color Spaces Other than sRGB RAW pictures taken in the sRGB color space can be converted to other color spaces during export. Note, however, that the color space for RAW pictures recorded with HLG selected for tone mode is fixed at BT.2100, regardless of the color space selected at export or in the options (preferences) dialog.
2 Remove the check from [Convert images to sRGB color space when they are converted into JPEG/TIFF format] under [Output] in the [Color Management] panel.
3 Select the desired option for [Options] > [NEF (RAW) Processing] > [Color Space for Color Reproduction]. Tip: “Color Space for Color Reproduction” The current color space for color reproduction can be viewed using the i button on the camera.
4 Select [Export] > [Add/Remove ICC color profile] and choose [Add]. 5 Click [Export]. The pictures will be exported in the selected color space.
Tip: Restoring the sRGB Color Space To restore pictures to the sRGB color space: select [sRGB] for [Options] > [NEF (RAW) Processing] > [Color Space for Color Reproduction], place a check next to [Convert images to sRGB color space when they are converted into JPEG/ TIFF format] under [Output] in the [Color Management] panel, and select [Nikon Adobe sRGB 4.0.0.
Troubleshooting Problems and Solutions ● HLG (HEIF) photos do not display correctly: Pictures taken with HLG selected for tone mode may not display correctly when viewed on other devices (for example, when output to other devices directly or when opened on a computer after upload). View the pictures on an HDR-compatible computer or other device. For more information on viewing HLG pictures on a computer, visit the following website: https://onlinemanual.nikonimglib.