
Reference Guide (PDF Edition)
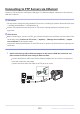
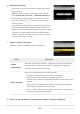
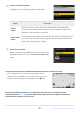
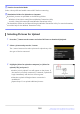
Table Of Contents
- Table of Contents
- When Your First Photo Can’t Wait
- Before You Begin
- Parts of the Camera
- Using the Menus
- First Steps
- Basic Photography and Playback
- Shooting Settings
- Video Recording
- Viewing Pictures
- Retouching Photographs
- Editing Videos
- Voice Memos
- Connecting to HDMI TVs and Recorders
- Connecting to Smart Devices
- Connecting to Computers or FTP Servers
- Making the Connection
- Computers: Connecting via USB
- Computers: Connecting via Wireless LAN
- Computers: Connecting via Ethernet
- FTP Servers: Connecting via Wireless LAN
- FTP Servers: Connecting via Ethernet
- What You Can Do When the Camera Is Connected to a Computer or FTP Server
- Troubleshooting Wireless LAN and Ethernet Connections
- Connecting to Other Cameras
- Flash Photography
- Remote Flash Photography
- The Photo Shooting Menu
- Menu Items and Defaults
- Shooting Menu Bank
- Extended Menu Banks
- Storage Folder
- File Naming
- Primary Slot Selection
- Secondary Slot Function
- Image Area
- Tone Mode
- Image Quality
- Image Size Settings
- RAW Recording
- ISO Sensitivity Settings
- White Balance
- Set Picture Control
- Manage Picture Control
- Set Picture Control (HLG)
- Color Space
- Active D-Lighting
- Long Exposure NR
- High ISO NR
- Vignette Control
- Diffraction Compensation
- Auto Distortion Control
- Skin Softening
- Portrait Impression Balance
- Photo Flicker Reduction
- High-Frequency Flicker Reduction
- Metering
- Flash Control
- Flash Mode
- Flash Compensation
- Focus Mode
- AF-Area Mode
- AF Subject Detection Options
- Vibration Reduction
- Auto Bracketing
- Multiple Exposure
- HDR Overlay
- Interval Timer Shooting
- Time-Lapse Video
- Focus Shift Shooting
- The Video Recording Menu
- Menu Items and Defaults
- Shooting Menu Bank
- Extended Menu Banks
- Storage Folder
- File Naming
- Destination
- Video File Type
- Frame Size/Frame Rate
- Video Quality (N-RAW)
- Image Area
- Extended Oversampling
- ISO Sensitivity Settings
- White Balance
- Set Picture Control
- Manage Picture Control
- HLG Quality
- Active D-Lighting
- High ISO NR
- Vignette Control
- Diffraction Compensation
- Auto Distortion Control
- Skin Softening
- Portrait Impression Balance
- Video Flicker Reduction
- High-Frequency Flicker Reduction
- Metering
- Focus Mode
- AF-Area Mode
- AF Subject Detection Options
- Vibration Reduction
- Electronic VR
- Microphone Sensitivity
- Attenuator
- Frequency Response
- Wind Noise Reduction
- Mic Jack Plug-in Power
- Headphone Volume
- Timecode
- External Rec. Cntrl (HDMI)
- Hi-Res Zoom
- The Custom Settings Menu
- Menu Items and Defaults
- Custom Settings Bank
- a1: AF-C Priority Selection
- a2: AF-S Priority Selection
- a3: Focus Tracking with Lock-On
- a4: Focus Points Used
- a5: Store Points by Orientation
- a6: AF Activation
- a7: Focus Point Persistence
- a8: Limit AF-Area Mode Selection
- a9: Focus Mode Restrictions
- a10: Focus Point Wrap-Around
- a11: Focus Point Display
- a12: Built-in AF-Assist Illuminator
- a13: Focus Peaking
- a14: Focus Point Selection Speed
- a15: Manual Focus Ring in AF Mode
- b1: ISO Sensitivity Step Value
- b2: EV Steps for Exposure Cntrl
- b3: Easy Exposure Compensation
- b4: Matrix Metering Face Detection
- b5: Center-Weighted Area
- b6: Fine-Tune Optimal Exposure
- b7: Keep Exp. When f/ Changes
- c1: Shutter-Release Button AE-L
- c2: Self-Timer
- c3: Power Off Delay
- d1: Continuous Shooting Speed
- d2: Maximum Shots per Burst
- d3: Pre-Release Capture Options
- d4: Sync. Release Mode Options
- d5: Extended Shutter Speeds (M)
- d6: Limit Selectable Image Area
- d7: File Number Sequence
- d8: View Mode (Photo Lv)
- d9: Starlight View (Photo Lv)
- d10: Warm Display Colors
- d11: LCD Illumination
- d12: View All in Continuous Mode
- d13: Release Timing Indicator
- d14: Image Frame
- d15: Grid Type
- d16: Virtual Horizon Type
- d17: Custom Monitor Shooting Display
- d18: Custom Viewfinder Shooting Display
- d19: High FPS Viewfinder Display
- e1: Flash Sync Speed
- e2: Flash Shutter Speed
- e3: Exposure Comp. for Flash
- e4: Auto Flash ISO Sensitivity Control
- e5: Modeling Flash
- e6: Auto Bracketing (Mode M)
- e7: Bracketing Order
- e8: Flash Burst Priority
- f1: Customize i Menu
- f2: Custom Controls (Shooting)
- f3: Custom Controls (Playback)
- f4: Control Lock
- f5: Reverse Dial Rotation
- f6: Release Button to Use Dial
- f7: Reverse Indicators
- f8: Reverse Ring for Focus
- f9: Focus Ring Rotation Range
- f10: Control Ring Response
- f11: Switch Focus/Control Ring Roles
- f12: Full-Frame Playback Flicks
- f13: Prefer Sub-selector Center
- g1: Customize i Menu
- g2: Custom Controls
- g3: Control Lock
- g4: Limit AF-Area Mode Selection
- g5: Focus Mode Restrictions
- g6: AF Speed
- g7: AF Tracking Sensitivity
- g8: Hi-Res Zoom Speed
- g9: Fine ISO Control (Mode M)
- g10: Extended Shutter Speeds (Mode M)
- g11: View Assist
- g12: Zebra Pattern
- g13: Limit Zebra Pattern Tone Range
- g14: Grid Type
- g15: Brightness Information Display
- g16: Custom Monitor Shooting Display
- g17: Custom Viewfinder Shooting Display
- g18: Red REC Frame Indicator
- The Playback Menu
- The Setup Menu
- Menu Items and Defaults
- Format Memory Card
- Language
- Time Zone and Date
- Monitor Brightness
- Monitor Color Balance
- Viewfinder Brightness
- Viewfinder Color Balance
- Finder Display Size (Photo Lv)
- Limit Monitor Mode Selection
- Auto Rotate Info Display
- AF Fine-Tuning Options
- Non-CPU Lens Data
- Save Focus Position
- Auto Temperature Cutout
- Sensor Shield Behavior at Power Off
- Clean Image Sensor
- Image Dust Off Ref Photo
- Pixel Mapping
- Image Comment
- Copyright Information
- IPTC
- Voice Memo Options
- Camera Sounds
- Silent Mode
- Touch Controls
- HDMI
- USB Connection Priority
- Location Data
- Wireless Remote (WR) Options
- Assign Remote (WR) Fn Button
- Conformity Marking
- Battery Info
- USB Power Delivery
- Energy Saving (Photo Mode)
- Slot Empty Release Lock
- Save/Load Menu Settings
- Reset All Settings
- Firmware Version
- The Network Menu
- My Menu/Recent Settings
- Troubleshooting
- Technical Notes
- Compatible Lenses and Accessories
- Camera Displays
- Compatible Flash Units
- Other Compatible Accessories
- Optional MB-N12 Power Battery Packs
- Parts of the MB-N12: Names and Functions
- Attaching the MB-N12
- Inserting Batteries in the MB-N12
- Charging Batteries Using an Optional EH-7P Charging AC Adapter or EH-8P AC Adapter
- Using an Optional EH-7P Charging AC Adapter or EH-8P AC Adapter as a Power Source
- Checking the Level of the Batteries in the MB-N12
- Precautions for Use
- If the Holder-Chamber Cover Detaches
- Specifications
- Attaching an EP-5B Power Connector and EH-5d, EH-5c, or EH-5b AC Adapter
- Software
- Caring for the Camera
- Caring for the Camera and Battery: Cautions
- Specifications
- Approved Memory Cards
- Portable Chargers (Power Banks)
- Memory Card Capacity
- Memory Card Capacity (Videos)
- Battery Endurance
- Trademarks and Licenses
- Notices
- Bluetooth and Wi-Fi (Wireless LAN)
- Index

Name the new profile.
To proceed t
o the next step without changing the default
name, press X.
Whatever name you choose will appear in the network
menu [Connect to FTP server]> [Network settings] list.
To rename the profile, press J. For information on text
entry, see “Text Entry” (
0 67). Press X to proceed after
entering a name.
There may be a delay before the camera detects the USB-
to-Ethernet adapter. If the camera is unable to detect an
Ethernet connection, the wizard will be configured to begin
creation of a wireless LAN profile with the default name
“WLAN1”. Tap Z or press 4 to return to Step 4, wait about
10 seconds, and then try again.
Obtain or select an IP address.
Highlight one of the following options and press J
.
Option Description
[Obtain
automatically]
Select this option if the network is configur
ed to supply the IP address
automatically. A “configuration complete” message will be displayed
once an IP address has been assigned.
[Enter manually]
Enter the IP addr
ess and sub-net mask manually.
Press J
; you will be prompted to enter the IP address.
Rotate the main command dial to highlight segments.
Press 4 or 2 to change the highlighted segment and press J to save
changes.
Next, press X; a “configuration complete” message will be displayed.
Press X again to display the sub-net mask.
Press 1 or 3 to edit the sub-net mask and press J; a “configuration
complete” message will be displayed.
Press J
to proceed when the “configuration complete” message is displayed.
354
FTP Ser
vers: Connecting via Ethernet
6
7
8