
Додатковий посібник з оновлення мікропрограми
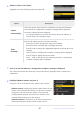
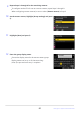
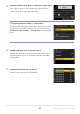
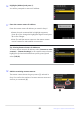
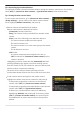
Table Of Contents
- Table of Contents
- Changes with “C” Firmware Version 2.00
- Features Available with “C” Firmware Version 2.00
- Changes Made with “C” Firmware Version 2.00
- New AF Subject Detection Option: “Birds”
- New Bracketing Increments
- New Items Added to Picture Control
- Addition of “Large” to Size Options Available for “JPEG Primary - JPEG Secondary” and “HEIF Primary - HEIF Secondary”
- New Menu Item: “Pixel Shift Shooting”
- New Menu Item: “Auto Capture”
- More Time for Pre-Release Capture
- New: Slow-Motion Videos
- Color Change to Hi-Res Zoom In-Focus Display
- Low ISO Sensitivity Settings for N-Log Video
- Changes to Hi-Res Zoom Speeds Available in g8 “Hi-Res Zoom Speed” in the Custom Settings Menu
- Changes to i-Menu “Select for Upload” Options
- Priority Upload Options Added to i Menu
- Addition of “Playback Speed” Item to the Video Playback i Menu
- Addition of “Auto Series Playback Options” to “Series Playback” in Playback Menu
- Addition of “Auto Image Rotation” to Playback Menu
- Support for Power Zoom
- Addition of “Focus Point Border Width” Item to a11 “Focus Point Display” in the Custom Settings Menu
- New Custom Setting: d5 “Exposure Delay Mode”
- Addition of “Half-Press to Cancel Zoom (MF)” Item to d18 and g17 in the Custom Settings Menu
- Exposure Compensation and White Balance Now Changeable During Shooting Function Recall
- New Options for Custom Settings f2 “Custom Controls (Shooting)” and g2 “Custom Controls”
- New Options for Custom Setting f3 “Custom Controls (Playback)”
- Changes to Method for Performing a Full Format with “Format Memory Card” in the Setup Menu
- Updates to “Non-CPU Lens Data”
- Changes to Character Limit for “Category” Entries when Editing Presets with “IPTC” in the Setup Menu
- Changes to Setup Menu “Camera Sounds” Options
- Shooting Display Maximum Magnification Increased to 400%
- “Finder Display Size (Photo Lv)” Changed to “Viewfinder Display Size” in the Setup Menu
- Updated Distance Display for Manual Focus
- Changes and Additions to “Connect to FTP Server”
- Changes to Synchronized Release
- New “Overwrite Copyright Info” Option for Master Cameras
- Using AirGlu Accessories While MC-N10 Remote Grips Connected
- Menu Items and Defaults for “C” Firmware Version 2.00
- Post-Upgrade Specifications for “C” Firmware Version 2.00
- Index

Obtain or select an IP address.
Highlight one of the following options and pr
ess J.
Highlight [Master/remote] and press 2.
Choose a role for each camera fr
om “master” and “remote”.
[Master camera]: Pressing the shutter-release button on the
master camera releases the shutters on the remote cameras.
Each group can have only one master. If the group has
multiple master cameras, only the first to connect to the
network will actually serve in that capacity.
[Remote camera]: The shutters on the remote cameras are
synchronized with the shutter on the master camera.
Option Description
[Obtain
automatically]
Select this option if the netw
ork is configured to supply the IP address
automatically. A “configuration complete” message will be displayed
once an IP address has been assigned.
It is recommended that you note the remote camera IP address, as
you will need it in subsequent steps.
[Enter
manually]
Ent
er the IP address and sub-net mask manually.
Press
J; you will be prompted to enter the IP address.
Rotate the main command dial to highlight segments.
Press 4 or 2 to change the highlighted segment and press J to save
changes.
Next, press X; a “configuration complete” message will be displayed.
Press X again to display the sub-net mask.
Press 1 or 3 to edit the sub-net mask and press J; a “configuration
complete” message will be displayed.
Press J
to proceed when the “configuration complete” message is displayed.
The camera will initiat
e the connection. The profile name is displayed when a connection is
established.
81
Changes to Synchronized Release
6
7
8