Z 8 Reference Guide (Supplement for Firmware Version 2.
Table of Contents Changes with “C” Firmware Version 2.00. . . . . . . . . . . . . . . . . . . . . . . . . . . . . . . . . . . . . . . . . . . . . . 6 Features Available with “C” Firmware Version 2.00. . . . . . . . . . . . . . . . . . . . . . . . . . . . . . . . . . . . . . . . . . . . 6 “Firmware Version”. . . . . . . . . . . . . . . . . . . . . . . . . . . . . . . . . . . . . . . . . . . . . . . . . . . . . . . . . . . . . . . . . . . . 6 Changes Made with “C” Firmware Version 2.00. . . . . . . . . . . .
Addition of “Auto Series Playback Options” to “Series Playback” in Playback Menu. . . . . . . . . . . . . . 47 Addition of “Auto Image Rotation” to Playback Menu. . . . . . . . . . . . . . . . . . . . . . . . . . . . . . . . . . . . . . . 48 Support for Power Zoom. . . . . . . . . . . . . . . . . . . . . . . . . . . . . . . . . . . . . . . . . . . . . . . . . . . . . . . . . . . . . . . . 49 New Custom Setting: f12 “Assign Power Zoom Buttons”. . . . . . . . . . . . . . . . . . . . . . . . . . . . . . . . .
Increased Profile Storage. . . . . . . . . . . . . . . . . . . . . . . . . . . . . . . . . . . . . . . . . . . . . . . . . . . . . . . . . . . . . . 69 Auto Reconnect on Error. . . . . . . . . . . . . . . . . . . . . . . . . . . . . . . . . . . . . . . . . . . . . . . . . . . . . . . . . . . . . . 69 Changes to Synchronized Release. . . . . . . . . . . . . . . . . . . . . . . . . . . . . . . . . . . . . . . . . . . . . . . . . . . . . . . . . 70 Configuring and Using Synchronized Release. . . . . . . . . .
V. . . . . . . . . . . . . . . . . . . . . . . . . . . . . . . . . . . . . . . . . . . . . . . . . . . . . . . . . . . . . . . . . . . . . . . . . . . . . . . . . .
Changes with “C” Firmware Version 2.00 Features Available with “C” Firmware Version 2.00 The Z 8 Reference Guide is for “C” firmware version 1.01 (the latest version of the Z 8 Reference Guide is available from the Nikon Download Center). This chapter details the new features and changes introduced with camera “C” firmware version 2.00. The two documents are to be read together.
Changes Made with “C” Firmware Version 2.00 The features added or updated with camera “C” firmware version 2.00 are summarized below. More information is available on the pages listed. For information on the menu items and defaults for “C” firmware version 2.00, see ‘Menu Items and Defaults for “C” Firmware Version 2.00’ ( 0 90).
Controls Support for Power Zoom ( 0 49) Addition of “Focus Point Border Width” Item to a11 “Focus Point Display” in the Custom Settings Menu ( 0 51) New Custom Setting: d5 “Exposure Delay Mode” ( 0 52) Addition of “Half-Press to Cancel Zoom (MF)” Item to d18 and g17 in the Custom Settings Menu ( 0 53) Exposure Compensation and White Balance Now Changeable During Shooting Function Recall ( 0 54) New Options for Custom Settings f2 “Custom Controls (Shooting)” and g2 “Custom Controls” ( 0 55) New Options for C
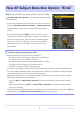
New AF Subject Detection Option: “Birds” [Birds] has been added to the subject detection options available in [AF subject detection options] in the photo shooting and video recording menus. In the case of the video recording menu, the choice of subject is made via [AF subject detection options] > [Subject detection]. Separate subject types can be selected for photo and video modes. If a bird is detected when [Birds] is selected, the focus point will appear over the face of the bird in question.
New Bracketing Increments New options are available to the bracketing increments when [AE & flash bracketing], [AE bracketing], or [Flash bracketing] is selected for [Auto bracketing] > [Auto bracketing set] in the photo shooting menu. Increments of 1.3, 1.7, 2.3, and 2.7 EV have been added to options available when ¹⁄₃ step is selected for Custom Setting b2 [EV steps for exposure cntrl]. Increments of 1.5 and 2.
New Items Added to Picture Control The following 3 items have been added to [Set Picture Control] in the photo shooting and video recording menus. Option Description 2 [Flat Monochrome] Features gentle gradations from highlights to shadows, producing soft monochrome pictures. 3 [Deep Tone Monochrome] Choose for slightly darker tones in the range from shadows to midtones, with brightness rapidly increasing as tones progress from mid-tones to highlights.
Picture Control Settings The options available when [Flat Monochrome] or [Deep Tone Monochrome] is selected are as follows. - [Quick sharp] - [Sharpening] - [Mid-range sharpening] - [Clarity] - [Contrast] - [Brightness] - [Filter effects] - [Toning] The options available when [Rich Tone Portrait] is selected are as follows.
Addition of “Large” to Size Options Available for “JPEG Primary - JPEG Secondary” and “HEIF Primary - HEIF Secondary” [Large] has been added to the size options available for copies recorded to the memory card in the secondary slot when [JPEG primary - JPEG secondary] or [HEIF primary - HEIF secondary] is selected for [Secondary slot function] in the photo shooting menu. The size can be selected by pressing 2 when [JPEG primary - JPEG secondary] or [HEIF primary - HEIF secondary] is highlighted.
New Menu Item: “Pixel Shift Shooting” A [Pixel shift shooting] item has been added to the photo shooting menu. The camera automatically shoots a series of NEF (RAW) photos, changing the position of the image sensor with each one. The photos can be blended using Nikon’s NX Studio software to create a single high-resolution image. Option [Pixel shift shooting mode] Description [On (series)]: Take multiple series of pixel shift photos.
Taking Photos Using Pixel Shift D Before Shooting Pixel shift is intended for pictures of landscapes, buildings, and other static subjects shot with the camera on a tripod. The desired results may consequently not be achieved with moving subjects or shots taken without a tripod. To improve the image quality of the resulting pixel-shift blended pictures, we recommend performing pixel mapping via [Pixel mapping] in the setup menu before shooting. Take a test shot at current settings.
3 Select a [Pixel shift shooting mode]. Highlight [Pixel shift shooting mode] and press 2. Press 1 or 3 to select [On (series)] or [On (single photo)], then press J. - Image quality will be fixed at [RAW]. An icon will appear in the shooting display. 4 Choose the [Number of shots]. Highlight [Number of shots] and press 2. Choose the number of shots using 1 or 3 and press J.
5 Choose a value for [Delay]. Highlight [Delay] and press 2. Choose the delay between the shutter-release button being pressed all the way down and the start of pixel shift photography. Choose a delay (in seconds) using 1 or 3 and press J. 6 Choose a value for [Interval until next shot]. Highlight [Interval until next shot] and press 2. Choose the interval between shots, in seconds. Choose an interval (in seconds) using 1 or 3 and press J.
7 Frame the photograph, focus, and shoot. Press the shutter-release button all the way down; the number selected for [Number of shots] will be displayed in the control panel, and the camera will begin taking NEF (RAW) photos after the time selected for [Delay], continuing until the selected number of shots has been taken. Shooting may continue for some time depending on the value selected for [Number of shots].
D Cautions: Pixel Shift In continuous release modes, the camera will not shoot continuously while the shutter-release button is held all the way down. Changing camera settings while pixel shift is in progress may cause shooting to end. Long time-exposures (“Bulb” or “Time”) are not supported. If the shutter speed is set to Bulb or Time, [Bulb] or [Time] will flash in the shooting display and control panel. The focus mode for autofocus is fixed at AF-S.
New Menu Item: “Auto Capture” [Auto capture] items have been added to the photo shooting and video recording menus. These items are used to shoot bursts or record video automatically when the camera detects that the subject meets certain conditions, for example that it is in the frame, within a certain range of distances, and moving in a certain direction. They can even help photographers take photographs or record videos automatically without being present.
The Auto Capture Settings Display The auto capture settings display can be viewed by selecting [Start] for [Auto capture] in the photo shooting or video recording menu. Highlight items and press J to display options for the selected item. 1 2 3 1 2 3 4 5 6 4 5 6 [Capture criteria] [Advanced: Motion] [Advanced: Subject detection] Option [Advanced: Distance] [Target area] [Timing options] Description Adjust auto capture criteria.
Option Description This option will take effect only if [Subject detection] is selected [Advanced: Subject detection] [Advanced: Distance] (M) for [Capture criteria]. It is used to choose the type and size of subjects that will trigger auto capture ( 0 33). This option will take effect only if [Distance] is selected (M) for [Capture criteria]. It is used to choose the range of distances at which the presence of a subject will trigger auto capture (0 35).
Taking Pictures Using Auto Capture D Before Shooting We recommend using one of the following power sources to prevent loss of power while shooting is in progress: - A fully-charged battery - An optional EH‑7P charging AC adapter - An optional EH‑8P AC adapter with a UC‑E25 USB cable (featuring Type C connectors at both ends) - An optional EP‑5B power connector with an EH‑5d, EH‑5c, or EH‑5b AC adapter In photo mode, only [FX (36×24)] and [DX (24×16)] image areas are available.
3 If you are using auto capture for photographs, select a continuous release mode: [Continuous high-speed], [Continuous low-speed], [C30], [C60] or [C120]. If you are using auto capture to record videos, proceed to Step 4. If single-frame or self-timer mode is selected, the camera will temporarily switch to continuous high-speed mode when auto capture begins. If you selected continuous low-speed or continuous high-speed mode, choose the frame advance rate before proceeding. 4 Position the focus point.
7 Highlight [Start] and press J. Auto capture settings will be displayed. 8 Highlight [Capture criteria] and press J. Adjust auto capture criteria. Highlight options and press J to select (M) or deselect (U). Press X to save changes and return to the auto capture settings display. 9 Adjust settings for each of the criteria selected for [Capture criteria]. For information on the criteria available when [Motion] is enabled (M), see ‘“Capture Criteria” > “Motion”’ ( 0 30).
10 Highlight [Target area] and press J. Choose the focus points used for subject detection when [Auto-area AF] is selected for AF-area mode. Target-area selection is not available in other AF-area modes. If another mode is selected, proceed to Step 11. Target-area selection can be used to disable focus points in areas of the frame that are blocked by obstacles or can otherwise be ignored for purposes of subject detection, ensuring that the desired subject can be detected more reliably.
11 Highlight [Timing options] and press J. Use [Recording time selection] to choose the length of each individual burst or video recording; options include [OFF] (no limit) and values of from 1 second to 30 minutes. When an option other than [OFF] is selected, shooting will continue for the selected time even if the trigger conditions are no longer met.
13 Check that the camera can detect subjects as desired using the selected criteria. Subjects detected by the camera are shown by green boxes in the settings confirmation dialog. You can choose the focus point when an option other than [Auto-area AF] is selected for AF-area mode. If you select [Wide-area AF (C1)] or [Wide-area AF (C2)] for AF-area mode, you can choose the size of the focus area by holding the focus-mode button and pressing 1, 3, 4, or 2.
D The Auto Capture Standby Display “A- CAP” will be displayed in the control panel. An X icon will flash in the shooting display. Tip: Pre-Release Capture The settings selected for Custom Setting d3 [Pre-Release Capture options] apply when [C30], [C60] or [C120] is selected for release mode. Tip: Silent Mode Silent mode can be enabled by selecting [ON] for [Silent mode] in the setup menu.
“Capture Criteria“ > “Motion” This option is used to choose the direction of motion, size, and speed of subjects that will trigger auto capture. 1 Highlight [Advanced: Motion] in the auto capture settings display and press J. Motion criteria will be displayed. 2 Press the W (Q) button and select directions. Direction criteria will be displayed. Highlight directions and press J to select (M) or deselect (U). Press X to save changes and return to the motion settings display.
3 Rotate the main command dial to choose the subject speed. Rotate the main command dial to choose a [Speed] of [1] to [5]. Choose higher values to restrict subject detection to fastermoving subjects, lower values to include subjects moving at slower speeds. Tip: Size and Speed Subjects that meet the criteria for [Subject Size] and [Speed] are shown by green boxes in the motion settings display. [Speed] is measured as the time taken for the subject to cross the frame horizontally.
4 Rotate the sub-command dial to choose the subject size. Rotate the sub-command dial to choose a [Subject Size] of [1] to [5]. Choose lower values to include smaller subjects, higher values to restrict subject detection to larger subjects. Tip: Size Options Subjects that meet the criteria for [Subject Size] and [Speed] are shown by green boxes in the motion settings display. The apparent subject size (measured in focus points) for each [Subject Size] option is listed below.
“Capture Criteria” > “Subject Detection” This option is used to choose the types and sizes of subject that trigger auto capture. 1 Highlight [Advanced: Subject detection] in the auto capture settings display and press J. Subject detection criteria will be displayed. 2 Press the W (Q) button and select the desired subject types. Your choices are auto, people, animals, vehicles and airplanes. Press J to save changes and return to the subject detection display.
3 Rotate the main command dial to choose the subject size. Choose a [Subject Size] from values [1] through [5]. Choose lower values to include smaller subjects, higher values to restrict subject detection to larger subjects. Tip: Size Options Subjects that meet the criterion for [Subject Size] are shown by green boxes in the subject detection display. The apparent subject size (as a percentage of the angle of view) for each setting is listed below. - [1]: 2.
“Capture Criteria“ > “Distance” Choose the maximum and minimum distances at which the camera will detect subjects for auto capture. Auto capture shooting will continue while the subject is within the specified range of distances. D “Advanced: Distance” You can use the [Advanced: Distance] feature when a NIKKOR Z lens is attached. It may not function with other lenses. 1 Highlight [Advanced: Distance] in the auto capture settings display and press J. Distance criteria will be displayed.
Tip: Fine-Tuning the Distances for “Near” and “Far” Fine-tuning is available exclusively with Nikon Z mount lenses, but not with the NIKKOR Z 58mm f/0.95 S Noct. Tip: The “Near” and “Far” Displays The distances for [Near] and [Far] are displayed in meters only. They will not be displayed in feet even when [Feet (ft)] is selected for [Distance units] in the setup menu. 3 Press the i button. The camera will save the changes and return you to the auto capture settings display.
D Auto Capture: Restrictions Auto capture cannot be combined with some camera features, including: long time-exposures (“Bulb” or “Time”), the self-timer, bracketing, multiple exposures, HDR overlay, interval-timer photography, time-lapse video recording, focus shift pixel shift shooting, and electronic VR.
More Time for Pre-Release Capture The length of time the camera will continue to buffer frames before cancelling shooting during the Pre-Release Capture phase of high-speed frame capture + has been increased from 30 to 300 seconds. If an option other than [None] is selected for Custom Setting d3 [Pre-Release Capture options] > [Pre-release burst], a green dot (I) will appear in the Y icon in the shooting display when the shutter-release button is pressed halfway.
New: Slow-Motion Videos [1920×1080; 30p ×4 (slow-motion)], [1920×1080; 25p ×4 (slow-motion)], and [1920×1080; 24p ×5 (slow-motion)] have been added to the options available for [Frame size/frame rate] when [H.264 8-bit (MP4)] is selected for [Video file type] in the video recording menu. These options are used to record slow-motion videos. Videos shot using [1920×1080; 30p ×4 (slow-motion)], for example, are recorded at a frame rate of 120p and play back at a rate of 30p.
D Cautions: Recording Slow-Motion Videos Features that cannot be used during slow-motion video recording include: - flicker reduction, - electronic VR, and - time code output. When recording via HDMI output to an external recorder, video will be recorded at original speed, not in slow motion.
Color Change to Hi-Res Zoom In-Focus Display The color of the in-focus AF-area brackets shown on the shooting display when [ON] is selected for [Hi-Res Zoom] in the video recording menu has been changed. While in earlier versions of the camera firmware, these brackets were shown in red, from “C” firmware version 2.00 they are shown in green.
Low ISO Sensitivity Settings for N‑Log Video Low ISO sensitivity options ranging from Lo 0.3 to Lo 2.0 have been added to the choices available for [ISO sensitivity settings] > [ISO sensitivity (mode M)] in the video recording menu when [N‑Log] is selected as the video tone mode. Sensitivity can be set to values below ISO 800 by approximately 0.3 to 2.0 EV (equivalent respectively to ISO 640 and 200).
Changes to Hi-Res Zoom Speeds Available in g8 “Hi-Res Zoom Speed” in the Custom Settings Menu Custom Setting g8 [Hi-Res Zoom speed] now offers a choice of 11 speeds, from −5 to +5. Press 4 or 2 to choose the speed. The higher the value, the higher the speed; the lower the value, the lower the speed.
Changes to i-Menu “Select for Upload” Options Changes have been made to the behavior of the [Select for upload to computer] and [Select for upload (FTP)] items in the playback i menu. These options are displayed only if the camera is connected to a computer or FTP server. While in earlier versions of the camera firmware, choosing [Select for upload to computer] or [Select for upload (FTP)] would mark the current picture for priority upload (s) and begin upload immediately, from “C” firmware version 2.
Priority Upload Options Added to i Menu [Select for priority upload to computer] and [Select for priority upload (FTP)] items have been added to the playback i menu. These options are displayed only if the camera is connected to a computer or FTP server. To mark the current picture for priority upload (s) and begin upload immediately, press the i button, highlight [Select for priority upload to computer] or [Select for priority upload (FTP)], and press J.
Addition of “Playback Speed” Item to the Video Playback i Menu A [Playback speed] item has been added to the video playback i menu. Select the video playback speed from [Original speed], [1/2× speed], and [1/4× speed]. Playback will proceed in slow motion at 1/2× speed or 1/4× speed if [1/2× speed] or [1/4× speed] is selected, respectively. Additionally, video playback speed can be changed during playback when the video is paused, using [Playback speed] in the playback i menu.
Addition of “Auto Series Playback Options” to “Series Playback” in Playback Menu [Auto series playback options] has been added to the options available for [Series playback] in the playback menu. Choose options for viewing bursts when [Auto series playback] is set to [ON]. Option [Loop playback] Description If [ON] is selected, the current series will playback repeatedly.
Addition of “Auto Image Rotation” to Playback Menu An [Auto image rotation] item has been added to the playback menu. If [ON] is selected, information on camera orientation when the photograph was taken is recorded. During playback on the camera or on a computer, images are rotated automatically using the recorded orientation information. If [OFF] is selected, information on camera orientation is not recorded. In this case, images displayed during playback are always in landscape (wide) orientation.
Support for Power Zoom The camera now supports power zoom for use with power zoom (PZ) lenses. In addition to using the lens zoom ring, you now have the option of zooming power zoom lenses attached to the camera in and out using camera controls (“power zoom”). New Custom Setting: f12 “Assign Power Zoom Buttons” Choose whether the X and W (Q) buttons can be used for power zoom during still photography when a power zoom lens is attached.
Tip: Assigning Power Zoom to Camera Controls The power zoom role can be assigned to camera controls using options newly added to Custom Settings f2 [Custom controls (shooting)] and g2 [Custom controls]. This role can be assigned to the Fn1 and Fn2 buttons ( 0 55). New Setup Menu Item: “Save Zoom Position (PZ Lenses)” If [ON] is selected when a power zoom (PZ) lens is attached, the camera will save the current zoom position when turned off and restore it when next turned on.
Addition of “Focus Point Border Width” Item to a11 “Focus Point Display” in the Custom Settings Menu A [Focus point border width] item has been added to a11 [Focus point display] in the Custom Settings menu. Choose from 3 focus point border widths, from [1] to [3].
New Custom Setting: d5 “Exposure Delay Mode” An [Exposure delay mode] item has been added to the Custom Settings menu at position d5. It can be used to delay the release of the shutter until about 0.2 to 3 seconds after the shutter-release button has been pressed, helping to reduce blur caused by camera shake. If an option other than [Off] is selected, a z icon appears in the shooting display.
Addition of “Half-Press to Cancel Zoom (MF)” Item to d18 and g17 in the Custom Settings Menu A [Half-press to cancel zoom (MF)] item has been added to d18 and g17 in the Custom Settings menu. If [ON] is selected while focus mode is set to manual focus and the view through the lens is zoomed in, zoom can be cancelled by pressing the shutter-release button halfway.
Exposure Compensation and White Balance Now Changeable During Shooting Function Recall Exposure compensation and white balance settings can now be changed while recalling the shooting function settings by pressing the button assigned the role of [Recall shooting functions (hold)] in Custom Settings f2 [Custom controls (shooting)]. To change the exposure compensation value, rotate the command dial while pressing the E button (or the button to which the exposure compensation role is assigned).
New Options for Custom Settings f2 “Custom Controls (Shooting)” and g2 “Custom Controls” Additions have been made to the roles available and the controls to which they can be assigned for Custom Setting f2 [Custom controls (shooting)] or g2 [Custom controls]. In addition, custom controls can now be reset. New Reset Option You can now reset selected controls to their default roles in the control-selection displays for Custom Settings f2 [Custom controls (shooting)] and g2 [Custom controls].
New Roles Available via Custom Setting f2 “Custom Controls (Shooting)” Option z [Switch eyes] Description Press the control to choose the eye used for focus when the camera detects the eyes of a human or animal portrait subject. Press the control to cycle the AF-area mode. To choose the AF-area modes to be cycled, press 2 when r [Cycle AF-area mode] [Cycle AF-area mode] is highlighted. Highlight options and press J or 2 to select (M) or deselect (U).
New Roles Available via Custom Setting g2 “Custom Controls” Option z [Switch eyes] Description Press the control to choose the eye used for focus when the camera detects the eyes of a human or animal portrait subject. Press the control to cycle the AF-area mode. To choose the AF-area modes to be cycled, press 2 when [Cycle r [Cycle AF-area mode] AF-area mode] is highlighted. Highlight options and press J or 2 to select (M) or deselect (U).
New Options for Custom Setting f3 “Custom Controls (Playback)” Additions have been made to the roles available and the controls to which they can be assigned for Custom Setting f3 [Custom controls (playback)]. In addition, custom controls can now be reset. New Reset Option You can now reset selected controls to their default roles in the Custom Setting f3 [Custom controls (playback)] control-selection display.
New Roles Additional roles can now be assigned to buttons or the command dials. Roles Which Can Be Assigned to Buttons Option O [Delete] Description Press the control once to display a confirmation dialog. Press the control again to delete the current picture and return to playback.
New Roles Available Via “Main Command Dial”/“Subcommand Dial” > “Frame Advance” Option Description [Uploaded to FTP] Skip to the next or previous picture that has been uploaded to FTP. [Uploaded to computer] Skip to the next or previous picture that has been uploaded to the computer. New Roles Available Via “Main Command Dial”/“Subcommand Dial” > “Video Playback” Option [Playback speed] Description Choose the video playback speed. Choose between the original speed, 1/2× speed, and 1/4× speed.
Changes to Method for Performing a Full Format with “Format Memory Card” in the Setup Menu Changes have been made to how a full format is performed with [Format memory card] in the setup menu when using a CFexpress memory card compatible with full format. Performing a Full Format 1 Select [Format memory card] in the setup menu and press 2. 2 Select [CFexpress/XQD card slot] and press 2. 3 Press O (Q) to proceed when the options are displayed.
4 Highlight [Yes] and press J.
Updates to “Non-CPU Lens Data” The [Focal length (mm)] and [Maximum aperture] options for [Non-CPU lens data] in the setup menu can now be used to enter a value of your choice. Names can be assigned to lenses with a [Lens number] of from [1] to [20]. To enter a name of up to 36 characters, highlight [Lens name] and press 2. - The lens names assigned above are recorded in the Exif data stored in pictures.
Changes to Character Limit for “Category” Entries when Editing Presets with “IPTC” in the Setup Menu The character limit for “Category” entries in IPTC presets created or edited using [IPTC] in the setup menu has been increased from 3 to 256.
Changes to Setup Menu “Camera Sounds” Options New options have been added to the [Camera sounds] item in the setup menu. Shutter sound volume can now be set separately from other electronic sounds. You can also choose the types of the shutter sound. Option Description [Shutter sound] If [ON] is selected, the camera will make a sound when the shutter is released. [Volume] Choose the volume of the electronic shutter sound from a total of five options. [Type] Choose from 5 types of shutter sound.
Shooting Display Maximum Magnification Increased to 400% While in earlier versions of the camera firmware, the maximum shooting display zoom was 200%, from “C” firmware version 2.00 the maximum magnification is 400%. Use the X and W (Q) buttons to zoom in and out.
“Finder Display Size (Photo Lv)” Changed to “Viewfinder Display Size” in the Setup Menu The selected option in [Finder display size (photo Lv)] in the setup menu now applies to both photo and video modes. This item has consequently been renamed [Viewfinder display size]. Select the viewfinder display magnification during shooting and playback from [Standard] and [Small].
Updated Distance Display for Manual Focus The focus distance indicator for manual focus now shows the distance between the camera and the focus position in units of your choosing. The choice is made using a [Distance units] item newly added to the setup menu, which has options for [Meters (m)] and [Feet (ft)]. The distance shown is intended as a guide only. It may vary from the actual distance, depending on the lens used.
Changes and Additions to “Connect to FTP Server” Changes and additions have been made to the [Connect to FTP server] item in the network menu. Increased Profile Storage The number of network profiles that can be saved using [Connect to FTP server] > [Network settings] > [Copy to/from card] > [Copy profile to card] has been increased from 1 to 99. Highlight [Copy profile to card] and press 2, and then highlight a profile you wish to save and press 2 again.
Changes to Synchronized Release The addition of [Group settings] to [Connect to other cameras] in the network menu changes how cameras are configured for synchronized release. Cameras can be grouped for synchronized release and remote camera settings adjusted separately for each group. Switching groups also switches the remote cameras that the master camera controls.
3 Name the new profile. To proceed to the next step without changing the default name, press X. Whatever name you choose will appear in the network menu [Connect to other cameras] > [Network settings] list. To rename the profile, press J. Press X to proceed after entering a name. 4 Highlight [Search for Wi-Fi network] and press J. The camera will search for networks currently active in the vicinity and list them by name (SSID).
5 Choose a network. Highlight a network SSID and press J. The band on which each SSID operates is indicated by an icon. Encrypted networks are indicated by a h icon. If the selected network is encrypted (h), you will be prompted to enter the encryption key. If the network is not encrypted, proceed to Step 7. If the desired network is not displayed, press X to search again. D Hidden SSIDs Networks with hidden SSIDs are indicated by blank entries in the network list.
6 Enter the encryption key. Press J and enter the encryption key for the wireless router. For more information, see the documentation for the wireless router. Press X when entry is complete. Press X again to initiate the connection. A message will be displayed for a few seconds when the connection is established.
7 Obtain or select an IP address. Highlight one of the following options and press J. Option [Obtain automatically] Description Select this option if the network is configured to supply the IP address automatically. A “configuration complete” message will be displayed once an IP address has been assigned. It is recommended that you note the remote camera IP address, as you will need it in subsequent steps. Enter the IP address and sub-net mask manually.
10 Repeat Steps 1 through 9 for the remaining cameras. When configuring remote cameras, be sure to select [Remote camera] in Step 9. 11 On the master camera, highlight [Group settings] and press 2. 12 Highlight [New] and press J. 13 Enter the group display name. Choose the display name for the remote camera group. Display names can be up to 32 characters long. Press X to proceed once entry is complete.
14 Highlight [Group name], press 2, and enter a group name. Enter a group name for the synchronized cameras. Group names can be up to eight characters long. D Assigning Remote Cameras a “Group Name” The group name selected on the remote cameras must match that chosen for the master camera. Choose the name using [Connect to other cameras] > [Group name] in the network menu. 15 Highlight [Remote camera list] and press 2. Add remote cameras to the group.
17 Highlight [Address] and press 2. You will be prompted to enter an IP address. 18 Enter the remote camera IP address. Enter the remote camera IP address you noted in Step 7. Rotate the main command dial to highlight segments. Press 4 or 2 to change the highlighted segment and press J to save changes. Press X to add the remote camera to the master camera remote camera list and establish a connection.
20 Take pictures. A k icon appears in the master camera shooting display together with the number of remote cameras connected. Pressing the shutter-release button on the master camera releases the shutters on the remote cameras. D Connection Errors In the event of remote camera connection errors, the remote camera count in the master camera shooting display will turn red and instead show the number of remote cameras that failed to connect.
Ethernet Follow the steps below to create host profiles for Ethernet connections. A USB (Type C) to Ethernet adapter (available separately from third-party sources) is required for Ethernet connections. Be sure to connect the adapter to the camera’s USB data connector.
3 Select [Connect to other cameras] in the network menu, then highlight [Network settings] and press 2. 4 Highlight [Create profile] and press J. 5 Name the new profile. To display IP address options without changing the default name, press X. Whatever name you choose will appear in the network menu [Connect to other cameras] > [Network settings] list. To rename the profile, press J. Press X to proceed after entering a name. There may be a delay before the camera detects the USBto-Ethernet adapter.
6 Obtain or select an IP address. Highlight one of the following options and press J. Option [Obtain automatically] Description Select this option if the network is configured to supply the IP address automatically. A “configuration complete” message will be displayed once an IP address has been assigned. It is recommended that you note the remote camera IP address, as you will need it in subsequent steps. Enter the IP address and sub-net mask manually.
9 Repeat Steps 3 through 8 for the remaining cameras. To configure another Z 8 for use as a remote camera, repeat Steps 2 through 8. When configuring remote cameras, be sure to select [Remote camera] in Step 8. 10 On the master camera, highlight [Group settings] and press 2. 11 Highlight [New] and press J. 12 Enter the group display name. Choose the display name for the remote camera group. Display names can be up to 32 characters long. Press X to proceed once entry is complete.
13 Highlight [Group name], press 2, and enter a group name. Enter a group name for the synchronized cameras. Group names can be up to eight characters long. D Assigning Remote Cameras a “Group Name” The group name selected on the remote cameras must match that chosen for the master camera. Choose the name using [Connect to other cameras] > [Group name] in the network menu. 14 Highlight [Remote camera list] and press 2. Add remote cameras to the group.
16 Highlight [Address] and press 2. You will be prompted to enter an IP address. 17 Enter the remote camera IP address. Enter the remote camera IP address you noted in Step 6. Rotate the main command dial to highlight segments. Press 4 or 2 to change the highlighted segment and press J to save changes. Press X to add the remote camera to the master camera remote camera list and establish a connection.
19 Take pictures. A k icon appears in the master camera shooting display together with the number of remote cameras connected. Pressing the shutter-release button on the master camera releases the shutters on the remote cameras. D Connection Errors In the event of remote camera connection errors, the remote camera count in the master camera shooting display will turn red and instead show the number of remote cameras that failed to connect.
Tip: Suspending Synchronized Release To temporarily disable synchronized release without ending the camera’s connection to the network, select [OFF] for [Connect to other cameras] > [Synchronized release] in the network menu. Tip: Viewing Remote Camera Status To view remote camera status, go to [Connect to other cameras] > [Group settings] > (group name) in the master camera network menu, highlight [Remote camera list], and press 2. Remote cameras are identified by IP address.
Tip: Saving Group Settings to a Memory Card. Navigate to [Connect to other cameras] > [Group settings] > [Copy to/from card] in the network menu, highlight [Copy to card], press 2, and then highlight group settings you wish to save and press 2 again. Select the destination (1–99) and press J to copy the group settings to the card. Saved group settings can be loaded using [Copy from card].
New “Overwrite Copyright Info” Option for Master Cameras [Overwrite copyright info] has been added to the options available for [Connect to other cameras] in the network menu. Selecting this option overwrites the copyright information on any remote cameras currently connected with the copyright information stored on the master camera.
Using AirGlu Accessories While MC-N10 Remote Grips Connected In earlier versions of the camera firmware, all Bluetooth functions were disabled while an MC-N10 was connected to the camera, but from “C” firmware version 2.00, Atomos UltraSync BLUE AirGlu accessories can be used via Bluetooth.
Menu Items and Defaults for “C” Firmware Version 2.00 The menu items and defaults after the firmware has been upgraded to “C” firmware version 2.00 are listed below.
[Long exposure NR]: OFF [High ISO NR]: Normal [Vignette control]: Normal [Diffraction compensation]: ON [Auto distortion control]: ON [Skin softening]: Off [Portrait impression balance]: Off [Photo flicker reduction]: OFF [High-frequency flicker reduction]: Off [Metering]: Matrix metering [Flash control] - [Flash control mode]: TTL - [Wireless flash options]: Off - [Remote flash control]: Group flash [Flash mode]: Fill flash [Flash compensation]: 0.
- [Starting storage folder] - [New folder]: U - [Reset file numbering]: U [Time-lapse video] - [Interval]: 5 s - [Shooting time]: 25 min. - [Exposure smoothing]: ON - [Choose image area]: FX - [Video file type]: H.265 8-bit (MOV) - [Frame size/frame rate]: 3840×2160; 30p - [Interval priority]: OFF - [Focus before each shot]: OFF - [Destination]: CFexpress/XQD card slot [Focus shift shooting] - [No.
[Video quality (N-RAW)]: High quality [Image area] - [Choose image area]: FX - [DX crop alert]: OFF [Extended oversampling]: OFF [ISO sensitivity settings] - [Maximum sensitivity]: 25600 - [Auto ISO control (mode M)]: ON - [ISO sensitivity (mode M)]: 100 [White balance]: Same as photo settings [Set Picture Control]: Same as photo settings [Manage Picture Control]: — [HLG quality] - [Quick sharp]: 0 - [Contrast]: 0 - [Saturation]: 0 - [Hue]: 0 [Active D-Lighting]: Off [High ISO NR]: Normal [Vignette control]
- [Timecode origin]: — - [Drop frame]: ON [External rec.
- [Focus peaking display]: OFF - [Focus peaking sensitivity]: 2 (standard) - [Focus peaking highlight color]: Red - a14: [Focus point selection speed]: Normal - a15: [Manual focus ring in AF mode] 2: ON b [Metering/exposure] - b1: [ISO sensitivity step value]: 1/3 step - b2: [EV steps for exposure cntrl]: 1/3 EV steps (comp.
- [16:9 (36×20)]: M - d8: [File number sequence]: On - d9: [View mode (photo Lv)]: Show effects of settings - [Show effects of settings]: Only when flash is not used - [Adjust for ease of viewing]: Auto - d10: [Starlight view (photo Lv)]: OFF - d11: [Warm display colors] - [Warm display color options]: Off - [Warm color display brightness]: 0 - d12: [LCD illumination]: OFF - d13: [View all in continuous mode]: ON - d14: [Release timing indicator] - [Indicator type]: Type B - [Type A auto restore delay]: 1/6
- f2: [Custom controls (shooting)] - [Fn1 button]: Shooting menu bank - [Fn2 button]: Choose image area - [Fn button for vertical shooting]: Exposure compensation - [Focus mode button]: Focus mode/AF-area mode - [Protect/Fn3 button]: Set Picture Control - [AF‑ON button]: AF‑ON - [Sub-selector center]: AE/AF lock - [DISP button]: Cycle live view info display - [OK button]: Select center focus point - [Playback button]: Playback - [Vertical multi selector center]: AE/AF lock - [AF-ON button for vertical shoot
- [Video playback]: 10 frames - [Frame advance zoom position]: Keep current zoom position - [Video record button]: None - [ISO sensitivity button]: None - [Exposure compensation button]: None - [BKT button]: None - [WB button]: None - [Lens Fn button]: None - [Lens Fn2 button]: None - f4: [Control lock] - [Shutter speed lock]: OFF - [Aperture lock]: OFF - [Focus-point lock]: OFF - f5: [Reverse dial rotation] - [Exposure compensation]: U - - [Shutter speed/aperture]: U f6: [Release button to use dial]: OFF
- [OK button]: Select center focus point [Playback button]: Playback [Vertical multi selector center]: AE/AF lock [AF-ON button for vertical shooting]: Same as AF-ON button [Video record button]: Record videos [Exposure compensation button]: Exposure compensation [ISO sensitivity button]: ISO sensitivity [Command dials] - [Exposure setting]: A: 3Av/y--, M: 3Av/yTv - [Focus/AF-area mode selection]: 3t/ys - [Sub-command dial zoom role]: Exposure setting - [Shutter-release button]: None - [WB button]: White
- g11: [Extended shutter speeds (mode M)]: OFF - g12: [View assist]: OFF - g13: [Zebra pattern] - [Pattern tone range]: Zebra pattern off - [Pattern]: Pattern 1 - [Highlight threshold]: 250 - [Mid-tone range]: Value: 160; range: ±10 - g14: [Limit zebra pattern tone range]: No restrictions - g15: [Grid type]: 3×3 - g16: [Brightness information display]: Histogram - g17: [Half-press to cancel zoom (MF)]: OFF - g18: [Custom monitor shooting display] - [Display 1]: L (cannot be deselected) - [Display 2]: M - [D
- [Copyright info]: M - [Location data]: M - [IPTC data]: M [Delete pictures from both slots]: Yes (confirmation required) [Dual-format recording PB slot]: CFexpress/XQD card slot [Filtered playback criteria] - [Protect]: U - [Picture type]: U - [Rating]: U - [Select for upload to computer]: U - [Select for upload (FTP)]: U - [Voice memo]: U - [Retouched pictures]: U [Series playback] - [Sub-selector displays first shot]: ON - [Auto series playback]: OFF - [Auto series playback options] - [Loop playback]: O
[Limit monitor mode selection] - [Automatic display switch]: M - [Viewfinder only]: M - [Monitor only]: M - [Prioritize viewfinder (1)]: M - [Prioritize viewfinder (2)]: M [Auto rotate info display]: ON [AF fine-tuning options] - [AF fine-tune]: OFF - [Fine-tune and save lens]: — - [Default]: — - [List saved values]: — - [Choose value for current lens]: — [Non-CPU lens data] - [Lens number]: 1 - [Focal length (mm)]: – – - [Maximum aperture]: – – - [Lens name]: – – [Distance units]: Meters (m) [Save focus po
- [Beep]: Off - [Volume]: 2 - [Pitch]: Low [Silent mode]: OFF [Touch controls] - [Enable/disable touch controls]: Enable - [Glove mode]: OFF [HDMI] - [Output resolution]: Auto - [Output range]: Auto - [Output shooting info]: ON - [Mirror camera info display]: ON [USB connection priority]: Upload [Location data] * - [Standby timer]: ON - [Set clock from satellite]: OFF - [Position]: — [Wireless remote (WR) options] - [LED lamp]: ON - [Link mode]: Pairing [Assign remote (WR) Fn button]: None [Conformity marki
- [Channel]: Auto - [Upload while off]: ON - [Location data (smart device)]: — [Connect to computer] - [Network settings]: — - [Connection type]: Picture transfer - [Options] - [Auto upload]: OFF - [Delete after upload]: OFF - [Upload RAW + JPEG as] - [Overflow/backup]: RAW + JPEG - [RAW primary - JPEG secondary]: RAW + JPEG - [Upload RAW + HEIF as] - [Overflow/backup]: RAW + HEIF - [RAW primary - HEIF secondary]: RAW + HEIF - [JPEG+JPEG slot selection]: Primary slot - [HEIF+HEIF slot selection]: Primary sl
- [View root certificate]: — - [Connect if authentication fails]: OFF [Connect to other cameras] - [Synchronized release]: ON - [Network settings]: — - [Master/remote]: Master camera - [Group settings]: — - [Group name]: — - [Synchronize date and time]: — - [Overwrite copyright info]: — [ATOMOS AirGlu BT options] - [Connect to ATOMOS AirGlu BT]: OFF - [Save ATOMOS AirGlu BT pairing info]: — - [Delete ATOMOS AirGlu BT pairing info]: — - [Camera]: NCZ8 [USB data connection]: MTP/PTP [Router frequency band]: (
Post-Upgrade Specifications for “C” Firmware Version 2.00 Product specifications following upgrade to “C” firmware version 2.00 are listed below. Type Type Digital camera with support for interchangeable lenses Lens mount Nikon Z mount Lens Compatible lenses Z mount NIKKOR lenses F mount NIKKOR lenses (mount adapter required; restrictions may apply) Effective pixels Effective pixels 45.7 million Image sensor Type 35.9 × 23.9 mm CMOS sensor (full-frame/FX-format) Total pixels 52.
Storage Image size (pixels) [FX (36 × 24)] selected for image area: - 8256 × 5504 (Large: 45.4 M) - 6192 × 4128 (Medium: 25.6 M) - 4128 × 2752 (Small: 11.4 M) [DX (24 × 16)] selected for image area: - 5392 × 3592 (Large: 19.4 M) - 4032 × 2688 (Medium: 10.8 M) - 2688 × 1792 (Small: 4.8 M) [1:1 (24 × 24)] selected for image area: - 5504 × 5504 (Large: 30.3 M) - 4128 × 4128 (Medium: 17.0 M) - 2752 × 2752 (Small: 7.6 M) [16:9 (36 × 20)] selected for image area: - 8256 × 4640 (Large: 38.
Storage Auto, Standard, Neutral, Vivid, Monochrome, Flat Monochrome, Deep Tone Monochrome, Portrait, Rich Tone Portrait, Landscape, Picture Control System Flat, Creative Picture Controls (Dream, Morning, Pop, Sunday, Somber, Dramatic, Silence, Bleached, Melancholic, Pure, Denim, Toy, Sepia, Blue, Red, Pink, Charcoal, Graphite, Binary, Carbon); selected Picture Control can be modified; storage for custom Picture Controls Note: Choice of Picture Controls is restricted to Standard, Monochrome, and Flat when
Monitor Monitor 8-cm/3.2-in., approx.
Exposure Metering system TTL metering using camera image sensor Matrix metering Center-weighted metering: Weight of 75% given to 12 or Metering mode 8 mm circle in center of frame or weighting can be based on average of entire frame Spot metering: Meters circle with a diameter of approximately 4 mm centered on selected focus point Highlight-weighted metering Range * −3 – +17 EV * Figures are for ISO 100 and f/2.
Autofocus Type Hybrid phase-detection/contrast AF with AF assist Detection range * −7 – +19 EV (−9 – +19 EV with starlight view) * Measured in photo mode at ISO 100 and a temperature of 20 °C/68 °F using single-servo AF (AF‑S) and a lens with a maximum aperture of f/1.
Flash Flash control TTL: i‑TTL flash control; i‑TTL balanced fill-flash is used with matrix, center-weighted, and highlight-weighted metering, standard i‑TTL fill-flash with spot metering Flash mode Front-curtain sync, slow sync, rear-curtain sync, red-eye reduction, red-eye reduction with slow sync, off Flash compensation −3 – +1 EV (choose from step sizes of ¹⁄₃ and ¹⁄₂ EV) Flash-ready indicator Lights when optional flash unit is fully charged; flashes as underexposure warning after flash is fired
Video Metering system TTL metering using camera image sensor Metering mode Matrix, center-weighted, or highlight-weighted 7680 × 4320 (8K UHD): 30p (progressive)/25p/24p Frame size (pixels) and frame rate 3840 × 2160 (4K UHD): 120p/100p/60p/50p/30p/25p/24p 1920 × 1080: 120p/100p/60p/50p/30p/25p/24p 1920 × 1080 (slow-motion): 30p (4×)/25p (4×)/24p (5×) Note: Actual frame rates for 120p, 100p, 60p, 50p, 30p, 25p, and 24p are 119.88, 100, 59.94, 50, 29.97, 25, and 23.976 fps respectively.
Video ISO sensitivity (Recommended Exposure Index) Active D‑Lighting Other options for video recording Mode M: Manual selection (ISO 64–25600; choose from step sizes of ¹⁄₆, ¹⁄₃ and 1 EV); with additional options available equivalent to approximately 0.3, 0.7, 1, or 2 EV (ISO 102400 equivalent) above ISO 25600; auto ISO sensitivity control (ISO 64–Hi 2.0) available with selectable upper limit Modes P, S, A: Auto ISO sensitivity control (ISO 64–Hi 2.
Interface USB Type C USB connectors USB data connector (SuperSpeed USB) ×1 USB Power Delivery connector ×1 HDMI output Type A HDMI connector Audio input Stereo mini-pin jack (3.5 mm diameter; plug-in power supported) Audio output Stereo mini-pin jack (3.5 mm diameter) Ten-pin remote terminal Built-in (can be used with MC-30A/MC-36A remote cords and other optional accessories) 115 Post-Upgrade Specifications for “C” Firmware Version 2.
Wi-Fi/Bluetooth Standards: - IEEE 802.11b/g/n (Africa, the Middle East (other than Israel), Taiwan, Bangladesh, Pakistan, and Bolivia) Wi-Fi - IEEE 802.11b/g/n/a/ac (other countries in the Asia, Europe, Israel, Australia, New Zealand, the Republic of Fiji, U.S.A., Canada, and Mexico) - IEEE 802.
Wi-Fi/Bluetooth Communication protocols: Bluetooth Specification version 5.0 Bluetooth Operating frequency: - Bluetooth: 2402–2480 MHz - Bluetooth Low Energy: 2402–2480 MHz Maximum output power (EIRP): - Bluetooth: -4.1 dBm - Bluetooth Low Energy: -5.6 dBm Power source Battery One EN‑EL15c rechargeable Li-ion battery * * EN‑EL15b and EN‑EL15a batteries can be used in place of the EN‑EL15c. Note, however, that fewer pictures can be taken on a single charge than with the EN‑EL15c.
Tripod socket Tripod socket 0.635 cm (¹⁄₄ in., ISO 1222) Dimensions/weight Dimensions (W × H × D) Approx. 144 × 118.5 × 83 mm/5.7 × 4.7 × 3.3 in. Weight Approx. 910 g (2 lb. 0.1 oz.) with battery and memory card but without body cap and accessory shoe cover; approx. 820 g/1 lb. 13 oz.
Index Index Symbols, Numerics 1920×1080; 24p ×5 (slow-motion) (0 39) 1920×1080; 25p ×4 (slow-motion) (0 39) 1920×1080; 30p ×4 (slow-motion) (0 39) D Deep Tone Monochrome (Picture Control) ( 0 11) Distance units ( 0 68) E A AE & flash bracketing ( 0 10) AE bracketing ( 0 10) AF subject detection options ( 0 9) Assign power zoom buttons ( 0 49) Auto bracketing ( 0 10) Auto capture ( 0 20) Auto capture settings display ( 0 21) Auto image rotation ( 0 48) Auto series playback options ( 0 47) Exposure delay
H P Half-press to cancel zoom (MF) ( 0 53) HEIF primary - HEIF secondary (Secondary slot function) (0 13) High-speed frame capture + ( 0 38) Hi-Res Zoom ( 0 41) Hi-Res Zoom speed ( 0 43) Picture Control ( 0 11) Pixel shift shooting ( 0 14) Playback speed ( 0 46) Pre-Release Capture options ( 0 38) R I IPTC presets (0 64) ISO sensitivity (mode M) ( 0 42) J JPEG primary - JPEG secondary (Secondary slot function) ( 0 13) N Rich Tone Portrait (Picture Control) ( 0 11) S Save zoom position (PZ lenses) (
No reproduction in any form of this document, in whole or in part (except for brief quotation in critical articles or reviews), may be made without written authorization from NIKON CORPORATION.