Professional Setting Guide — For Still Photography — En
Table of Contents Landscapes 5 Basic Settings for Landscape Photography.................... 6 • Focus Mode: Choose “Single Single AF” AF (AF‑S) and Single-Point AF”!. AF ........................................................................7 “Single-Point • Vibration Reduction: Choose “Normal Normal” for Hand-Held Photography!...............................................................7 On”!...............................................
Custom Controls for Portrait Photography................... 21 • K Playback......................................................................................21 • K Select Center Focus Point....................................................21 • y Active D‑Lighting......................................................................22 • Shooting Mode > p Zoom On/Off............................................22 • Playback Mode > p Zoom On/Off.............................................
Table of Contents Tips and Tricks 39 Recalling Saved Settings via the Mode Dial................. 40 Using the Viewfinder Without Fatigue........................... 41 Flicker Reduction............................................................... 42 Subject-Tracking AF........................................................... 44 Assigning Focus and Release to Separate Controls..... 46 Animal-Detection AF......................................................... 47 • Basic Settings for Animal Portraits...
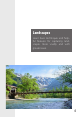
Landscapes Learn basic techniques and helpful features for capturing landscapes more vividly and with greater ease.
Basic Settings for Landscape Photography The following are the recommended settings for photographing landscapes: Photo shooting menu Focus mode AF-area mode Diffraction compensation Vibration reduction Single AF Single-point AF On • Hand-held photography: Normal • Tripod photography: Off 1 On Silent photography Custom Settings menu Shutter/AF-ON a6 AF activation a10 Low-light AF On d4 Exposure delay mode 1 s2 Other settings Release mode Single frame Monitor mode Monitor only 1.
Single AF” AF (AF‑S) and l Focus Mode: Choose “Single “Single-Point Single-Point AF”! AF Choose [Single AF] (AF‑S) for [Focus mode] and select [Single-point AF] for [AF-area mode]. This is the standard combination of settings for landscapes and other static subjects: focus will lock once you have chosen a focus point and pressed the shutter-release button halfway.
Tripod Photography The recommended settings for tripod photography vary with the lens: • Z mount lenses: Choose [Normal] for lenses with on-board vibration reduction, [Off] for other lenses. • F mount lenses: If you are using one of the lenses listed below, slide the lens vibration reduction switch to “NORMAL”. Users of other lenses should consult the lens manual. ‣ AF‑P DX NIKKOR 10–20mm f/4.5–5.6G VR ‣ AF‑P DX NIKKOR 18–55mm f/3.5–5.6G VR ‣ AF‑P DX NIKKOR 70–300mm f/4.5–6.
Basic Settings for Landscape Photography FTZ Mount Adapter Firmware Support for the Z 7II/Z 6II is available from FTZ mount adapter firmware version 1.10. The current mount adapter firmware version can be viewed by selecting [Firmware version] in the camera setup menu when the adapter is attached. For more information, visit the Nikon website for your country or region.
On”! l Low-Light AF: Choose “On When photographing sunsets, night scenes, and other dimly-lit subjects with AF-S selected for focus mode, choose [On] for Custom Setting a10 [Low-light AF] to help the camera focus. 1 s”! s l Exposure Delay Mode: Choose “1 Custom Setting d4 [Exposure delay mode] is used to delay release of the shutter for a set time after the shutter-release button is pressed. A delay of a second or more helps reduce blur caused by the camera moving when you press the shutter-release button.
Basic Settings for Landscape Photography Monitor Only”! Only l Monitor Mode: Choose “Monitor To prevent the monitor turning off should you accidentally trigger the eye sensor with your face or hands while composing photographs, use the monitor mode button to select “monitor only” mode.
Custom Controls for Landscape Photography The following custom control settings are recommended for landscape photography: w Fn1 button y Fn2 button V AF‑ON button 8 Sub-selector center z Movie record button Shooting mode J button Playback mode q Preview b Framing grid display A AF‑ON K Select center focus point b Live view info display off p Zoom on/off; zoom ratio 1:1 (100%) p Zoom on/off; zoom ratio 1:1 (100%) Roles can be assigned to the J button via Custom Setting f3 [OK button] and to other controls
l q Preview Hold the selected control to preview color, exposure, and depth of field while shooting landscapes. l b Framing Grid Display Use the selected control to quickly view the framing grid for landscape shots that keep verticals vertical and horizontals horizontal. l K Select Center Focus Point If you typically use the sub-selector for focus-point selection, assigning this role to the center of the control lets you use it to quickly choose the center focus point.
Custom Controls for Landscape Photography l Shooting Mode > p Zoom On/Off Use the J button to quickly zoom the display in on the area around the current focus point and check focus before shooting. You’ll find this particularly useful for improved focus when using manual focus in situations in which the camera has difficulty focusing using autofocus. To choose the zoom ratio, select Custom Setting f3 [OK button] > [Shooting mode], highlight [Zoom on/off], and press 2.
Portraits Learn basic techniques and helpful features that free you to concentrate on your subject during portrait photography.
Basic Settings for Portrait Photography The following settings are recommended for portrait photography: Photo shooting menu Set Picture Control Focus mode AF-area mode Vibration reduction Silent photography Custom Settings menu a5 Store points by orientation d5 Shutter type Other settings Monitor mode Portrait Continuous AF Wide-area AF (L-people) Normal Off Yes Auto Prioritize viewfinder Portrait”! l Set Picture Control: Choose “Portrait Choose this option for portraits in which your subject’s complexio
Wide-Area AF (L-People)”! (L-People) l AF-Area Mode: Choose “Wide-Area When this option is selected, the camera detects and focuses on the faces or eyes of human portrait subjects in the active focus area (face/ eye-detection AF), making this a good choice when you want to focus on a particular human portrait subject.
When Lighting Is Poor When photographing dimly-lit subjects with AF-S selected for focus mode, choose [On] for Custom Setting a10 [Low-light AF] to help the camera focus. Normal”! l Vibration Reduction: Choose “Normal Choose [Normal] for a comparatively high level of vibration reduction. As a consequence of how lens shift vibration reduction operates in [Normal] mode, the image in the display may jiggle after the shutter is released, but this is expected and does not indicate a malfunction.
Basic Settings for Portrait Photography Yes”! l Store Points by Orientation: Choose “Yes Selecting [Yes] for Custom Setting a5 [Store points by orientation] lets you choose separate focus points for “wide” (landscape) orientation, for “tall” (portrait) orientation with the camera rotated 90° clockwise, and for “tall” orientation with the camera rotated 90° counterclockwise.
Basic Settings for Portrait Photography Prioritize Viewfinder”! Viewfinder l Monitor Mode: Choose “Prioritize Recommended for users familiar with traditional digital SLRs, “prioritize viewfinder” mode lets you frame pictures in the viewfinder during hand-held photography. In photo mode, putting your eye to the viewfinder turns it on and displays the view through the lens, but the shooting display does not appear in the monitor when you take your eye away.
Custom Controls for Portrait Photography The following custom control settings are recommended for portrait photography: w Fn1 button y Fn2 button V AF‑ON button 8 Sub-selector center z Movie record button Shooting mode J button Playback mode K Playback z Focus mode/AF-area mode A AF‑ON K Select center focus point y Active D‑Lighting p Zoom on/off; zoom ratio 1:1 (100%) p Zoom on/off; zoom ratio 1:1 (100%) Roles can be assigned to the J button via Custom Setting f3 [OK button] and to other controls via Cu
Custom Controls for Portrait Photography l y Active D‑Lighting Active D‑Lighting can be adjusted by holding the button and rotating a command dial, easing the task of photographing subjects in high-contrast settings, as for example when framing a sunlit subject through a window from inside a darkened room or photographing subjects on a beach in direct sunlight.
Sports Learn basic techniques and helpful features for photographing sporting events and other scenes that feature motion.
Basic Settings for Sports Photography The following are the recommended settings for shots of sporting events and other scenes that feature motion: Photo shooting menu Focus mode AF-area mode Vibration reduction Silent photography Custom Settings menu a3 Focus tracking with lock-on d5 Shutter type Other settings Release mode Shutter speed Monitor mode Continuous AF Dynamic-area AF Sport Off 3 Auto Continuous H or Continuous H (extended) High shutter speeds of 1/500 s or faster Prioritize viewfinder Contin
Dynamic-Area AF”! AF l AF-Area Mode: Choose “Dynamic-Area The camera focuses on a point of your choosing but will use information from surrounding focus points if the subject wanders briefly from the chosen point. This option is only available when AF-C is selected for focus mode. If the subject is moving quickly or is otherwise hard to track, try using [Wide-area AF (S)] or [Wide-area AF (L-people)] to allow autofocus to choose subjects from a wider area.
Basic Settings for Sports Photography Prioritize Viewfinder”! Viewfinder l Monitor Mode: Choose “Prioritize Recommended for users familiar with traditional digital SLRs, “prioritize viewfinder” mode lets you frame pictures in the viewfinder during hand-held photography. In photo mode, putting your eye to the viewfinder turns it on and displays the view through the lens, but the shooting display does not appear in the monitor when you take your eye away.
Custom Controls for Sports Photography The following custom control settings are recommended for sports photography: w Fn1 button y Fn2 button V AF‑ON button 8 Sub-selector center z Movie record button Shooting mode J button Playback mode K Playback g Protect A AF‑ON K Select center focus point z Focus mode/AF-area mode p Zoom on/off; zoom ratio 1:1 (100%) p Zoom on/off; zoom ratio 1:1 (100%) Roles can be assigned to the J button via Custom Setting f3 [OK button] and to other controls via Custom Setting f
Custom Controls for Sports Photography l K Select Center Focus Point If you typically use the sub-selector for focus-point selection, assigning this role to the center of the control lets you use it to quickly choose the center focus point. l z Focus Mode/AF-Area Mode Focus and AF-area modes can be selected by holding the control and rotating the main and sub-command dials. This role is normally assigned to the Fn2 button and we recommend you give it to another control when the Fn2 button is reassigned.
Split-Second Shots Ordinary burst photography may fail to capture the decisive moment of a golf swing or other fast-moving event. For split-second shots the like of which you’ve never taken before, try switching to movie mode, where the camera can record photos at up to 120 fps while the shutter-release button is pressed. 1 Select movie mode. Rotate the photo/movie selector to 1.
2 Set the frame size and rate to [1920 × 1080; 120p]. The number of shots the camera takes per second is equivalent to the frame rate chosen for [Frame size/frame rate] in the movie shooting menu or for [Frame size and rate/image quality] in the movie-mode i menu. For a frame rate of 120 fps, choose [1920 × 1080; 120p]. The photos will be the same dimensions as the movie frame and have an aspect ratio of 16∶9. 3 Press the c (E) button and choose [Continuous] release mode.
Split-Second Shots 5 Rotate the mode dial to “M”. Exposure cannot be adjusted manually in modes P and S when movie mode is selected. Choose mode M to make your own adjustments to aperture, ISO sensitivity, and other exposure settings. 6 Adjust exposure. Adjust shutter speed, aperture, and ISO sensitivity. To reduce blur caused by subject motion, choose a shutter speed at least as fast as 1/1000 s. 7 Focus. Press the shutter-release button halfway or press the AF‑ON button to focus. 8 Take pictures.
“Continuous H” Versus “Continuous H (Extended)” The differences between the [Continuous H] and [Continuous H (extended)] release modes for the Z 7II and Z 6II are summarized below. Choose a mode according to the subject and situation.
l The Shooting Display The image displayed in the monitor or viewfinder during shooting differs according to the release mode. Subject motion “Continuous H” Apart from momentarily going dark when the shutter is released, the display for [Continuous H] mode shows subject motion more or less in real time. “Continuous H (Extended)” The display for [Continuous H (extended)] never goes dark but lags subject motion by a fraction of a second.
l Frame Advance Rate Frame advance rates for burst photography vary with the camera model and settings. The approximate maximum rates for [Continuous H] and [Continuous H (extended)] release modes are shown below. Z 7II Image quality JPEG NEF (RAW)/NEF (RAW) + JPEG JPEG NEF (RAW)/NEF (RAW) + JPEG Bit Silent Continuous H depth photography Continuous H (extended) — 5.5 fps 10 fps 1 12 Off 14 5 fps 9 fps 2 — 4 fps 8 fps 12 On 14 3.5 fps 6.
“Continuous H” Versus “Continuous H (Extended)” 1. Maximum rate in focus mode MF or AF-S, or with [Single-point AF] selected for AF-area mode in focus mode AF-C. Maximum rate in all other cases is approximately 9 fps (Z 7II) or 12 fps (Z 6II). 2. Maximum rate in focus mode MF or AF-S, or with [Single-point AF] selected for AF-area mode in focus mode AF-C. Maximum rate in all other cases is approximately 8 fps (Z 7II) or 9 fps (Z 6II).
AE with Constant Shutter Speed and Aperture If ISO sensitivity is fixed, you may find it difficult to achieve the desired exposure without varying shutter speed or aperture, particularly in settings with a mix of sun and shade, such as a soccer stadium or baseball diamond during a day game. Enabling auto ISO sensitivity control allows the camera to adjust ISO sensitivity for optimal exposure. Auto ISO sensitivity control can be turned on or off by holding the S button and rotating the sub-command dial.
[ISO sensitivity settings] > [Minimum shutter speed] is used to choose the shutter speed below which auto ISO sensitivity control will kick in to prevent underexposure in modes P and A. Choose from speeds of 1/4000 to 30 s, or select [Auto] to have the camera choose the minimum shutter speed based on the focal length of the lens.
Tips and Tricks Learn about useful features that can be used with any subject.
Recalling Saved Settings via the Mode Dial Frequently-used settings can be assigned to mode-dial positions U1, U2, and U3. For example, you can assign landscape settings to U1, portrait settings to U2, and settings for sports photography to U3 and instantly switch combinations just by rotating the mode dial.
Using the Viewfinder Without Fatigue If you find your eyes get tired after using the viewfinder for prolonged periods, select [Off] for Custom Setting d9 [Apply settings to live view]. Viewfinder brightness and hue will be adjusted for ease of viewing rather than to reflect changes to white balance, Picture Controls, exposure compensation, and the like.
Flicker Reduction When powered by alternating current, fluorescent lamps and certain other types of artificial lighting flicker at a rate determined by the frequency of the power supply, which depending on the timing of the shutter release may produce areas of uneven color or exposure. Flicker reduction helps prevent this by matching the timing of the shutter release to the flicker rate. To enable flicker reduction, select [On] for [Flicker reduction shooting] in the photo shooting menu.
Flicker Reduction Shooting Flicker reduction can detect flicker at 100 and 120 Hz (associated respectively with AC power supplies of 50 and 60 Hz). Flicker may not be detected or the desired results may not be achieved with dark backgrounds, bright light sources, or decorative lighting displays and other non-standard lighting. Depending on the light source, there may be a slight delay before the shutter is released.
Subject-Tracking AF For subject-tracking AF, we recommend that you choose a focus mode of AF-C and an AF-area mode of [Auto-area AF], [Auto-area AF (people)], or [Auto-area AF (animals)]. Once tracking starts, focus will follow the subject through the frame while the AF-ON button is pressed or the shutter-release button is pressed halfway. To start subject-tracking AF, press J. Position the focus point as desired.
To suspend subject tracking and restore the focus point selected before tracking started, lift your finger from the shutter-release or AF‑ON button. If you started subject tracking by pressing J or by tapping your subject in the display, you can press J to suspend tracking and select the center focus point. To end subject-tracking AF, press W (Q).
Assigning Focus and Release to Separate Controls If [AF‑ON only] is selected for Custom Setting a6 [AF activation], the camera will focus only when the AF‑ON button is pressed, freeing you to concentrate on the shutter-release button during portrait or sports photography and in other situations where you focus using AF‑C. The camera focuses while the AF‑ON button is pressed and pauses when the button is released.
Animal-Detection AF To focus on the faces or eyes of dogs and cats (animal-detection AF), select [Wide-area AF (L-animals)] or [Auto-area AF (animals)] for AF-area mode.
Auto-Area AF (Animals) Face/eye-detection is also available with animal portrait subjects when [Auto-area AF (animals)] is selected. If more than one animal face or eye is detected, e and f icons will appear on the focus point, which can then be positioned over a different face or eye by pressing 4 or 2.
Animal-Detection AF The eyes of some animals may be adversely affected by the light of the AF-assist illuminator. Choose [Off] for Custom Setting a11 [Built-in AF-assist illuminator].
Protecting and Rating Pictures Pictures can be protected and rated during playback. These settings remain in effect when the pictures are opened in Capture NX‑D or ViewNX‑i. l Protecting Pictures Pictures can be protected to prevent accidental deletion. Note that this does not prevent the pictures being deleted when the memory card is formatted. From the i Menu The i menu can be used to protect pictures during playback. 50 1 Play the picture back.
3 Select [Protect]. Highlight [Protect] and press J. Protected pictures are marked with a P icon; to remove protection, select the picture and choose [Protect] again. Using Function Buttons You can assign [Protect] to either of the Fn1 and Fn2 buttons using Custom Setting f2 [Custom controls] and thereafter add or remove protection simply by pressing the chosen control. 1 Play the picture back. Start playback by pressing the K button and select a picture you want to protect.
l Rating Pictures Selected pictures can be rated or marked as candidates for later deletion. Ratings can also be viewed in Capture NX-D and ViewNX-i. Protected pictures cannot be rated; remove protection before rating pictures. From the i Menu The i menu can be used to rate pictures during playback. 52 1 Play the picture back. Start playback by pressing the K button and select a picture you want to rate. 2 Press the i button. The playback i menu will be displayed. 3 Select [Rating].
Protecting and Rating Pictures 4 Choose a rating. Rotate the main command dial to choose a rating of from zero to five stars, or select d to mark the picture as a candidate for later deletion. Press J to apply the selected rating. Using Function Buttons You can assign [Rating] to either of the Fn1 and Fn2 buttons using Custom Setting f2 [Custom controls] and thereafter rate pictures simply by holding the chosen control and rotating the main command dial. 1 Play the picture back.
© 2020 Nikon Corporation