
Technical Guide(Images Edition)


4
Sharpening and Softening Images, Continued
Step 2: Fine-Tune “Sharpening”, “Mid-Range Sharpening”, and “Clarity”
After using Quick sharp to obtain the desired overall look, you can ne-
tune the results using Sharpening and its sisters. The examples below
show how to soften the complexions of portrait subjects while leaving
their eyes clearly visible. The recommended settings for images des-
tined for printing vary with output size.
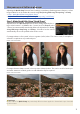
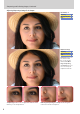
Original (Taken with the “Standard” Picture Control) Quick Sharp: −2 (“Softer”)
Sharpening 3
The table lists the default values for
the Standard Picture Control.
Mid-range sharpening 2
Clarity 1
Sharpening −0.5
Selecting −2 for Quick sharp soft-
ens the complexion of the portrait
subject.
Mid-range sharpening −1
Clarity −1
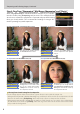
A3 Output Viewed at a Distance of 60cm (2 ft) A1 Output Viewed at a Distance of 60cm (2 ft)
Sharpening 2
Sharpening and Mid-range sharp-
ening have been increased so that
the eyes are clearly dened, while
Clarity has been left at −1 to keep
the complexion smooth.
Mid-range sharpening 1
Clarity −1
Sharpening 3
Sharpening has been raised to 3
so that the eyes are clearly dened,
while Mid-range sharpening and
Clarity have been left at −1 to keep
the complexion smooth.
Mid-range sharpening −1
Clarity −1
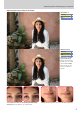
Choosing Picture Control Settings Based on Output Size
How an image appears when viewed from a given distance varies with the output size:
• When pictures are printed or displayed at a large size, small details will be visible. Most adjustments should
therefore be made using Sharpening, which eectively softens or sharpens ne elements.
• When pictures are printed or displayed at a small size, small details are not visible. Most adjustments
should therefore be made using Clarity, which has its greatest eect at the borders between the main
subject and the background.