
Reference Manual
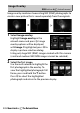


Table Of Contents
- Package Contents
- Table of Contents
- For Your Safety
- Notices
- Getting to Know the Camera
- First Steps
- Basic Photography and Playback
- Basic Settings
- Shooting Controls
- The i Menu
- More About Playback
- Menu Guide
- Defaults
- The Playback Menu: Managing Images
- The Photo Shooting Menu: Shooting Options
- Reset Photo Shooting Menu
- Storage Folder
- File Naming
- Choose Image Area
- Image Quality
- Image Size
- NEF (RAW) Recording
- ISO Sensitivity Settings
- White Balance
- Set Picture Control
- Manage Picture Control
- Color Space
- Active D-Lighting
- Long Exposure NR
- High ISO NR
- Vignette Control
- Diffraction Compensation
- Auto Distortion Control
- Flicker Reduction Shooting
- Metering
- Flash Control
- Flash Mode
- Flash Compensation
- Focus Mode
- AF-Area Mode
- Vibration Reduction
- Auto Bracketing
- Multiple Exposure
- HDR (High Dynamic Range)
- Interval Timer Shooting
- Time-Lapse Movie
- Focus Shift Shooting
- Silent Photography
- The Movie Shooting Menu: Movie Shooting Options
- Reset Movie Shooting Menu
- File Naming
- Choose Image Area
- Frame Size/Frame Rate
- Movie Quality
- Movie File Type
- ISO Sensitivity Settings
- White Balance
- Set Picture Control
- Manage Picture Control
- Active D-Lighting
- High ISO NR
- Vignette Control
- Diffraction Compensation
- Auto Distortion Control
- Flicker Reduction
- Metering
- Focus Mode
- AF-Area Mode
- Vibration Reduction
- Electronic VR
- Microphone Sensitivity
- Attenuator
- Frequency Response
- Wind Noise Reduction
- Headphone Volume
- Timecode
- Custom Settings: Fine-Tuning Camera Settings
- Reset Custom Settings
- a: Autofocus
- a1: AF-C Priority Selection
- a2: AF-S Priority Selection
- a3: Focus Tracking with Lock-On
- a4: Auto-Area AF Face/Eye Detection
- a5: Focus Points Used
- a6: Store Points by Orientation
- a7: AF Activation
- a8: Limit AF-Area Mode Selection
- a9: Focus Point Wrap-Around
- a10: Focus Point Options
- a11: Low-Light AF
- a12: Built-in AF-Assist Illuminator
- a13: Manual Focus Ring in AF Mode
- b: Metering/Exposure
- c: Timers/AE Lock
- d: Shooting/Display
- e: Bracketing/Flash
- f: Controls
- g: Movie
- The Setup Menu: Camera Setup
- Format Memory Card
- Save User Settings
- Reset User Settings
- Language
- Time Zone and Date
- Monitor Brightness
- Monitor Color Balance
- Viewfinder Brightness
- Viewfinder Color Balance
- Control Panel Brightness
- Limit Monitor Mode Selection
- Information Display
- AF Fine-Tune
- Non-CPU Lens Data
- Clean Image Sensor
- Image Dust Off Ref Photo
- Image Comment
- Copyright Information
- Beep Options
- Touch Controls
- HDMI
- Location Data
- Wireless Remote (WR) Options
- Assign Remote (WR) Fn Button
- Airplane Mode
- Connect to Smart Device
- Connect to PC
- Wireless Transmitter (WT-7)
- Conformity Marking
- Battery Info
- Slot Empty Release Lock
- Save/Load Settings
- Reset All Settings
- Firmware Version
- The Retouch Menu: Creating Retouched Copies
- My Menu/Recent Settings
- Connections
- On-Camera Flash Photography
- Remote Flash Photography
- Troubleshooting
- Technical Notes
- The Camera Display and Control Panel
- The Nikon Creative Lighting System
- Other Accessories
- Caring for the Camera
- Caring for the Camera and Battery: Cautions
- Specifications
- NIKKOR Z 24–70mm f/4 S Lens User’s Manual
- FTZ Mount Adapter User’s Manual
- Approved Memory Cards
- Memory Card Capacity
- Battery Endurance
- Index

327Menu Guide > N The Retouch Menu
Create copies that reduce the effects of
perspective in photos taken looking up
from the base of a tall object. Use the
multi selector to adjust perspective
(note that greater amounts of
perspective control result in more of the
edges being cropped out). The results can be previewed in the
edit display. Press J to save the retouched copy.
Perspective Control
G button ➜ N (retouch menu)
Before After