
Reference Manual


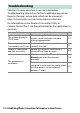
Table Of Contents
- Package Contents
- Table of Contents
- Menu List
- For Your Safety
- Notices
- Getting to Know the Camera
- Parts of the Camera
- Camera Controls
- The Viewfinder
- The Monitor Mode Button
- The Mode Dial
- The Command Dials
- The ISO (ISO Sensitivity) Button
- The Exposure Compensation Button
- Touch Controls
- The DISP Button
- The Playback Zoom and Thumbnail/Help Buttons
- The AE-L/AF-L (Protect) Button
- The MENU Button
- The i Button (i Icon)
- The Function Buttons (Fn1 and Fn2)
- The Flash Pop-Up Control
- First Steps
- Basic Photography and Playback
- Basic Settings
- Shooting Controls
- The i Menu
- More About Playback
- Menu Guide
- Defaults
- The Playback Menu: Managing Images
- The Photo Shooting Menu: Shooting Options
- Reset Photo Shooting Menu
- Storage Folder
- File Naming
- Choose Image Area
- Image Quality
- Image Size
- NEF (RAW) Recording
- ISO Sensitivity Settings
- White Balance
- Set Picture Control
- Manage Picture Control
- Color Space
- Active D-Lighting
- Long Exposure NR
- High ISO NR
- Vignette Control
- Diffraction Compensation
- Auto Distortion Control
- Flicker Reduction Shooting
- Metering
- Flash Control
- Flash Mode
- Flash Compensation
- Release Mode
- Focus Mode
- AF-Area Mode
- Optical VR
- Auto Bracketing
- Multiple Exposure
- HDR (High Dynamic Range)
- Interval Timer Shooting
- Time-Lapse Movie
- Silent Photography
- The Movie Shooting Menu: Movie Shooting Options
- Reset Movie Shooting Menu
- File Naming
- Frame Size/Frame Rate
- Movie Quality
- Movie File Type
- ISO Sensitivity Settings
- White Balance
- Set Picture Control
- Manage Picture Control
- Active D-Lighting
- High ISO NR
- Vignette Control
- Diffraction Compensation
- Auto Distortion Control
- Flicker Reduction
- Metering
- Release Mode (Save Frame)
- Focus Mode
- AF-Area Mode
- Optical VR
- Electronic VR
- Microphone Sensitivity
- Attenuator
- Frequency Response
- Wind Noise Reduction
- Custom Settings: Fine-Tuning Camera Settings
- The Setup Menu: Camera Setup
- Format Memory Card
- Save User Settings
- Reset User Settings
- Language
- Time Zone and Date
- Monitor Brightness
- Viewfinder Brightness
- Viewfinder Color Balance
- Information Display
- AF Fine-Tune
- Image Dust Off Ref Photo
- Image Comment
- Copyright Information
- Beep Options
- Touch Controls
- Self-Portrait Mode
- HDMI
- Location Data Display
- Airplane Mode
- Connect to Smart Device
- Connect to PC
- Wireless Remote (ML-L7) Options
- Conformity Marking
- Energy Saving
- Slot Empty Release Lock
- Reset All Settings
- Firmware Version
- The Retouch Menu: Creating Retouched Copies
- My Menu/Recent Settings
- Establishing Wireless Connections to Computers or Smart Devices
- Connecting to Other Devices
- On-Camera Flash Photography
- Remote Flash Photography
- Troubleshooting
- Technical Notes
- Compatible Lenses
- The Camera Display
- The Nikon Creative Lighting System
- Other Accessories
- Software
- Caring for the Camera
- Caring for the Camera and Battery: Cautions
- Specifications
- Approved Memory Cards
- Memory Card Capacity
- Battery Endurance
- NIKKOR Z DX 16–50mm f/3.5–6.3 VR Lens User’s Manual
- NIKKOR Z DX 50–250mm f/4.5–6.3 VR Lens User’s Manual
- Lenses That May Block the Built-in Flash and AF-Assist Illuminator
- Trademarks and Licenses
- Index
- Added Functions

382 Establishing Wireless Connections to Computers or Smart Devices
7 Camera/Android device: Follow the on-screen instructions.
Camera: Press J. The camera will
display a message stating that the
devices are connected.
Android device: Pairing is complete. Tap OK to exit to the tab.
Pairing is now complete. The next time you use the SnapBridge
app, you can connect as described in “Connecting to a Paired
Device” (0 389).
D Pairing for the First Time
The first time you pair the Android device with a camera after
installing the SnapBridge app, you will be prompted to select auto
link (auto upload and auto clock and location synchronization)
options. This prompt will not appear again, but auto link settings
can be accessed at any time using Auto link in the tab.
D Ending Bluetooth Connections
To end the connection to the smart device, select Disable for Connect
to smart device > Pairing (Bluetooth) > Bluetooth connection in
the camera setup menu.