SB3B04(11) 6MO00711-04 En Features Available with “C” Firmware Version 1.40 Updating the Z 5 “C” firmware from version 1.21 to version 1.40 gives access to the features described below. For information on features available with prior updates, see the Z 5 Reference Manual. To view the camera firmware version or update the camera firmware, select [Firmware version] in the setup menu. The latest firmware for the Z 5 is available for download from the Nikon Download Center. https://downloadcenter.
Support for Eye-Detection AF in Movie Mode Updating to “C” firmware version 1.40 allows the use of eyedetection AF (a feature that detects and focuses on the eyes of humans, dogs, and cats) in movie mode, a mode in which it was not supported in earlier versions (“C” firmware versions 1.21 and earlier). “C” firmware versions 1.21 and earlier “C” firmware version 1.
New Options for Custom Setting f2 “Custom Controls”: “Save Focus Position” and “Recall Focus Position” [Save focus position] and [Recall focus position] have been added to the roles that can be assigned to camera controls using Custom Setting f2 [Custom controls]. You can save the current focus position by assigning [Save focus position] to [Lens Fn button] and then pressing and holding the lens Fn button.
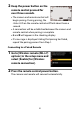
❚❚ Memory Recall 1 Select [Save focus position] for Custom Setting f2 [Custom controls] > [Lens Fn button]. 2 Select [Recall focus position] for Custom Setting f2 [Custom controls] > [Lens Fn2 button]. 3 Focus on the desired subject in the shooting display and press and hold the lens Fn button. If the operation is successful, an icon will appear in the shooting display to indicate that the focus position has been saved. 4 Press the lens Fn2 button. • The saved focus position will be restored.
D Cautions: Memory Recall • Focus positions cannot be saved while shooting information is displayed. • Changes in ambient temperature may result in focus being recalled to a position different from that at which it was saved. • Previously-saved focus positions tend to change if recalled after lens focal length is adjusted via zoom.
New Setup Menu Option: “USB” A [USB] item has been added to the setup menu. Use this item for wired USB connections between the camera and a computer or smart device. • Select [MTP/PTP] for wired connections to computers. • A USB cable can be used to connect the camera to smart devices running the NX MobileAir smartphone app. Choose an option according to the type of device connected. - Select [MTP/PTP] for connection to Android devices.
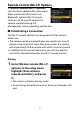
Remote Control (ML-L7) Options A [Wireless remote (ML-L7) options] item has been added to the setup menu. When paired with the camera via Bluetooth, optional ML-L7 remote controls can be used to control the camera remotely during still photography, movie recording, and the like. ❚❚ Establishing a Connection The ML-L7 remote control must be paired with the camera before use. • The camera can be paired with only one remote at a time.
2 Keep the power button on the remote control pressed for over three seconds. • The camera and remote control will begin pairing. During pairing, the status LED on the remote control will flash about twice a second. • A connection will be established between the camera and remote control when pairing is complete. • L and Z will appear in the shooting display. • If a message is displayed stating that pairing has failed, repeat the pairing process from Step 1.
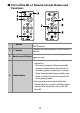
❚❚ The Setup Menu “Wireless Remote (ML-L7) Options” Item The [Wireless remote (ML-L7) options] item in the setup menu contains the following options: • [Wireless remote connection]: Select [Enable] to connect to the remote control with which the camera has been most recently paired. To end the connection, select [Disable]. • [Save wireless remote controller]: Pair the camera with a remote control. For more information, see “Pairing” in the section on “Establishing a Connection” (0 7).
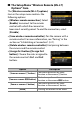
❚❚ Parts of the ML-L7 Remote Control: Names and Functions Performs the same function as the camera W (Q) button. Performs the same function as the camera X 2 “+” button button. Press once to start movie recording and 3 Movie-record button again to stop. • Press the button to turn the remote control on. - The remote control will automatically connect to the camera with which it is currently paired, assuming it is nearby.
The color and behavior of the status LED indicates remote control and shooting status. For more information, see “The Remote Control Status LED (Z 5)” (0 12). Press the button to release the shutter. • The remote control shutter-release button cannot be pressed halfway. • The remote control shutter-release button Shutter-release cannot be kept pressed for burst button photography. • The procedure for taking photographs at a shutter speed of “Bulb” is the same as that for “Time”.
A The Remote Control Status LED (Z 5) Color Orange Behavior Flashes approximately once a second Flashes quickly (approximately twice a second) Flashes approximately once every three seconds Flashes once Orange Flashes twice Red Red Flashes once Flashes twice Green Green Green Status Searching for paired camera. Pairing. Connected to camera. Photography started. “Bulb” or “Time” photography ended. Movie recording started. Movie recording ended.
D Troubleshooting Try the solutions listed below if you experience any of the following when using an ML-L7 remote control. • [Wireless remote (ML-L7) options] cannot be selected in the setup menu and the camera cannot be paired with the remote control: - Check that the camera battery is charged or use an optional charging AC adapter or an optional EP-5B power connector and EH-5d, EH-5c, or EH-5b AC adapter. - Confirm that [Disable] is selected for [Airplane mode] in the setup menu.
New Optional Remote Grip The camera now supports the optional MC-N10 remote grip. When connected to the camera, the MC-N10 can be used for such tasks as video recording, photography, and adjusting camera settings. • The MC-N10 comes equipped with a rosette for attachment to third-party camera equipment.