
Owner's Manual

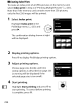
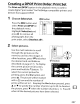


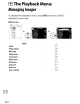
Table Of Contents
- Using the Supplied Manuals
- Quick Start Guide
- Owners Manual
- Two-Button Reset
- Memory Card Compatibility
- Setting Language / Time / Date
- Table of Contents
- Q & A Index
- Icons Used in This Manual
- Supplied Accessories
- Parts & Controls
- Getting Started
- Basic Operation
- Focus
- Release Mode
- ISO Sensitivity
- Exposure
- White Balance
- Image Enhancement
- Flash Photography
- Other Shooting Options
- More Playback Options
- Connecting to Other Devices
- Menu Guide
- Compatible Lenses
- Optional Flash Units
- Other Accessories
- Care / Maintenance
- Troubleshooting
- Error Messages
- Specs
- Index
- Software Installation Guide
- Scan of Software CD-ROM
- Warranty

II
Creating
Index
Prints
To
create
an
index
print
of
all
JPEG
pictures on the memory card,
select
Index print in Step 2
of
"Printing
Multiple
Pictures"
(OJ
233).
Note
that
if
the
memory
card contains more than 256 pictures,
only the first 256 images will be printed.
1 Select Index print.
Highlight
Index print in the
PictBridge menu
(ITJ
233) and
press
~.
The confirmation dialog shown at right
will be displayed.
.
~.~'-
-.
-.
2
Display printing options.
Press
®
to
display PictBridge printing options.
3
Adjust printing options.
Choose page
size,
border, and
time
stamp options
as
described on page 235
(a
warning will be displayed
if
the
selected page
size
is
too
small).
4
Start printing.
~
EJ
Highlight
Start printing and press ®
to
start printing.
To
cancel before
printing
is
complete, press
§.
236