
Owner's Manual
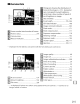


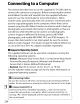
Table Of Contents
- Using the Supplied Manuals
- Quick Start Guide
- Owners Manual
- Two-Button Reset
- Memory Card Compatibility
- Setting Language / Time / Date
- Table of Contents
- Q & A Index
- Icons Used in This Manual
- Supplied Accessories
- Parts & Controls
- Getting Started
- Basic Operation
- Focus
- Release Mode
- ISO Sensitivity
- Exposure
- White Balance
- Image Enhancement
- Flash Photography
- Other Shooting Options
- More Playback Options
- Connecting to Other Devices
- Menu Guide
- Compatible Lenses
- Optional Flash Units
- Other Accessories
- Care / Maintenance
- Troubleshooting
- Error Messages
- Specs
- Index
- Software Installation Guide
- Scan of Software CD-ROM
- Warranty

Connecting
to
a Computer
This section describes
how
to
use
the
supplied
UC
-E4
USB
cable
to
connect
the
camera
to
a computer. Before connecting
the
camera,
install Nikon Transfer and ViewNX from
the
supplied Software
Suite
CD
(see
the
Install Guide for more information). Nikon
Transfer starts automatically when the camera
is
connected and
is
used
to
copy photographs
to
the
computer, where
they
can be
viewed using ViewNX (Nikon Transfer can also be used
to
back
up
photographs and embed
information
in photographs
as
they
are
transferred,
while
ViewNX can be used
to
sort photographs,
convert images
to
different file formats, process
NEF/RAW
photographs, and
modify
NEF/RAW,
TIFF,
and
JPEG
images).
To
ensure
that
data transfer
is
not
interrupted, be sure
the
camera
battery
is
fully charged.
If
in
doubt,
charge
the
battery before use
or
use
an
EH-Sa
or
EH-S
AC
adapter (available separately).
II
Supported
Operating
Systems
The supplied software can be used
with
computers running
the
following
operating systems:
•
Windows:
Windows Vista Service
Pack
1 (32-bit Home Basic/Home
Premium/Business/Enterprise/Ultimate) and Windows
XP
Service
Pack
3 (Home Edition/Professional)
•
Macintosh:
Mac
as
x(version 10.3.9, 10.4.11, or 10.5.6)
See
the
websites listed on page xxiv for
the
latest
information
on
supported operating systems.
~
Connecting Cables
Be
sure
the
camera
is
off
when connecting or disconnecting interface
cables. Do
not
use force or
attempt
to
insert
the
connectors at
an
angle.
IA;]
B Camera Control Pro 2
Camera Control
Pro
2 (available separately; 0 355) can be used
to
control
the
camera
from
a computer. When Camera Control
Pro
2
is
running, lip
[II
will be displayed and
the
exposure indicator will blink in
the
control panel.
224