
Owner's Manual


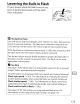
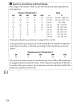
Table Of Contents
- Using the Supplied Manuals
- Quick Start Guide
- Owners Manual
- Two-Button Reset
- Memory Card Compatibility
- Setting Language / Time / Date
- Table of Contents
- Q & A Index
- Icons Used in This Manual
- Supplied Accessories
- Parts & Controls
- Getting Started
- Basic Operation
- Focus
- Release Mode
- ISO Sensitivity
- Exposure
- White Balance
- Image Enhancement
- Flash Photography
- Other Shooting Options
- More Playback Options
- Connecting to Other Devices
- Menu Guide
- Compatible Lenses
- Optional Flash Units
- Other Accessories
- Care / Maintenance
- Troubleshooting
- Error Messages
- Specs
- Index
- Software Installation Guide
- Scan of Software CD-ROM
- Warranty

To
use active D-Lighting:
!i.!I
•
~
AUTO
IBSD
~~I
OFF
OFF;
Active
D-lighbng
ti
SHOOTING
MENU
Ii
IPEG
compression
;~
NEF
(RAW)
recording
(VS
Whit~
balance
:<
,~{
Set
PIcture
Control
••
;~'"
Manage
Picture
Control
\fa
~.'<'
Color
space
IJ
long
expo
NR
MENU
button
r-1~0
L-K@:
~.:.
@
{§) [
@-~
Select Active D-Lighting.
To
display the menus, press
the
MENU
button. Highlight
Active
D-Lighting
in
the
shooting menu and press
~.
1
Gil
N
Normal
(QK)
II
Active
D-lighting
o
I
~
"fliil<JlllAuto
.
flii
If
Extra
high
IfliiH
High
I
GilL
low
f;i$,!~
M
2 Choose an
option.
Highlight
FrnAUTOAuto,
Frn
H+
Extra
high,
Ii(] H
High,
gil
N
Normal,
[ _
~
Frcl
L Low,
or
Off
and press ®.
If
'WI
Frci
AUTO
Auto
is
selected,
the
camera
will
automatically
adjust Active
D-Lighting
according
to
shooting
conditions
(in
exposure
mode
rt
however,
frrl
AUTO
Auto
is
equivalent
to
fro
N
Normal).
~
Active
D-Lighting
Matrix
metering
is
recommended
(0
102). When Active
D-Lighting
is
on,
noise (graininess,
banding,
and
mottling)
may
appear in
photographs
taken
at
high
ISO
sensitivities and
additional
time
is
required
to
record
images. The
Brightness
and
Contrast
Picture Control settings
(0
157)
can
not
be
adjusted
while
active
D-Lighting
is
in effect.
~
IIActive
D-Lighting"
versus
liD-lighting"
The
Active
D-Lighting
option
in
the
shooting
menu
adjusts
exposure
before
shooting
to
optimize
the
dynamic
range,
while
the
D-Lighting
option
in
the
retouch
menu
optimizes
dynamic
range in images
after
shooting.
~
See
Also
When
ADL
bracketing
is
selected
for
Custom
Setting
e5
(Auto
bracketing
set, 0 289),
the
camera varies
Active
D-Lighting
over
a
series
of
shots. See
page
129
for
more
information.
165