
Owner's Manual
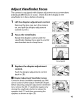

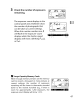
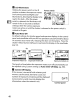


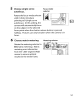
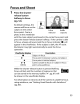
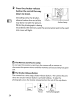
Table Of Contents
- Using the Supplied Manuals
- Quick Start Guide
- Owners Manual
- Two-Button Reset
- Setting Language / Time / Date
- Table of Contents
- Q & A Index
- Supplied Accessories
- Parts & Controls
- Getting Started
- Basic Photography
- Basic Playback
- Image Area
- Image Quality
- Image Size
- Focus
- Release Mode
- ISO Sensitivity
- Exposure
- White Balance
- Image Enhancement
- Flash Photography
- Other Shooting Options
- More Playback Options
- Connecting to Other Devices
- Menu Guide
- Playback Menu - Managing Images
- Shooting Menu - Shooting Options
- Shooting Menu Bank
- Reset Shooting Menu
- Active Folder
- File Naming
- Image Quality
- Image Size
- Image Area
- JPEG Compression
- NEF (RAW) Recording
- White Balance
- Set Picture Control
- Manage Picture Control
- Color Space
- Active D-Lighting
- Vignette Control
- Long Exposure NR
- High ISO NR
- ISO Sensitivity Settings
- Live View
- Multiple Exposure
- Interval Timer Shooting
- Custom Settings - Fine Tuning the Camera
- Setup Menu - Camera Setup
- Format Memory Card
- LCD Brightness
- Clean Image Sensor
- Lock Mirror Up for Cleaning
- Video Mode
- HDMI
- World Time
- Language
- Image Comment
- Auto Image Rotation
- Dust Off Reference Photo
- Battery Information
- Wireless Transmitter
- Image Authentication
- Copyright Information
- Save / Load Settings
- GPS
- Virtual Horizon
- Non-CPU Lens Data
- AF Fine Tune
- Firmware Version
- Retouch Menu - Creating Retouched Copies
- My Menu - Creating a Custom Menu
- Compatible Lenses
- Optional Flash Units
- Other Accessories
- Care / Maintenance
- Troubleshooting
- Error Messages
- Defaults
- Memory Card Capacity
- Specs
- Index
- 24-120mm Lens Instruction Manual
- Software Installation Instructions
- Scans of Software CD-ROMs
- AC Power Cord Specs
- Warranty

Basic
Photographyand
Playback
Turn
the
Camera On
EJ
Before taking photographs, turn the camera on and check the
battery level and number
of
exposures remaining
as
described
below.
- - •
·'0.
.••••
_
._,
•.•
_.
_.
.•.
_
••
_
.••••••••••
_.
._~.
_
~
1 Turn the camera on.
Power switch
Turn the camera on. The
control panel will turn on and
the display
in
the viewfinder
will light.
2 Check the battery level.
Check the battery level
in
the control
panel or viewfinder.
P
Ie'S
Fs.O
II
1>
~"ilf~'i
Ii
1)
-_.-..
-
-~
.
G!!l
i
i
.1
,
..
·
..
,··«
,
,,,
,
--
..
-
••••••••••••
_ «
..
,."
_ 0 -
""
,
,,-
..
-.--··,,··
--~._
_
--
..
!
Low
battery.
Prepare
to charge battery
i
or
ready
spare
battery.
••
m
•••••••••••
·~·······~I·
1'"
·0-·
Tsll'u"tt
e'r-re'le
a
se"dTsabfed~-Ch
a
rge··or-
--
(blinks)
I
(blinks)
Ii
exchange battery.
......
- _ , ~~
.~
,
..
__
~
__
..
~
__
._
•..._
.'_.
__
.•
,_
__
_ _..•._0.__.._..- .•.
_.
__
.
__
• .
..
~~
..
_ _
~
..
~._
~._._
_~
__
~~.~
__
_~
• .. .
*
No
icon
displayed
when
camera
is
powered
by
optional
AC
adapter.
--
..
···_-·
..
-·-kon-
i
-····
··-------·-r--·----·--··---············-·--------··----_.
"con-tro"lpaneiTvieWfinder'j
Description
...
.
+-
_ _ _
~
__
_
_--_
__
..
-_
__
..
-._
_-----_
..
-
~rl"'l:
I Battery fully charged.
....
"-"""r-
~
. . ; _
~~
__
~
..
~
--
..
--.-
~
..
-,.----
..
-
,-,-
..
-.---
..
~
..
--
..
_."'~
..
-_
~-
_-~
..
-
..
-
--.---
..
---
".~"
---.-
,-.-
..
--.-
..
--
~_I
i
; I
·t··-·
..
··
..
·····-
IBattery partially discharged.
.......................... .
..
i _ ,
~
j
,
46