
Owner's Manual
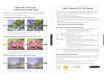


Table Of Contents
- Using the Supplied Manuals
- Quick Start Guide
- Owners Manual
- Two-Button Reset
- Setting Language / Time / Date
- Table of Contents
- Q & A Index
- Supplied Accessories
- Parts & Controls
- Getting Started
- Basic Photography
- Basic Playback
- Image Area
- Image Quality
- Image Size
- Focus
- Release Mode
- ISO Sensitivity
- Exposure
- White Balance
- Image Enhancement
- Flash Photography
- Other Shooting Options
- More Playback Options
- Connecting to Other Devices
- Menu Guide
- Playback Menu - Managing Images
- Shooting Menu - Shooting Options
- Shooting Menu Bank
- Reset Shooting Menu
- Active Folder
- File Naming
- Image Quality
- Image Size
- Image Area
- JPEG Compression
- NEF (RAW) Recording
- White Balance
- Set Picture Control
- Manage Picture Control
- Color Space
- Active D-Lighting
- Vignette Control
- Long Exposure NR
- High ISO NR
- ISO Sensitivity Settings
- Live View
- Multiple Exposure
- Interval Timer Shooting
- Custom Settings - Fine Tuning the Camera
- Setup Menu - Camera Setup
- Format Memory Card
- LCD Brightness
- Clean Image Sensor
- Lock Mirror Up for Cleaning
- Video Mode
- HDMI
- World Time
- Language
- Image Comment
- Auto Image Rotation
- Dust Off Reference Photo
- Battery Information
- Wireless Transmitter
- Image Authentication
- Copyright Information
- Save / Load Settings
- GPS
- Virtual Horizon
- Non-CPU Lens Data
- AF Fine Tune
- Firmware Version
- Retouch Menu - Creating Retouched Copies
- My Menu - Creating a Custom Menu
- Compatible Lenses
- Optional Flash Units
- Other Accessories
- Care / Maintenance
- Troubleshooting
- Error Messages
- Defaults
- Memory Card Capacity
- Specs
- Index
- 24-120mm Lens Instruction Manual
- Software Installation Instructions
- Scans of Software CD-ROMs
- AC Power Cord Specs
- Warranty

After/
Despues
Ejemplo
o
Para
quitar
manchas
LDesea
quitar
las
manchas
de
las
fotografias?
+
Drag
the
slider
to
size
the
brush.
Arrastre
el
control
deslizante
para ajustar
el
tamano
del
pincel.
Finish
/
Finalizar
The
object
is
automatically
removed
to
produce a
blemish-freepicture.
EI
objeto
se
elimina
automaticamente
para
producir
unaimagen
libre
de manchas.
Start/lniciar
Use
the
0.:
tool
in
the
tool
bar
to
zoom
in
on
the
area you wish
to
retouch.
Utilice
la
herramienta q: en
la
barra de herramientas para ampliar
el
area
que
desea
retocar.
Example
o
Remove
Blemishes
Do
you
want
to
remove blemishes
from
your
photographs?
2
Drag
the
mouse
to
paint
over
the
object
you
wish
to
remove.
Arrastre el raton para
pintar
sobre el
objeto
que desea eliminar.
---'---'----<-'--------
Paint
an
area
slightly
larger
than
the
object.
Eldrea
pintada
es
ligeramente
mayor
que
elobjeto.
<0
Using the
Auto
Retouch
Brush
Utilizar
el
pincel
autocorrector
Blemishes
can
simply
be
painted out
with
the
auto
retouch
brush.
Las
manchas
se
pueden
eliminar
fdci/mente
can
el
ptncel
autocorrector
Try Capture
NX
2's full range
of
advanced
image
enhancement
options
today!
jPruebe
hoy
mismo
el
amplio
rango
de
opciones
avanzadas
de
mejoras
de
imagen
de
Capture
NX
2!
Changes
will
be
applied only
to
the
area
or object identified
by
the
selection
control
point.
Los
cam
bios
se
aplicaran
sola
mente
en
el
area
u objeto identificado
mediante
el
punta
de
control
de
la
seleccion.
The
sharpened flower stands
out
againstthe background.
La
flor
con
mayornitidez resalta sobre
el
fondo.
Click
the
flower.
Haga
elie
en
la
flor.
Selection control
Changes
apply to the
area
or
object identified
by
this
point.
CD
point
Los
cambios
se
aplican
al
area
u objeto identificado
Punta de control de
la
mediante este punta.
selecci6n
Size
slider
Controls the
size
of
the
area
affected.
@ Control deslizante de
Controla
el
tamano del
area
afectada.
tamano
Opacity slider
The higher the value for opacity, the more visible the
changes will be. The default for the
"+"
tool
is
100%.
@ Control deslizante de
A
mayor
valor
de
opacidad,
mas
visibles
seran
los
cam
bios.
EI
opacidad
valor predeterminado
para
la
herramienta
"+"
es
100%.
To
move
the
selection
control
point,
click and
drag
Para
mover
el
punto
de
control
de
la
seleccion, haga
c1ic
y arrastre
To
delete
the
selection
control
point,
press
the
delete
key.
Para
eliminar
el
punto
de
control
de la seleccion, pulse la tecla Suprimir.
"0
Selection
Control
Points
/
Puntos
de
control
de
la
selecci6n
Drag the sliders
to
choose the
area
identified by
the
CD
@
selection control point.
Opacity
@
Arrastre
los
controles deslizantes para seleccionar
el
Opacidad
area
identificada par media del
punta
de control de
la
selecci6n.
3-"'----1----'-------
After/
Despues
The
entire
image
is
sharpened.
Toda
10
imagen
se
vuelve
mas
nitida.
Ejemplo
Para
corregir
sola
mente
10
necesario
LDesea
dar
nitidez
solo
a una
parte
de
la
imagen
para resaltar el
sujeto
principal?
Click
the
t>~
icon in
the
toolbar.
Ha
a
e1ic
en el
icono
..::>~
en la barra de herramientas.
Use
the
"+"
tool
to
apply
changes
only
in
the
selected
area.
Utilice
10
herramienta
"+"
para
aplicar
los
cambios
sola
mente
en
elarea
afectada.
xample
Using Selection
Control
Points
Utilizar
los
puntos
de
control
de
la
selecci6n
hal1ges
upply only to
the
area
or
hJect
identIfied
by
the
sele
non
cantre
oint.
Her
we
w'll
use
selection
(ont"
..
1
oints
to
re
triet
sharpening
to
u
leeted
flower.
5
camblos
se
aoltron
sol(lmente
011rea
Uobjeto identificado
me110nte
el
pUf'to
1e
((
ntrol
de
/a
elemon.
AqUl
utiJlzaremos
los
puntas
de
control
de
10
se/eccion
para restrlnglr
Ja
mtldez
en
una
flor
plpcciof1lJdo.
Fix
What
Needs
Fixing
o
you
want
to
sharpen
just
part
of
the
mage
to
make
the
main
subject
stand out?
Unlike
color control
points,
which
can
only
be
used
to
modify
color,
selection
control points
can
be
used
to
select
areas
for
any
image adjustment.
AI
contra
rio
que
can
los
puntas
de
control
de
color,
los
cuales
se
pueden
utilizar
sola
mente
para
modificar
el
color,
los
puntas
de
control
de
la
seleccion
se
pueden
utilizar
para
seleccionar
areas
para
cualquier
tipo
de
ajuste
de
imagen.
Start/lniciar
2
.............-
1
After
selecting
View>
View
at
100%,
select
Adjust>
Focus>
Unsharp
Mask
and sharpen
the
entire
image.
Despues de
haber
seleccionado
Ver
>
Ver
all
00
%,
seleccione
Ajustar>
Enfoque
>
~cara
de
enfo
ue
dele
rna
or
nitidez
a
toda
la ima en.