
Owner's Manual

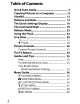


Table Of Contents
- Using the Supplied Manuals
- Quick Start Guide
- Owners Manual
- Two-Button Reset
- Setting Language / Time / Date
- Table of Contents
- Q & A Index
- Supplied Accessories
- Parts & Controls
- Getting Started
- Basic Photography
- Basic Playback
- Image Area
- Image Quality
- Image Size
- Focus
- Release Mode
- ISO Sensitivity
- Exposure
- White Balance
- Image Enhancement
- Flash Photography
- Other Shooting Options
- More Playback Options
- Connecting to Other Devices
- Menu Guide
- Playback Menu - Managing Images
- Shooting Menu - Shooting Options
- Shooting Menu Bank
- Reset Shooting Menu
- Active Folder
- File Naming
- Image Quality
- Image Size
- Image Area
- JPEG Compression
- NEF (RAW) Recording
- White Balance
- Set Picture Control
- Manage Picture Control
- Color Space
- Active D-Lighting
- Vignette Control
- Long Exposure NR
- High ISO NR
- ISO Sensitivity Settings
- Live View
- Multiple Exposure
- Interval Timer Shooting
- Custom Settings - Fine Tuning the Camera
- Setup Menu - Camera Setup
- Format Memory Card
- LCD Brightness
- Clean Image Sensor
- Lock Mirror Up for Cleaning
- Video Mode
- HDMI
- World Time
- Language
- Image Comment
- Auto Image Rotation
- Dust Off Reference Photo
- Battery Information
- Wireless Transmitter
- Image Authentication
- Copyright Information
- Save / Load Settings
- GPS
- Virtual Horizon
- Non-CPU Lens Data
- AF Fine Tune
- Firmware Version
- Retouch Menu - Creating Retouched Copies
- My Menu - Creating a Custom Menu
- Compatible Lenses
- Optional Flash Units
- Other Accessories
- Care / Maintenance
- Troubleshooting
- Error Messages
- Defaults
- Memory Card Capacity
- Specs
- Index
- 24-120mm Lens Instruction Manual
- Software Installation Instructions
- Scans of Software CD-ROMs
- AC Power Cord Specs
- Warranty

8
Copying Pictures
to
a
Computer
This section describes
how
to
use
the supplied
UC-E4
USB
cable
to
connect the camera
to
a computer. Before
connecting the camera, install Nikon Transfer and ViewNX
from
the
supplied Software Suite
CD
(see
the Software
Installation Guide
for more information). Nikon Transfer
starts automatically when the camera
is
connected and
is
used
to
copy photographs
to
the computer, where they
can
be viewed using ViewNX (Nikon Transfer
can
also be used
to
back
up
photographs and embed information in
photographs
as
they are transferred, while ViewNX
can
be
used
to
sort photographs, convert images
to
different file
formats, and perform simple editing on
NEF
(RAW)
photographs). To ensure that data transfer
is
not
interrupted, be sure the camera battery
is
fully charged. Ifin
doubt,
charge the battery before
use
or
use
an
EH-Sa
or
EH-S
AC
adapter (available separately).
~r~'~~:!'!'~:=$"";'/,,,"""":'·~:f~~~~-~'~Y'I"':N'~':"":~'~·:~'~':'*-':<:'H"M:::"~·'''''':':;'''N'~·'''''~~~·~':'''''"o/.a~~·!~~'~~"",,"",:t>o·,,,,~",,~~,,,~~~,~,,,,~,,:?:,,-,,:~':''';''~~<;;~''~-:::;:-_7'~~~'~':''~:«''~'::M:;.(.o::j;),.Q.:?'l:
- . -
ISupported Operating Systems
i . I
IThe camera can be connected
to
computers running the
I
following
operating systems: i
;-
Windows:
Windows Vista Service
Pack
1 (32-bit Home I
~
Basic/Home Premium/Business/Enterprise/Ultimate) I
I and Windows
XP
Service
Pack
2
(Home
Edition/ I
:i
i
! Professional) I
j I
I·
Macintosh:
Mac as x(version 10.3.9, 10.4.11,
or
10.5.2) I
! j
i.
.",
......
~.,.....,-->."":"':><:-"'-~~,
•
.,.:
...
-..--o-~_:"~
•••
~.":'
....
~-:o/.,
...
"._~-"'".-.-,.y.~"'~.:~'V·l<
...
~'-·.<·;·
....
->,..~'".';
.......
,_:.o-<··"'·-O-?~"'''''---~·<'''':><~'''''.",",'~'''''''''''''~,,,,,,'''~~o),''''I''''::'N';-~''':'''''''''''''
""
...
-
.......
~._'_."'.~-
....
~
....
.,.>.$o'
...
_>"'?;...,
......
;,~
......
_._<.:.
::",~..:·->:v
.............
:(
••
..,.~.;r."",.<,,,<,;,
........
~i