
Owner's Manual


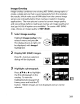
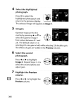
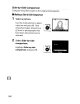

Table Of Contents
- Using the Supplied Manuals
- Quick Start Guide
- Owners Manual
- Two-Button Reset
- Setting Language / Time / Date
- Table of Contents
- Q & A Index
- Supplied Accessories
- Parts & Controls
- Getting Started
- Basic Photography
- Basic Playback
- Image Area
- Image Quality
- Image Size
- Focus
- Release Mode
- ISO Sensitivity
- Exposure
- White Balance
- Image Enhancement
- Flash Photography
- Other Shooting Options
- More Playback Options
- Connecting to Other Devices
- Menu Guide
- Playback Menu - Managing Images
- Shooting Menu - Shooting Options
- Shooting Menu Bank
- Reset Shooting Menu
- Active Folder
- File Naming
- Image Quality
- Image Size
- Image Area
- JPEG Compression
- NEF (RAW) Recording
- White Balance
- Set Picture Control
- Manage Picture Control
- Color Space
- Active D-Lighting
- Vignette Control
- Long Exposure NR
- High ISO NR
- ISO Sensitivity Settings
- Live View
- Multiple Exposure
- Interval Timer Shooting
- Custom Settings - Fine Tuning the Camera
- Setup Menu - Camera Setup
- Format Memory Card
- LCD Brightness
- Clean Image Sensor
- Lock Mirror Up for Cleaning
- Video Mode
- HDMI
- World Time
- Language
- Image Comment
- Auto Image Rotation
- Dust Off Reference Photo
- Battery Information
- Wireless Transmitter
- Image Authentication
- Copyright Information
- Save / Load Settings
- GPS
- Virtual Horizon
- Non-CPU Lens Data
- AF Fine Tune
- Firmware Version
- Retouch Menu - Creating Retouched Copies
- My Menu - Creating a Custom Menu
- Compatible Lenses
- Optional Flash Units
- Other Accessories
- Care / Maintenance
- Troubleshooting
- Error Messages
- Defaults
- Memory Card Capacity
- Specs
- Index
- 24-120mm Lens Instruction Manual
- Software Installation Instructions
- Scans of Software CD-ROMs
- AC Power Cord Specs
- Warranty

Red-Eye Correction
This
option
is
used
to
correct
II
re
d-eye
ll
caused
by
the
flash, and
is
available only
with
photographs taken using
the
flash. The
photograph
selected for red-eye correction
is
previewed
as
shown at right. Confirm
the
effects
of
red-eye correction and create a
copy
as
described in
the
following
table. Note
that
red-eye
correction may
not
always produce
the
expected results and may
in very rare circumstances be applied
to
portions
of
the
image
that
are
not
affected by red-eye; check
the
preview
thoroughly
before
proceeding.
To
Use Description
Zoom in
Zoom
out
Create
copy
Cancel zoom
View
other
areas
of
image
Press
~
button
to
zoom in,
E(~
button
to
zoom out. While
photo
is
zoomed in,
..
_
..
-.-
_ - - -
-+
- -- ; use
multi
selector
to
view
areas
of
image
not
visible in
monitor. Keep
multi
selector pressed
to
- - - + ; scroll rapidly
to
other
areas
of
frame.
Navigation
window
is
displayed when
zoom
buttons
or
multi
selector
is
pressed;
area currently visible in
monitor
is
indicated
by yellow border.
Press
®
to
cancel zoom.
------
-
--.--
-.-
--l---.-.---
_+-
--
the
camera red-eye in
selected photograph, a copy will be created
that
has
been processed
to
reduce its
effects. No copy will be created
if
the
I§]l
camera
is
unable
to
detect red-eye.
355