
Owner's Manual
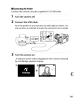

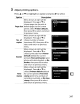
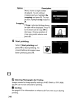

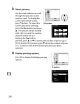


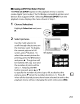
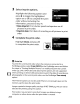
Table Of Contents
- Using the Supplied Manuals
- Quick Start Guide
- Owners Manual
- Two-Button Reset
- Setting Language / Time / Date
- Table of Contents
- Q & A Index
- Supplied Accessories
- Parts & Controls
- Getting Started
- Basic Photography
- Basic Playback
- Image Area
- Image Quality
- Image Size
- Focus
- Release Mode
- ISO Sensitivity
- Exposure
- White Balance
- Image Enhancement
- Flash Photography
- Other Shooting Options
- More Playback Options
- Connecting to Other Devices
- Menu Guide
- Playback Menu - Managing Images
- Shooting Menu - Shooting Options
- Shooting Menu Bank
- Reset Shooting Menu
- Active Folder
- File Naming
- Image Quality
- Image Size
- Image Area
- JPEG Compression
- NEF (RAW) Recording
- White Balance
- Set Picture Control
- Manage Picture Control
- Color Space
- Active D-Lighting
- Vignette Control
- Long Exposure NR
- High ISO NR
- ISO Sensitivity Settings
- Live View
- Multiple Exposure
- Interval Timer Shooting
- Custom Settings - Fine Tuning the Camera
- Setup Menu - Camera Setup
- Format Memory Card
- LCD Brightness
- Clean Image Sensor
- Lock Mirror Up for Cleaning
- Video Mode
- HDMI
- World Time
- Language
- Image Comment
- Auto Image Rotation
- Dust Off Reference Photo
- Battery Information
- Wireless Transmitter
- Image Authentication
- Copyright Information
- Save / Load Settings
- GPS
- Virtual Horizon
- Non-CPU Lens Data
- AF Fine Tune
- Firmware Version
- Retouch Menu - Creating Retouched Copies
- My Menu - Creating a Custom Menu
- Compatible Lenses
- Optional Flash Units
- Other Accessories
- Care / Maintenance
- Troubleshooting
- Error Messages
- Defaults
- Memory Card Capacity
- Specs
- Index
- 24-120mm Lens Instruction Manual
- Software Installation Instructions
- Scans of Software CD-ROMs
- AC Power Cord Specs
- Warranty

•
1~~_1
100-1~~
•••
8+G;Set
@JZoom
(@OK
!'(
Print
(DPOF)
A
~
~
6)
e
Nllfon
Use
the
multi
selector
to
scroll
through
the pictures on the
memory card.
To
display the
current picture full screen,
press
~
button.
To
select the
o-n
button
current picture for printing,
press the
o-n
button
and press
.... The picture will be marked
with
a
~
icon and the number
of
prints will be set
to
1.
Keeping the
o-n
button
pressed,
press'"
or'"
to
specify the
number
of
prints (up
to
99;
to
deselect the picture,
press'"
when
the
number
of
prints
is
1).
Continue until all the desired pictures have been
selected.
3 Select pictures.
........................................
4 Display printing options.
Press
®
to
display PictBridge printing
options.
e
e
18
A
_Pl~N'kon~
®
button
EJ
~(
Setup
Start
printing
@KJ
Page
size
~
Border
~
Time
stamp
~
iJ
250