
Owner's Manual
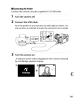

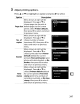
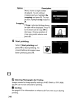


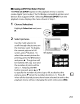
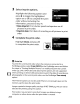
Table Of Contents
- Using the Supplied Manuals
- Quick Start Guide
- Owners Manual
- Two-Button Reset
- Setting Language / Time / Date
- Table of Contents
- Q & A Index
- Supplied Accessories
- Parts & Controls
- Getting Started
- Basic Photography
- Basic Playback
- Image Area
- Image Quality
- Image Size
- Focus
- Release Mode
- ISO Sensitivity
- Exposure
- White Balance
- Image Enhancement
- Flash Photography
- Other Shooting Options
- More Playback Options
- Connecting to Other Devices
- Menu Guide
- Playback Menu - Managing Images
- Shooting Menu - Shooting Options
- Shooting Menu Bank
- Reset Shooting Menu
- Active Folder
- File Naming
- Image Quality
- Image Size
- Image Area
- JPEG Compression
- NEF (RAW) Recording
- White Balance
- Set Picture Control
- Manage Picture Control
- Color Space
- Active D-Lighting
- Vignette Control
- Long Exposure NR
- High ISO NR
- ISO Sensitivity Settings
- Live View
- Multiple Exposure
- Interval Timer Shooting
- Custom Settings - Fine Tuning the Camera
- Setup Menu - Camera Setup
- Format Memory Card
- LCD Brightness
- Clean Image Sensor
- Lock Mirror Up for Cleaning
- Video Mode
- HDMI
- World Time
- Language
- Image Comment
- Auto Image Rotation
- Dust Off Reference Photo
- Battery Information
- Wireless Transmitter
- Image Authentication
- Copyright Information
- Save / Load Settings
- GPS
- Virtual Horizon
- Non-CPU Lens Data
- AF Fine Tune
- Firmware Version
- Retouch Menu - Creating Retouched Copies
- My Menu - Creating a Custom Menu
- Compatible Lenses
- Optional Flash Units
- Other Accessories
- Care / Maintenance
- Troubleshooting
- Error Messages
- Defaults
- Memory Card Capacity
- Specs
- Index
- 24-120mm Lens Instruction Manual
- Software Installation Instructions
- Scans of Software CD-ROMs
- AC Power Cord Specs
- Warranty

Printing Multiple Pictures
.M
...
·.·.·.····_·_···········
._
•••••
__
·.~·.,,·.······
•••••••••••••••••••••••••••
_.....
•
•••••••••••••••••••••
_.
1 Display
the
PictBridge menu.
Press
the
MENU
button
in
the
PictBridge
playback display
(see
Step 3 on page
245).
-I
~\
II
0
'Ie
0
e
M'lton
MENU
button
tt;
EI
Highlight
one
of
the
following
options
and press
~.
•
Print
select: Select pictures
for
printing.
•
Print
(DPOF): Print an existing
print
order created
with
the
Print
set
(DPOF)
option
in
the
playback menu (pg. 253). The
current
print
order will be displayed in Step
3.
To
create an index
print
of
all
JPEG
pictures on
the
memory
card, select
Index
print.
See
page 252 for more information.
2 Choose
Print
select
or
Print
(DPOF).
249